ATA Dual-Drive Configurations
Dual-drive ATA installations can be problematic because each drive has its own controller and both controllers must function while being connected to the same bus. There has to be a way to ensure that only one of the two controllers will respond to a command at a time.
The ATA standard provides the option of operating on the AT bus with two drives in a daisy-chained configuration. The primary drive (drive 0) is called the master, and the secondary drive (drive 1) is called the slave. You designate a drive as being master or slave by setting a jumper or switch on the drive or by using a special line in the interface called the cable select (CS) pin and setting the CS jumper on the drive.
When only one drive is installed, the controller responds to all commands from the system. When two drives (and, therefore, two controllers) are installed, both controllers receive all commands from the system. Each controller then must be set up to respond only to commands for itself.
In this situation, one controller must be designated as the master and the other as the slave. When the system sends a command for a specific drive, the controller on the other drive must remain silent while the selected controller and drive are functioning.
Setting the jumper to master or slave enables discrimination between the two controllers by setting a special bit (the DRV bit) in the Drive/Head Register of a command block.
Configuring ATA drives can be simple, as is the case with most single-drive installations, or troublesome, especially when it comes to mixing two older drives from different manufacturers on a single cable. Most ATA drives can be configured with four possible settings:
-
Master (single-drive)
-
Master (dual-drive)
-
Slave (dual-drive)
-
Cable select
Many drives simplify this to three settings: master, slave, and cable select. Because each ATA drive has its own controller, you must specifically tell one drive to be the master and the other to be the slave.
No functional difference exists between the two, except that the drive that's specified as the slave will assert a signal called DASP after a system reset informs the master that a slave drive is present in the system. The master drive then pays attention to the drive select line, which it otherwise ignores.
Telling a drive that it's the slave also usually causes it to delay its spinup for several seconds to allow the master to get going and thus to lessen the load on the system's power supply. Until the ATA specification, no common implementation for drive configuration was in use.
Some drive companies even used different master/slave methods for different models of drives. Because of these incompatibilities, some drives work together only in a specific master/slave or slave/master order. This situation mostly affects older IDE drives introduced before the ATA specification.
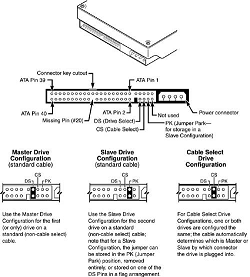
Most drives that fully follow the ATA specification now need only one jumper (master/slave) for configuration. A few also need a slave present jumper, as well. Figure below shows the jumpers on a typical ATA drive.

The master jumper indicates that the drive is a master or a slave. Some drives also require a slave present jumper, which is used only in a dual-drive setup and then installed only on the master drive—which is somewhat confusing.
This jumper tells the master that a slave drive is attached. With many ATA drives, the master jumper is optional and can be left off.
Installing this jumper doesn't hurt in these cases and can eliminate confusion; I recommend that you install the jumpers listed here. To eliminate confusion over master/slave settings, most newer systems now use the cable select option. This involves two things.
The first is having a special ATA cable that has all the wires except pin 28 running from the motherboard connector to both drive connectors. Pin 28 is used for cable select and is connected to one of the drive connectors (labeled master) and not to the other (labeled slave).
Both drives are then configured in cable select mode via the CS jumper on each drive. With cable select, the drive that receives signals on pin 28 automatically becomes the master, and the other becomes the slave.
Most cables implement this by removing the metal insulation displacement bit from the pin-28 hole, which can be difficult to see at a glance. Other cables have a section of pin 28 visibly cut from the cable somewhere along the ribbon.
Because this is such a minor modification to the cable and can be difficult to see, cable select cables typically have the connectors labeled master, slave, and system, indicating that the cable controls these options rather than the drive. All 80-conductor UltraATA cables are designed to use cable select.
With cable select, you simply set the CS jumper on all drives and then plug the drive you want to be the master into the connector labeled master on the cable and the drive you want to be the slave into the connector labeled slave.
The only downside I see to using cable select is that it can restrict how the cable is routed or where you mount the drive that is to be master versus slave because they must be plugged into specific cable connector positions.