ATA Features
The ATA standards have gone a long way toward eliminating incompatibilities and problems with interfacing IDE drives to ISA/PCI bus systems. The ATA specifications define the signals on the 40-pin connector, the functions and timings of these signals, cable specifications, and so on.
ATA I/O Connector
The ATA interface connector is normally a 40-pin header-type connector with pins spaced 0.1'' (2.54mm) apart, and generally it is keyed to prevent the possibility of installing it upside down.
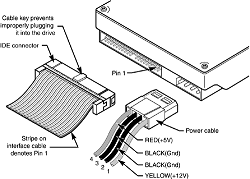
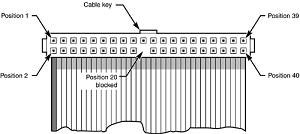
To create a keyed connector, the manufacturer usually removes pin 20 from the male connector and blocks pin 20 on the female cable connector, which prevents the user from installing the cable backward.
Some cables also incorporate a protrusion on the top of the female cable connector that fits into a notch in the shroud surrounding the mating male connector on the device. The use of keyed connectors and cables is highly recommended. Plugging in an ATA cable backward normally won't cause any permanent damage; however, it can lock up the system and prevent it from running at all.
The 2 1/2'' drives found in notebook/laptop-size computers typically use a smaller unitized 50-pin header connector with pins spaced only 2.0mm (0.079'') apart. The main 40-pin part of the connector is the same as the standard ATA connector (except for the physical pin spacing), but there are added pins for power and jumpering.
Normally, the cable that plugs into this connector has 44 pins, carrying power as well as the standard ATA signals. The jumper pins usually have a jumper on them (the jumper position controls cable select, master, or slave settings). Figure 3 shows the unitized 50-pin connector used on 2 1/2'' ATA drives found in laptop or notebook computers.
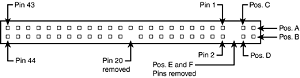
Note the jumper pins at positions A–D and that the pins at positions E and F are removed. A jumper usually is placed between positions B and D to set the drive for cable select operation.
On this connector, pin 41 provides +5v power to the drive logic (circuit board), pin 42 provides +5v power to the motor (2 1/2'' drives use 5v motors, unlike larger drives that typically use 12v motors), and pin 43 provides a power ground. The last pin (44) is reserved and not used.
ATA I/O Cable
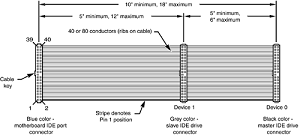
A 40-conductor ribbon cable is specified to carry signals between the bus adapter circuits and the drive (controller). To maximize signal integrity and eliminate potential timing and noise problems, the cable should not be longer than 18'' (0.46 meters).
Note that ATA drives supporting the higher-speed transfer modes, such as PIO Mode 4 or any of the Ultra-DMA (UDMA) modes, are especially susceptible to cable integrity problems and cables that are too long. If the cable is too long, you can experience data corruption and other errors that can be maddening.
This will be manifested in any type of problem reading from or writing to the drive. In addition, any drive using UDMA Mode 5 (66MBps transfer rate), Mode 6 (100MBps transfer rate), or Mode 7 (133MBps transfer rate) must use a special, higher-quality 80-conductor cable (the extra conductors are grounds to reduce noise).
I also recommend this type of cable if your drive is running at UDMA Mode 2 (33MBps) or slower because it can't hurt and can only help. I always keep a high-quality 80-conductor ATA cable in my toolbox for testing drives where I suspect cable integrity or cable length problems. Figure 4 shows the typical ATA cable layout and dimensions.
ATA Signals
Pin 20 is used as a key pin for cable orientation and is not connected to the interface. This pin should be missing from any ATA connectors, and the cable should have the pin-20 hole in the connector plugged off to prevent the cable from being plugged in backward.
Pin 39 carries the drive active/slave present (DASP) signal, which is a dual-purpose, time-multiplexed signal. During power-on initialization, this signal indicates whether a slave drive is present on the interface. After that, each drive asserts the signal to indicate that it is active.
Early drives could not multiplex these functions and required special jumper settings to work with other drives. Standardizing this function to allow for compatible dual-drive installations is one of the features of the ATA standard. This is why some drives require a slave present (SP) jumper whereas others do not.
Pin 28 carries the cable select signal (CSEL). In some older drives, it could also carry a spindle synchronization signal (SPSYNC), but that is not commonly found on newer drives.
The CSEL function is the most widely used and is designed to control the designation of a drive as master (drive 0) or slave (drive 1) without requiring jumper settings on the drives. If a drive sees the CSEL as being grounded, the drive is a master; if CSEL is open, the drive is a slave.
You can install special cabling to ground CSEL selectively. This installation usually is accomplished through a Y-cable arrangement, with the ATA bus connector in the middle and each drive at opposite ends of the cable.
One leg of the Y has the CSEL line connected through, indicating a master drive; the other leg has the CSEL line open (conductor interrupted or removed), making the drive at that end the slave.


