Flash BIOS Recovery
When you performed the flash reprogramming, you should have seen a warning message onscreen similar to the following:
The BIOS is currently being updated. DO NOT REBOOT OR POWER DOWN until the update
is completed (typically within three minutes)...
If you fail to heed this warning or something interrupts the update procedure, you will be left with a system that has a corrupted BIOS. This means you will not be able to restart the system and redo the procedure, at least not easily.
Depending on the motherboard, you might have to replace the flash ROM chip with one that was preprogrammed by the motherboard manufacturer or from a vendor such as BIOSWorld, which provides replacement BIOS chips containing the same BIOS code as that provided by your motherboard vendor.
This is an unfortunate necessity because your board will be nonfunctional until a valid ROM is present. This is why I still keep my trusty ROM burner around; it is very useful for those motherboards with socketed flash ROM chips. In minutes, I can use the ROM burner to reprogram the chip and reinstall it in the board.
If you need a ROM programmer, I recommend Andromeda Research Labs (see the Vendor List on the DVD). In many of the latest systems, the flash ROM is soldered into the motherboard so it can't be replaced, rendering the reprogramming idea moot.
However, this doesn't mean the only way out is a complete motherboard replacement. Most motherboards with soldered-in flash ROMs have a special BIOS Recovery procedure that can be performed. This hinges on a special non-erasable part of the flash ROM that is reserved for this purpose.
In the unlikely event that a flash upgrade is interrupted catastrophically, the BIOS might be left in an unusable state. Recovering from this condition requires the following steps. A minimum of a power supply, a speaker, and a floppy drive configured as drive A: should be attached to the motherboard for this procedure to work:
-
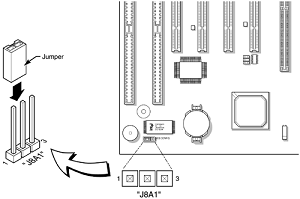
Change the Flash Recovery jumper to the recovery mode position. Virtually all Intel motherboards and many third-party motherboards have a jumper or switch for BIOS recovery, which in most cases is labeled "Recover/Normal." Figure below shows this jumper on the Intel SE440BX, a typical motherboard.
- Install the bootable BIOS upgrade disk you previously created to do the flash upgrade into drive A: and reboot the system. Because of the small amount of code available in the non-erasable flash boot block area, no video prompts are available to direct the procedure. So, you will see nothing onscreen.
In fact, it is not even necessary for a video card to be connected for this procedure to work. The procedure can be monitored by listening to the speaker and looking at the floppy drive LED. When the system beeps and the floppy drive LED is lit, the system is copying the BIOS recovery code into the flash device.
- As soon as the drive LED goes off and the system beeps (normally twice), the recovery should be complete. Sometimes there might be pauses where the drive stops reading during the recovery process; however, the process might not be complete.
Be sure to wait for a minute or so to ensure a complete recovery before turning off the system. When you are sure the recovery is complete and there is no further activity, power off the system.
- Change the flash recovery jumper back to the default position for normal operation.
When you power the system back on, the new BIOS should be installed and functional. However, you might want to leave the BIOS upgrade floppy in drive A: and check to see that the proper BIOS version was installed.

