Installing CD/DVD Drive
Installation of a CD-ROM, CD-R, CD-RW, DVD-ROM, or rewriteable DVD drive can be as difficult or as easy as you make it. If you plan ahead, the installation should go smoothly. After you install the hardware, your job might be finished if you are running Windows and using a Plug and Play drive, or you might have to manually load the software necessary to access the drive.
Avoiding Conflict
Regardless of the type of installation—internal or external drive—you must have a functioning ATA or SCSI host adapter before the drive can function. In most cases, you will be connecting the optical drive to an existing ATA or SCSI adapter. If so, the adapter should already be configured not to conflict with other devices in your system.
All you have to do is connect the drive with the appropriate cable and proceed from there. Most computers today have an ATA adapter integrated into the motherboard. However, if you are adding SCSI to your system for the first time, you must install a SCSI host adapter into an expansion slot and ensure it is configured to use the appropriate hardware resources, such as the following:
-
IRQ
-
DMA channel
-
I/O port address
As always, Windows 9x/Me/2000/XP and PnP hardware can completely automate this process; however, if you're using another operating system, you might have to configure the adapter manually.
Drive Configuration
Configuration of your new optical drive is paramount to its proper functioning. Examine your new drive and locate any jumpers. For an ATA drive, here are the typical ways to jumper the drive:
-
As the primary (master) drive on the secondary ATA connection
-
As the secondary (slave) drive to a current hard disk drive
-
Using Cable Select (CS), where the cable connector determines which drive is master or slave automatically
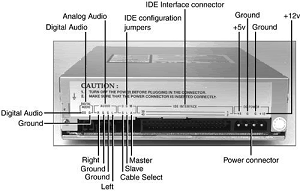
If the drive is to be the only device on your secondary ATA interface, the factory settings are usually correct. Consult the manual to make sure this is so.
When you use the CD-ROM or DVD-ROM as a secondary drive—that is, the second drive on the same ribbon cable with another device—be sure it is jumpered as the slave drive, and configure the other device so it is the master drive. In most cases, the drive shows up as the next logical drive, or the D: drive.
Depending on how you look at it, SCSI drives can be a bit easier to configure because you need only to select the proper SCSI ID for the drive. By convention, the boot disk (the C: drive) in a SCSI system is set as ID0, and the host adapter has an ID of 7.
You are free to choose any ID in between that is not being used by another device. Most SCSI devices use some type of rotating or pushbutton selector to cycle between the SCSI IDs, but some might use jumpers. SCSI devices are cabled together in a bus configuration.
If your new SCSI drive falls at the end of the SCSI bus, you also must terminate the drive. Note that the SCSI bus refers to the physical arrangement of the devices, and not the SCSI IDs selected for each one.
Installing External CD/DVD (SCSI) Drive
Unpack the drive carefully. With the purchase of an external drive, you should receive the following items:
-
CD-ROM or DVD-ROM drive
-
SCSI adapter cable
With the exception of the SCSI host adapter, this is the bare minimum you need to get the drive up and running. You'll probably also find a CD caddy, documentation for the drive, driver software, a SCSI terminator plug, and possibly a sampling of CDs to get you started.
SCSI drives almost never come with the SCSI host adapter necessary to connect them to the system. Because SCSI is designed to support up to seven devices on the same system (or up to fifteen devices for Ultra2 SCSI), including a host adapter with every peripheral is impractical.
Although a few computers have SCSI interfaces integrated into the motherboard, in most cases you have to purchase a SCSI adapter as a separate expansion card. To begin the installation, take a look at your work area and the SCSI cable that came with the drive. Where will the drive find a new home?
You're limited by the length of the cable. Find a spot for the drive, and insert the power cable into the back of the unit. Be sure you have an outlet or, preferably, a free socket in a surge-suppressing power strip to plug in the new drive. SCSI devices generally use one of two cable types.
Some older drives use a 50-pin Centronics cable, referred to as an A-cable. Most drives today, though, use a 68-pin cable called a P-cable. Plug one end of the supplied cable into the connector socket of the drive and one into the SCSI connector on the adapter card.
Most external drives have two connectors on the back—either connector can be hooked to the PC. You use the other connector to attach another SCSI device or, if the drive is at the end of the bus, to connect a terminator plug. Secure the cable with the guide hooks on both the drive and adapter connectors, if provided.
Finally, your external drive should have a SCSI ID select switch on the back. This switch sets the identification number the host adapter uses to distinguish the drive from the other devices on the bus.
The host adapter, by most manufacturers' defaults, should be set for SCSI ID 7, and some (but not all) manufacturers reserve the IDs 0 and 1 for use by hard disk drives.
Be sure you set the SCSI ID for the CD-ROM or DVD-ROM drive to any other number—6, 5, or 4, for example. The only rule to follow is to be sure you do not set the drive for an ID that is already occupied—by either the adapter or any other SCSI peripheral on the bus.
Installing Internal CD/DVD Drive
Unpack your internal drive kit. You should have the following pieces:
-
The drive
-
The internal CD-audio cable
-
Floppy disks/CD-ROM with device driver software and manual
-
Drive rails and mounting screws
Your manufacturer also might have provided a power cable splitter—a bundle of wires with plastic connectors on each of three ends. A disc caddy and owner's manual might also be included. If you do not already have one in the computer, you also will need a SCSI host adapter to connect SCSI peripherals.
Make sure the PC is turned off, and remove the cover from the case. Before installing a SCSI adapter into the PC's expansion bus, connect the SCSI ribbon cable to the adapter card.
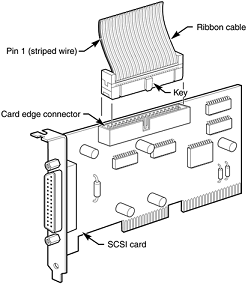
The ribbon cable should be identical on both ends. You'll find a red stripe or dotted line down one side of the outermost edge of the cable.
This stripe indicates a pin-1 designation and ensures that the SCSI cable is connected properly to the card and drive. If you're lucky, the manufacturer has supplied a cable with notches or keys along one edge of the connector.
With such a key, you can insert the cable into the card and drive in only one way. Unkeyed cables must be hooked up according to the pin-1 designation.
Along one edge of your SCSI adapter is a double row of 50 brass-colored pins. This is the card edge connector. In small print along the base of this row of pins you should find at least two numbers next to the pins—1 and 50.
Aligning the ribbon cable's marked edge over pin 1, carefully and evenly insert the ribbon cable connector. Next, insert the adapter card into a free bus slot in the computer, leaving the drive end of the cable loose for the time being.
Choose a bay in the front of your computer's case for your internal drive. Make sure it's easily accessible from the outside and not blocked by other items on your desk. You'll be inserting the CDs or DVDs here, and you'll need the elbow room. Remove the drive bay cover from the computer case.
You might have to loosen some screws to do this, or the cover might just pop off. Inside the drive bay, you should find a metal enclosure with screw holes for mounting the drive. If the drive has mounting holes along its side and fits snugly into the enclosure, you won't need mounting rails.
If it's a loose fit, however, mount the rails along the sides of the drive with the rail screws, and then slide the drive into the bay. Secure the drive into the bay with four screws—two on each side. If the rails or drive don't line up evenly with four mounting holes, be sure you use at least two screws—one mounting screw on each side.
Because you'll be inserting and ejecting many discs over the years, mounting the drive securely is a must. Once again, find the striped side of the ribbon cable and align it with pin 1 on the drive's edge connector. Either a diagram in your owner's manual or a designation on the connector itself tells you which is pin 1.
The back of the drive has a four-pin power connector outlet. Inside the case of your PC, at the back of your floppy or hard disk, are power cords—bundled red and yellow wires with plastic connectors on them. You might already have a power connector lying open in the case.
Take the open connector and plug it into the back of the power socket on the CD-ROM or DVD-ROM drive. These connectors can go in only one way. If you do not have an open connector, use a drive power splitter. Disconnect an existing drive power cord from the device that uses the least power.
Next, attach the splitter to the detached power cord. Plug one of the free ends back into the drive you removed the power from and plug the other into the CD-ROM or DVD-ROM drive. Do not replace the PC cover yet—you need to make sure that everything is running perfectly before you seal the case. You're now ready to turn on the computer. If everything runs normally, it's time to put that cover back on.
Installing SCSI Chains
Remember, one of the primary reasons for using the SCSI interface for your CD-ROM or DVD-ROM drive is the capability to connect a string of peripherals from one adapter, thus saving card slots inside the PC and limiting the nightmare of tracking IRQs, DMAs, and I/O memory addresses.
You can add hard drives, scanners, tape backup units, and other SCSI peripherals to this chain. You must keep a few things in mind, however, and chief among them is SCSI termination.
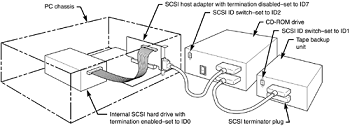
Example One: All External SCSI Devices. Say that you installed your CD-ROM or DVD-ROM drive and added a tape device to the SCSI bus with the extra connector on the back of the optical drive. The first device in this SCSI bus is the adapter card itself.
Most modern host adapters are autoterminating, meaning they will terminate themselves without your intervention if they are at the end of the bus. From the card, you ran an external cable to the optical drive, and from the optical drive, you added another cable to the back of the tape unit.
You must now terminate the tape unit as well. Most external units are terminated with a SCSI cap—a small connector that plugs into the unused external SCSI connector. These external drive connectors come in two varieties: a SCSI cap and a pass-through terminator. The cap is just that; it plugs over the open connector and covers it.
The pass-through terminator, however, plugs into the connector and has an open end into which you can plug the SCSI cable. This type of connector is essential if your external drive has only one SCSI connector; you can plug the drive in and make sure it's terminated—all with one connector.
Example Two: Internal Chain and Termination. On an internal SCSI bus, the same rules apply: All the internal devices must have unique SCSI ID numbers, and the first and last devices must be terminated. In the case of internal devices, however, you must check for termination.
Internal devices typically have DIP switches or terminator packs similar to those on your adapter card. If you install a tape unit as the last device on the chain, it must have some means of terminating the bus. If you place your optical drive in the middle of the bus, you must deactivate its termination. The host adapter at the end of the chain must still be terminated.
Example Three: Internal and External SCSI Devices. If you mix and match external as well as internal devices, follow the same rules. The bottom example shown in Figure below has an internal CD-ROM drive, terminated and set for SCSI ID 6; the external hard drive also is terminated and is using SCSI ID 5.
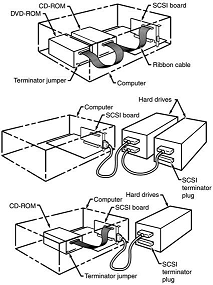
The SCSI adapter itself is set for ID 7 and, most importantly, its termination has been disabled because it is no longer at the end of the bus.
To help you determine whether your SCSI interface card and devices are functioning properly, Adaptec supplies a utility program called SCSI Interrogator. Use it to determine which logical unit numbers (LUNs) are available for new devices.
If you don't see any devices listed, you might have a termination problem. Shut down your system and your devices. Then, check terminator plugs, switches, or resistor packs. If they appear correct, turn on the external devices about 5 seconds before you start the system.
A multiswitch power director with high-quality surge protection works well for this because it allows you to turn on individual devices. If the devices fail to show up after you restart the system, you might have a problem with the SCSI BIOS or device driver software.
Check the documentation for your particular card and device to ensure you have installed the proper drivers. One peculiarity of the Adaptec SCSI Interrogator is that it lists a "host adapter #1" that's actually your ATA interface! If your SCSI card isn't working, both "host adapter #0" and "host adapter #1" are actually ATA. You can tell whether this is happening with Windows 9x because it will list "ESDI_506" as the driver version.

