Installing Motherboard
When you are installing your system's motherboard, unpack the motherboard and check to ensure you have everything that should be included. If you purchase a new board, you typically get at least the motherboard, some I/O cables, and a manual.
If you order the motherboard with a processor or memory, it is usually installed on the board for you but might also be included separately. Some board kits include an antistatic wrist strap to help prevent damage due to static electricity when installing the board.
Installing the CPU and Heatsink
Before your new motherboard is installed, you should install the processor and memory. This usually is much easier to do before the board is installed in the chassis. Some motherboards have jumpers that control both the CPU speed and the voltage supplied to it.
If these are set incorrectly, the system might not operate at all, might operate erratically, or might possibly even damage the CPU. If you have any questions about the proper settings, contact the vendor who sold you the board before making any jumper changes.
Most processors today run hot enough to require some form of heatsink to dissipate heat from the processor. To install the processor and heatsink, use the following procedure:
-
Take the new motherboard out of the antistatic bag it was supplied in and set it on the bag or the antistatic mat, if you have one.
- Install the processor. There are two procedures—one for socketed processors and the other for slot-based processors. Slot-based processors are outdated, but you might need to install one in an older system.
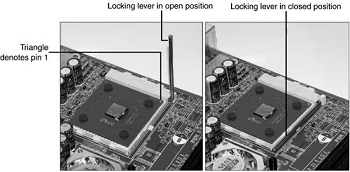
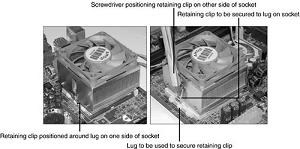
Most heatsinks clip to the socket with one or more retainer clips. Be careful when attaching the clip to the socket; you don't want it to scrape against the motherboard, which can damage circuit traces or components.
Installing Memory Modules
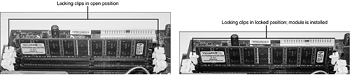
To function, the motherboard must have memory installed on it. Modern motherboards use either DIMMs or RIMMs. Depending on the module type, it will have a specific method of sliding into and clipping to the sockets. Usually, you install modules in the lowest-numbered sockets or banks first.
 Note that some boards require modules to be installed in pairs; this is most common with boards that use dual-channel RDRAM and systems using the Intel 865 and 875 dual-channel DDR SDRAM chipsets.
Consult the motherboard documentation for more information on which sockets to use first and in what order and how to install the specific modules the board uses. Memory modules frequently are keyed to the sockets by a notch on the side or bottom, so they can go in only one way. Figure below shows how to install a DIMM or RIMM.
Mounting Motherboard
The motherboard attaches to the case with one or more screws and often several plastic standoffs. If you are using a new case, you might have to attach one or more metal spacers or plastic standoffs in the proper holes before you can install the motherboard. Use the following procedure to install the new motherboard in the case:
-
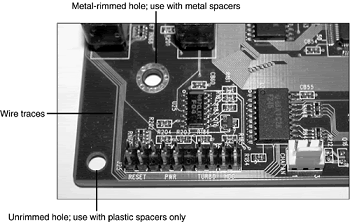
Find the holes in the new motherboard for the metal spacers and plastic standoffs. You should use metal spacers wherever there is a ring of solder around the hole. Use plastic standoffs where there is no ring of solder.
- Screw any metal spacers into the new case in the proper positions to align with the screw holes in the motherboard.
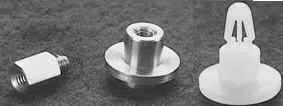
- Most motherboards today attach directly to the chassis or to a removable motherboard tray with screws that thread into brass standoffs attached to the chassis or tray. Figure below shows three types of standoffs, including two brass types and one plastic. One screws directly to the chassis or tray, whereas the others attach to the motherboard and then slide into notches in the case or tray.
If the board uses the type of standoff that fits into slots in the chassis or tray, rather than screwing directly in, insert the standoffs directly into the new motherboard from underneath until they snap into place. Or attach them to the board with a screw if necessary.
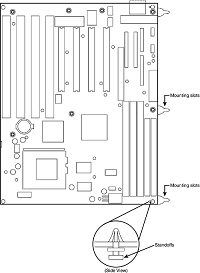
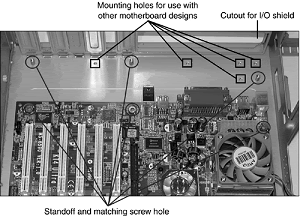
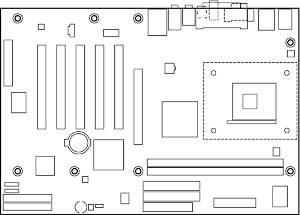
Figure below shows a typical ATX-style motherboard with arrows indicating the typical location of the screw holes for mounting the motherboard to the case (see your motherboard manual for the exact location of these screw holes).
After you have inserted the standoffs and lined them up with the screw holes on the motherboard, carefully attach the screws to secure the motherboard to the motherboard tray or case, depending on your chassis design. Figure below shows a motherboard attached to a tray.
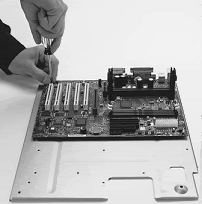
Note the use of the thumb and forefinger to stabilize the screwdriver tip. This prevents accidental slippage of the screwdriver tip off of the screw, which is one of the biggest causes of new board failures.
- Install the I/O shield (if used) into the chassis by snapping it into place
- Install the new motherboard into the case or motherboard tray. Either screw it directly to the standoffs or slide the standoffs already attached to the board by sliding the entire board into position. Be sure you align the I/O shield with the case or the ports on the back of the board with the I/O shield already in the case.
Often, you will have to set the board into the case and slide it sideways to engage the standoffs into the slots in the case.
When the board is in the proper position, the screw holes in the board should be aligned with all the metal spacers or screw holes in the case.
Some cases and boards, particularly ATX types, don't use any plastic spacers. Instead they use up to seven screws into metal standoffs that are installed in the case.
These are somewhat easier to install because the board drops into place and doesn't require that it be moved to the side to engage any standoffs.
- Take the screws and any plastic washers that were supplied with the new motherboard and screw the board into the case.
Installing Power Supply
 The power supply is very easy to install, and it usually attaches to the chassis with four screws. ATX-style motherboards have a single power connector that can go on only one way and an optional secondary connector that is also keyed.
If the system uses a single ATX-style power connector, plug it in; it can go on only one way. Some ATX systems also use a 6-pin auxiliary connector as well as a 4-pin ATX12V connector.
These are also keyed and plug in only one way.
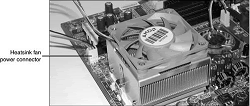
Plug in the power lead for the CPU fan if one is used. The fan will either connect to the power supply via a disk drive power connector or connect directly to a fan power connector on the motherboard. 
Connecting I/O and Other Cables
Several connections must be made between a motherboard and the case. These include LEDs for the hard disk and power, an internal speaker connection, a reset button, and a power button. Most modern motherboards also have several built-in I/O ports that have to be connected.
This includes dual IDE host adapters, a floppy controller, and front-mounted USB or IEEE-1394 ports. Some boards also include additional items such as built-in video, sound, or SCSI adapters. If the board is an ATX type, the connectors for all the external I/O ports are already built into the rear of the board.
If you are using a legacy Baby AT–type board, you might have to install cables and brackets to run the serial, parallel, and other external I/O ports to the rear of the case. If your motherboard has onboard I/O (nearly all PCs today use onboard I/O), use the following procedure to connect the cables:
-
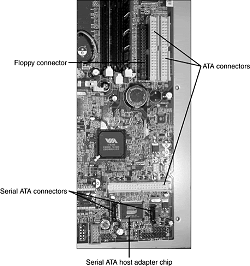
Connect the floppy cable between the floppy drives and the 34-pin floppy controller connector on the motherboard.
- Connect the IDE cables between the hard disk, IDE CD-ROM, and 40-pin primary and secondary IDE connectors on the motherboard. Typically, you will use the primary IDE channel connector for hard disks only and the secondary IDE channel connector to attach an IDE CD-ROM or other device, such as a tape drive.
If you have a Serial ATA hard disk and a Serial ATA host adapter on the motherboard, connect the Serial ATA cable from the hard disk to the host adapter connection on the motherboard.
- Most newer motherboards also include a built-in mouse port. If the connector for this port is not built into the back of the motherboard (typically next to the keyboard connector), you probably have a card bracket-type connector to install. In that case, plug the cable into the motherboard mouse connector and then attach the external mouse connector bracket to the case.
- Attach the front-panel switch, LED, internal speaker wires, and front-mounted ports such as USB and IEEE-1394 from the case front panel to the motherboard. If they are not marked on the board, check where each one is on the diagram in the motherboard manual.
Installing Additional Cards
 Many systems use additional expansion cards for network interface, Internet connection (modem), sound, and SCSI adapters. These cards are plugged into the bus slots present on the motherboard.
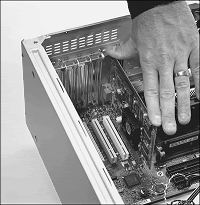
Insert each card by holding it carefully by the edges, being sure not to touch the chips and circuitry. Put the bottom-edge finger connector into a slot that fits.
Firmly press down on the top of the card, exerting even pressure, until it snaps into place. Secure each card bracket with a screw.


