Intalling Hardisk Physically
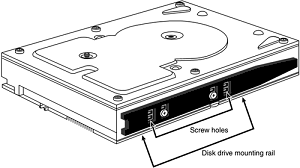
The procedure for the physical installation of a hard disk drive is much the same as that for installing any other type of drive. You must have the correct screws, brackets, and faceplates for the specific drive and system before you can install the drive. Some computer cases require plastic or metal rails that are secured to the sides of a hard disk drive so it can slide into the proper place in the system.
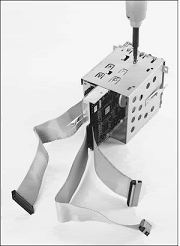
Other case designs have drive bays that directly accept the drive via screws through the side supports and no other hardware is necessary, whereas others use a cage arrangement where you first install the drives into a cage and then slide the cage into the case.
If your case uses rails or a cage, these are usually included with the case. With the proper mounting mechanism supplied via the case, all you need is the bare drive to install.
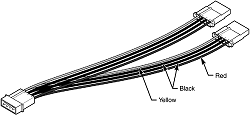
Because ATA, SCSI, and SATA drives use different cables, be sure you have the proper cable for both your drive and controller/host adapter. For example, to run ATA-66 or faster modes (through ATA-133), you need a special 80-conductor cable that supports the CS feature.
This cable is also recommended if you are running Ultra-ATA/33, and it works for all slower modes as well. To determine whether your cable has 40 or 80 conductors, simply count the ridges on the ribbon cable—each ridge contains a conductor (wire).
Another indication is that the 80-conductor cable typically has the motherboard connector end color-coded blue, and the master and slave drive connectors color-coded black and gray, respectively.
If you need additional drive-mounting hardware not included with either your case or the drive, several companies that specialize in drive-mounting brackets, cables, and other hardware accessories are listed in the Vendor List (on the DVD). If you intend to install a 3 1/2'' hard drive in a 5 1/4'' drive bay, you need yet another type of mounting bracket.
Many 3 1/2'' hard drives come with these brackets, or one might be supplied with your case or chassis. Different faceplate, or bezel, options are also available. Make sure you have the correct bezel for your application. Some systems, for example, do not need a bezel; if a bezel exists on the drive
The step-by-step procedures for installing an ATA hard drive are as follows:
-
Check your computer for an unused ATA/IDE connector. Typical Pentium-class and newer PCs have two ATA/IDE connectors, allowing for up to four ATA/IDE devices. You might need an additional cable if both master and slave connectors are used on the primary cable and you are adding a third device.
-
Double-check the pin configuration and cable type. The colored (normally red or red-flecked) stripe on one edge of the cable goes to pin 1 of the hard drive's data connector. Most cables and drive connectors are keyed to prevent improper (backward) installation, but many are not.
Keying can be done via missing and plugged pins, a ridge on one side of the connector, or both. One tip to note is that pin 1 on the drive connector is almost always oriented nearest to the power connector.
-
Configure the drive jumpers. If the drive is ATA/IDE and you are using a cable that supports CS, you must set the CS jumper on any drives connected to that cable. Otherwise, you must set the drives on the cable as either master or slave. Note that some older drives also required a slave-present jumper be set if the drive was configured as a master with a slave drive on the same cable.
- Slide the drive carefully into a drive bay of the correct size. Most hard drives—except for a few very high-capacity SCSI drives meant for servers and the now-discontinued Quantum Bigfoot series—are 3 1/2'' wide and 1'' high. If you have no 3 1/2'' drive bays left for your hard disk, attach a drive-adapter kit to the sides of the drive to make it wide enough to fit into a 5 1/4'' wide drive bay.
Some case designs require you to attach rails to the side of the hard drive. If so, attach them to the drive using the screws supplied with either the case or the drive. Be sure the screws aren't too long; if you bottom the screws in the drive, you can damage it. Then, slide the drive into the bay in the case until the rails latch into place.
- Attach the data cable connector to the back of the drive, unless you are adding the drive and cable at the same time. In that case, attach the cable to the drive before you slide it into the drive bay and fasten it into place (step 2).
- Attach the appropriate power connector to the drive. Most hard drives use the larger, or "Molex," four-wire power connector. If necessary, purchase a Y-splitter cable to create two power connectors from one (many computers have fewer power connectors than drive bays).
- Turn on the computer and listen for the new hard disk to spin up. Even though today's drives are very quiet compared to early hard disks, you should still hear a faint rattling or clicking as the new hard disk starts to run. If you don't hear anything from the drive, double-check the data and power cables.
- Restart the computer and access the BIOS setup screens to configure the new hard disk. If your BIOS has an autodetect or auto type setting, I recommend you use it because it will configure the parameters automatically using optimal settings.
For ATA hard drives above 528MB (504 megabytes), you also must set logical block address (LBA) translation to access the drive's full capacity. If autodetect was selected, LBA translation should already be set correctly.
Many systems have a Peripherals Configuration screen, which also enables you to set transfer speeds for maximum drive performance, but again these should be configured automatically if you enabled autodetect. If your BIOS can't autodetect your drive, see the documentation that came with the drive for the correct settings.
Most drives have the CHS parameters as well as jumper setting information displayed on a sticker attached to the drive, and all modern BIOSs support autodetect, as well. Save the BIOS configuration and exit the BIOS Setup screen to continue.
- With your operating system boot CD or floppy in the appropriate drive, restart the computer. If you intend to install the operating system, Windows 98 or later will automatically guide you through the partitioning and formatting process during the operating system installation.
If you want, you can partition and format the drive before installing the OS, by using the operating system's disk partitioning software. If you use Windows 9x or Me, FDISK can be found on the operating system start disk, such as the Windows startup disk.
Simply insert the startup disk in the floppy drive, boot from it, and type the FDISK command at the A: prompt. Windows 2000 and XP use the DISKPART command or the Disk Management utility.
SATA Drives Installation Issues
The step-by-step procedure for installing an SATA hard drive differs from the ATA drive installation as follows:
-
Check your computer for an unused SATA connector. Even though some new computers and motherboards have one or two SATA connectors, you might need to install a separate SATA host adapter card on most systems. If you need to install a separate SATA host adapter, consult its manual for physical and driver installation instructions.
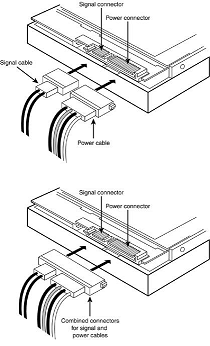
- Connect the SATA data cable to the SATA host adapter. SATA data cables can be combined with the SATA power cable or be separate. If the SATA data cable is separate from the SATA power cable, either end of the cable can be used for the drive or host adapter.
- Slide the drive carefully into a drive bay of the correct size, as in step 4 of the ATA host adapter installation in the previous section.
- Attach the SATA data cable connector to the back of the drive, unless you are adding the drive and cable at the same time. In that case, attach the cable to the drive before you slide it into the drive bay and fasten it into place.
- Attach the appropriate power connector to the drive. Because most power supplies don't have an SATA power connector, you might need to purchase a Molex 12V-to-SATA power converter cable if one was not provided with your drive. This converter connects to a standard 4-pin Molex power connector into an SATA power connector.
From this point, the remainder of the installation is the same as with a standard ATA drive.
SCSI Drives Installation Issues
The step-by-step procedure for installing a SCSI hard drive differs from the ATA drive installation as follows:
-
Check your computer for a SCSI host adapter card unless your computer has a SCSI host adapter on the motherboard. If the SCSI host adapter already has a ribbon cable connected to it, verify that an empty connector is available. If the SCSI host adapter doesn't have a ribbon cable connected to it, you must attach a ribbon cable with the correct pinout to the host adapter.
-
Verify that the SCSI drive has been configured to use a unique SCSI device ID number. Generally, this is done by adjusting jumpers on the rear of the drive.
-
Configure the terminator jumpers correctly, according to whether the drive is the only internal drive (termination on) or is being added to a cable after an existing drive (termination on for the new drive and termination off for the existing drive).
-
Slide the drive carefully into a drive bay of the correct size, as in step 4 of the ATA host adapter installation.
-
Attach the SCSI data cable connector to the back of the drive, unless you are adding the drive and cable at the same time. In that case, attach the cable to the drive before you slide it into the drive bay and fasten it into place.
-
Attach the appropriate power connector to the drive, as in step 6 of the ATA host adapter installation.
-
Turn on the computer and listen to the drive, as in step 7 of the ATA host adapter installation.
-
After the computer starts, start the SCSI host adapter drive configuration utility and configure your host adapter and drive. See the SCSI host adapter manual for details.
-
Run your operating system's disk preparation program, as described in step 9 of the ATA host adapter installation.

