Partitioning with Disk Management
Windows 2000 and Windows XP have a very powerful command-line tool called DISKPART that provides FDISK-like capabilities, along with additional options useful for working with advanced disk structures such as RAID arrays, and dynamic disks.
Most Windows 2000 and Windows XP users, utilize the GUI-based Disk Management component of the Microsoft Management Console, to perform hard disk partitioning and formatting, when installing a new hard disk on an existing system.
As with FDISK, you can select the type of file system you want to use, but the following differences exist between FDISK and Disk Management:
-
Disk Management is a true GUI-based utility. Color-coded indicators for partition type and drive condition let you easily see which tasks you've performed with a drive. Wizards enable you to partition and format a drive under the guidance of Windows.
-
Disk Management supports more file systems than FDISK. Whereas FDISK is limited to FAT-16 (and FAT-32 on Windows 95B and above, Windows 98, and Windows Me), Disk Management also supports NTFS.
-
Disk Management partitions and formats hard disks with a simple process. Unlike FDISK, which requires you to restart the system before a new hard disk can be formatted and uses a separate FORMAT program to finish the job, Disk Management can perform both tasks without the need to restart the computer.
-
Disk Management uses drive letters not already in use for hard disk or optical drives, regardless of the partition type. Unlike FDISK, which can scramble existing drive letter assignments if you prepare a new hard disk with a primary partition, Disk Management assigns a drive letter(s) to the new hard drive that follows those already in use.
And, if installing a new drive causes conflicts with removable-media drives such as USB keychain or flash memory card readers you use occasionally, you can use Disk Management to select a different drive letter for the new hard disk or for existing hard disks or optical drives.
To use Disk Management to partition a new hard disk in Windows XP, do the following:
-
Open the Start menu, right-click My Computer, and select Manage from the context menu.
-
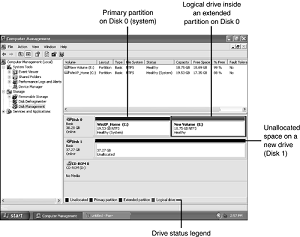
From the Computer Management screen, click Disk Management in the left window. The current hard disk drive letter is displayed in the upper-right window, and physical hard disks are displayed in the bottom-right window. A newly installed drive is shown as unallocated space.
- Select the new hard disk, right-click it, and select New Partition from the right-click menu to start the partitioning process.
- Click Next at the opening screen of the New Partition Wizard.
- Select Primary or Extended partition. Generally, you should choose an extended partition unless you want to create a primary partition that you can use to start the computer. Click Next to continue.
- If you want to leave part of the hard disk unallocated, change the partition size. Otherwise, click Next to continue.
- The New Partition Wizard displays the changes it's about to make to the new drive. Click Finish to complete the partitioning process.
-
After the wizard finishes, the Computer Management view displays the newly partitioned hard disk as free space. Right-click the partition, and select New Logical Drive to continue.
-
Click Next to continue with the wizard. Click Next again to select a logical drive.
-
To create more than one logical drive, change the maximum size of the partition size. To create a single logical drive, click Next.
-
Select the drive letter to assign. By default, the next available drive letter is displayed, but you can choose any unused drive letter. If you prefer, you can mount the new logical drive into an empty NTFS folder, or even not assign a drive letter or path. Click Next to continue.
-
Select the format options. By default, the new logical drive is formatted with NTFS, but you can choose FAT32 if the logical drive is 32,768MB (32GB) or less. If the logical drive is 32,769MB or larger, only NTFS can be used to format the drive.
You can also specify the volume label, select a particular allocation unit (cluster) size, enable file/folder compression, and perform a quick format. If you want to format the drive later, select Do Not Format This Partition. Click Next to continue.
-
Again, the New Partition Wizard displays a list of changes to be made. Click Back to return to a particular menu if you need to make any changes, or click Finish to format the logical drive with the options selected.
- Repeat steps 10–14 if you didn't use all the free space as a logical drive and want to prepare additional logical drives.
No rebooting is necessary, and the color-coded legend at the bottom of the Disk Management display helps you track the status of the disk preparation process.
Drive Partitioning on Market
Alternative partitioning programs such as PartitionMagic by PowerQuest and Partition Commander by V-Communications enable you to take an existing hard drive and perform the following changes to it without loss of data:
-
Create, resize, split, move, and merge partitions on the fly without losing data.
-
Convert between file systems without losing data—conversions include FAT to FAT32 and NTFS; FAT32 to FAT; NTFS to FAT and FAT32; primary to logical and vice versa; and FAT32 to NTFS under Windows 2000 and XP. It also includes support for ext2 and Linux SWAP file systems.
-
Move applications between partitions and automatically update the drive-letter references after partitioning with their DriveMapper utility.
-
Undelete FAT, FAT32, Linux ext2, and NTFS partitions that have been deleted. You can restore partitions that have been deleted on disk as long as the space has not been reallocated or written over.
-
Copy or move a partition to another partition or drive.
Although the program recommends a full backup before starting, I've used these utilities many times to turn a single "big drive" into two or more drive letters in less than 10 minutes.
Performing the same task with backup software and FDISK/FORMAT can take several hours because you must back up your existing drive, remove existing partitions with FDISK, create new partitions with FDISK, restart your computer, format the new drives, and reload your operating system and your backup.

