Making UTP Cables
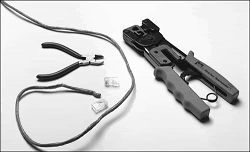
Making your own UTP cables requires a few tools that aren't commonly found in a typical toolbox. Those items that you might not already have you can typically purchase for a single price from many network-products vendors. You will need the following tools and supplies to build your own Ethernet cables:
-
UTP cable (Category 5 or better)
-
RJ-45 connectors
-
Wire stripper
-
RJ-45 crimping tool
Before you make a "real" cable of any length, you should practice on a short length of cable. RJ-45 connectors and bulk cable are cheap; network failures are not. Follow these steps for creating your own twisted-pair cables:
-
Determine how long your UTP cable should be. You should allow adequate slack for moving the computer and for avoiding strong interference sources. Keep the maximum distances for UTP cables listed later in this chapter in mind.
-
Roll out the appropriate length of cable.
-
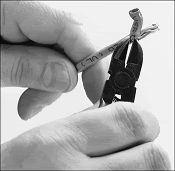
Cut the cable cleanly from the box of wire.
-
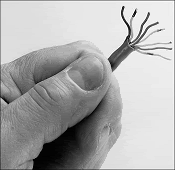
Use the wire stripper to strip only the insulation jacket off the cable to expose the TP wires; you'll need to rotate the wire about 1 1/4 turns to strip away all the jacket. If you turn it too far, you'll damage the wires inside the cable.
-
Check the outer jacket and inner TP wires for nicks; adjust the stripper tool and repeat steps 3 and 4 if you see damage.
-
As shown in Figure below, arrange the wires according to the EIA 568B standard.
-
Trim the wire edges so the eight wires are even with one another and are slightly less than 1/2'' past the end of the jacket. If the wires are too long, crosstalk (wire-to-wire interference) can result; if the wires are too short, they can't make a good connection with the RJ-45 plug.
-
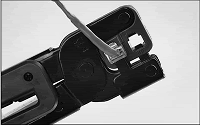
With the clip side of the RJ-45 plug facing away from you, push the cable into place. Verify that the wires are arranged according to the EIA/TIA 568B standard before you crimp the plug onto the wires. Adjust the connection as necessary.
- Use the crimping tool to squeeze the RJ-45 plug onto the cable. The end of the cable should be tight enough to resist being removed by hand.
-
Repeat steps 4–9 for the other end of the cable. Recut the end of the cable if necessary before stripping it.
-
Label each cable with the following information:
-
Wiring standard
-
Length
-
End with crossover (if any)
-
_______________ (blank) for computer ID
-
The cables should be labeled at both ends to make matching the cable with the correct computer easy and to facilitate troubleshooting at the hub. Check with your cable supplier for suitable labeling stock or tags you can attach to each cable.
Distance Limitations
The people who design computer systems love to find ways to circumvent limitations. Manufacturers of Ethernet products have made possible the building of networks in star, branch, and tree designs that overcome the basic limitations already mentioned. You can have thousands of computers on a complex Ethernet network.
LANs are local because the network adapters and other hardware components typically can't send LAN messages more than a few hundred feet. Keep the following points in mind:
-
You can't connect more than 30 computers on a single Thinnet Ethernet segment.
-
You can't connect more than 100 computers on a Thicknet Ethernet segment.
-
You can't connect more than 72 computers on a UTP Token-Ring cable.
-
You can't connect more than 260 computers on an STP Token-Ring cable.
If you have a station wired with Category 5 cable that is more than 328 feet (100 meters) from a hub, you must use a repeater.
If you have two or more stations beyond the 328" limit of UTP Ethernet, connect them to a hub or switch that is less than 328 feet away from the primary hub or switch, and connect the new hub or switch to the primary hub or switch via its uplink port.
Because hubs and switches can act as repeaters, this feature enables you to extend the effective length of your network
