Customizing Windows Vista
When you first turn on your new computer system, you see the Windows desktop as Microsoft (or your computer manufacturer) set it up for you. If you like the way it looks, great. If not, you can change it.
Windows presents a lot of different ways to personalize the look and feel of your desktop. In fact, one of the great things about Windows is how quickly you can make the desktop look like your desktop, different from anybody else’s.
Windows Control Panel
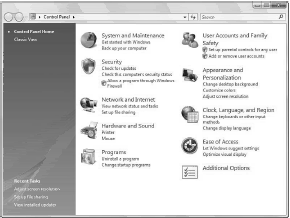
Virtually all of Windows’ settings are configured via the Control Panel. You open the Control Panel by clicking the Start button and selecting Control Panel; from there, what you see depends on which version of Windows you’re using. In Windows Vista, the Control Panel looks like the one shown in Figure 1.
You can click a major category, such as System and Maintenance or Security, to access related configuration settings. Or you can click one of the key settings under a major heading to go directly to that setting.
Changing Windows Vista Desktop
One of the first things that most users want to personalize is the look of the Windows desktop itself. This is a little different in Windows Vista than in Windows XP, due to Vista’s added visual features. Read on to learn how to customize your Vista desktop.
Changing Desktop Background
Don’t like the default background picture on your desktop? Then change it! Windows Vista offers a wide selection of pictures you can use for your desktop background; you can also opt to have a plain-colored background, or choose any other picture on your PC. All you have to do is follow these steps:
- From the Start menu, select Control Panel.
- When the Control Panel opens, select Change Desktop Background (in the Appearance and Personalization section).
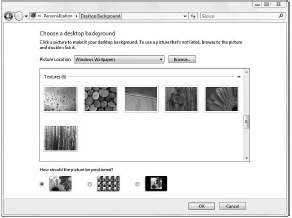
- This opens the Desktop Background window, shown in Figure 3. Click the Picture Location list and select what kind of background you want—Windows Wallpapers, Pictures, Sample Pictures, Public Pictures, or Solid Colors.
- Scroll through the list of options until you find the background you want. Select by the background by clicking it; this automatically applies the background to your desktop.
- For all backgrounds except solid colors, you can position the picture three ways on your desktop—stretched, tiled, or centered. Check the desired How Should the Picture Be Positioned? option at the bottom of the dialog box.
- Click OK.
Changing Color Scheme
The primary Windows Vista interface is called the Aero interface, and it’s a nice combination of translucent (see-through) colors. You can change the color scheme, however, as well as the level of translucency used in windows and other onscreen elements. To change the color and translucency in Windows Vista, follow these steps:
- From the Start menu, select Control Panel.
- When the Control Panel opens, select Customize Colors (in the Appearance and Personalization section).
- When the Window Color and Appearance window appears, click the color scheme you want. Alternately, you can click the Show Color Mixer button to fine-tune the selected hue, saturation, and brightness.
- To make the onscreen windows more transparent, move the Transparency slider to the left. To make the windows more solid, move the slider to the right.
- Click OK when finished.
Changing the Desktop Size
You can also configure your computer’s display so that the desktop is larger or smaller than normal. A larger desktop lets you view more things onscreen at the same time—even though each item is smaller than before. A smaller desktop displays fewer items, but they’re larger. (This is great if your eyesight is less than perfect.)
Changing the size of the desktop is accomplished by changing Windows’ screen resolution. You do this by following these steps:
- From the Start menu, select Control Panel.
- When the Control Panel opens, select Adjust Screen Resolution (in the Appearance and Personalization section).
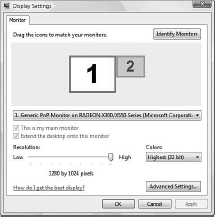
- When the Display Settings dialog box appears, as shown in Figure 4, adjust the Resolution slider.
Move the slider to the right (High) to put more items on the desktop; move it to the left (Low) to create a smaller desktop with larger individual items.
- Click OK to apply your changes.
By the way, while you are in the Display Settings dialog box, you can also change the number of colors displayed by your monitor. (More is better.) Just choose the desired setting from the Colors drop-down list and then click OK when finished.
Choosing a Screensaver
Screensavers display moving designs on your computer screen when you haven’t typed or moved the mouse for a while. This prevents static images from burning into your screen— and provides some small degree of entertainment if you’re bored at your desk.
To activate one of the screensavers included with Windows Vista, follow these steps:
- From the Start menu, select Control Panel.
- When the Control Panel opens, select Appearance and Personalization.
- When the next window appears, select Change Screen Saver (in the Personalization section).
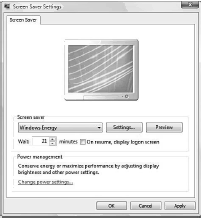
- When the Screen Saver Settings dialog box appears, as shown in Figure 5, pull down the Screen Saver list and select the screensaver you want. (You can preview any selected screensaver by clicking the Preview button.)
- Click the Settings button to configure that screensaver’s specific settings (if available).
- Click OK when finished.
Customizing the Windows Sidebar
One of the cool new features in Windows Vista is the Windows Sidebar, shown in Figure 6.
The Sidebar is an area of the desktop (typically docked on the right side of the screen) used to hold a variety of “gadgets.” These gadgets are actually small utility applications that perform a single simple function.
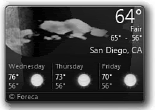
For example, the Clock gadget displays the current time, the Weather gadget reports the current weather conditions and forecast for your area, and so on.
These gadgets can stay docked to the Sidebar, or they can be dragged off with your mouse to sit on the desktop itself, as shown in Figure 7. In either position, you can configure their opacity—each gadget can have a solid background, or it can be seethrough, to match the Vista interface.
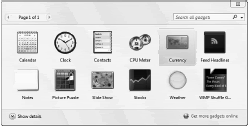
The Sidebar should be displayed by default in Windows Vista. If it isn’t, you can display it by clicking the Start button and selecting All Programs, Accessories, Windows Sidebar. To add gadgets to the Sidebar, right-click anywhere on an empty section of the Sidebar and select Add Gadgets from the pop-up menu.
When the next window appears, as shown in Figure 8, double-click any gadget you want to add.
To view even more gadgets, click Get More Gadgets Online; this launches Internet Explorer and takes you to the Windows Vista Gadgets Gallery online. Browse through the available gadgets, and click the Download button when you find one you want.
To configure an individual gadget, right-click it and select Options; to change the opacity, right-click the gadget, select Opacity, and then select a percent. To change the position of the gadgets in the Sidebar, use your mouse to drag a gadget up or down in the Sidebar.
Resetting the Time and Date
The time and date for your system should be automatically set when you first turn on your computer. If you find that you need to change or reset the time or date settings, all you have to do is follow these steps; it’s easy. In Windows Vista, click the time display in the notification area of the taskbar; then select Change Date and Time Settings.
This opens the Date and Time dialog box. Select the Date and Time tab; then click the Change Date and Time button. When the Date and Time Settings dialog box appears, select the correct month and year; then use the clock control to set the correct time. Click OK when finished.
While you’re in the Date and Time dialog box, you can also set your time zone. Just click the Change Time Zone button and select your time zone from the pull-down list. This process is similar in Windows XP.
If you’re an XP user, double-click the time display in the system tray; then, when the Date and Time Properties dialog box appears, make the appropriate date, time, and time zone selections.
Setting Up Additional Users
Chances are you’re not the only person using your computer; it’s likely that you’ll be sharing your PC to some degree with your spouse and kids. Fortunately, you can configure Windows so that different people using your computer sign on with their own custom settings—and access to their own personal files.
You should assign each user in your household his own password-protected user account. Anyone trying to access another user’s account and files without the password will then be denied access. You can establish two different types of user accounts on your computer—computer administrator and standard user. (In XP, this is called a limited account.)
Only an administrator account can make systemwide changes to your PC, install software, and access all the files on the system. When you first configured Windows on your PC, you were set up as an administrator.
The other members of your household should be set up with standard accounts; they’ll be able to use the computer and access their own files but won’t be able to install software or mess up the main settings.
Creating a New Account
Only the computer administrator can add a new user to your system. To set up a new account, follow these steps:
- From the Start menu, select Control Panel.
- When the Control Panel opens, select Add or Remove User Accounts (in the User Accounts and Family Safety section).
- When the next window appears, click Create a New Account.
- When prompted, enter a name for the new account; then select whether this account is for a standard user or an account administrator.
- Click the Create Account button.
Windows now creates the new account and randomly assigns a picture that will appear next to the username.
Changing an Account
If you don’t like the picture assigned to an account, you can change this picture at any time by opening the Control Panel and selecting Add or Remove User Accounts. When the Manage Accounts window appears, select the account you want to change; then select the Change the Picture option.
By default, no password is assigned to the new account. If you want to assign a password, return to the Manage Accounts window, select the account, and then select the Create a Password option.
Setting Up Parental Controls
If you set up an account for one of your children, you may want to take advantage of Windows Vista’s new Parental Controls feature. Parental Controls let you determine how your children will use your computer.
You can set time limits for when they can use the PC, and you can select which websites they can visit, which PC games they can play (based on game ratings), and which specific programs they can or cannot use. You can even have Vista create activity reports for each chosen user.
To activate and configure the various Parental Controls, open the Control Panel and select Set Up Parental Controls for Any User (in the User Accounts and Family Safety section). When the next screen appears, select the user that you want to monitor; then follow the onscreen instructions to configure the desired controls.
