Customizing Windows XP
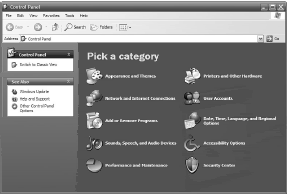
In Windows XP, the Control Panel looks a bit different than Windows Vista. As you can see in Figure 1, the XP Control Panel also organizes configuration settings by type but doesn’t let you go directly to any individual setting.
And, of course, XP’s and Vista’s configuration settings are organized differently, so you’ll have a different path to get to any specific setting; it’s all fairly logical, however. After you click through the various links, you eventually end up with a specific configuration utility displayed onscreen.
Each type of configuration setting uses a different utility; you may see a full-fledged window full of controls, or a smaller dialog box with a few options to check. Whatever you see onscreen, select those options you want; then click OK. This applies the settings you selected.
Changing Windows XP Desktop
If your computer is running Windows XP, you can change many of the same desktop options as you can with Windows Vista. This section explains how.
Personalizing the Desktop Background
To change the desktop background in Windows XP, follow these steps:
- From the Start menu, select Control Panel.
- When the Control Panel opens, select Appearance and Themes; then select Change the Desktop Background.
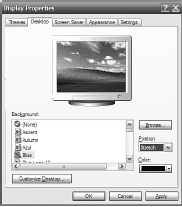
- When the Display Properties dialog box appears, select the Desktop tab, shown in Figure 2.
- To choose one of Windows’ built-in backgrounds, make a selection from the Background list. Or, to select your own graphics file, click the Browse button and navigate to the file you want to use.
- To determine how the image file is displayed on your desktop, select one of the items from the Position pull-down list: Center, Tile, or Stretch.
- Click OK to register your changes.
Changing the Desktop Size
To change the screen resolution in Windows XP, follow these steps:
- From the Start menu, select Control Panel.
- When the Control Panel opens, select Appearance and Themes; then select Change the Screen Resolution.
- When the Display Properties dialog box appears, select the Settings tab.
- Adjust the Screen Resolution slider to left for a lower resolution (smaller desktop with larger items), or to the right for a higher resolution (bigger desktop with smaller items).
- Click OK when finished.
As with Windows Vista, you can also change the number of colors displayed while you’re on this tab. More is better, of course.
Choosing a Screensaver
Windows XP also has its own collection of screensavers. To choose a screensaver, follow these steps:
- From the Start menu, select Control Panel.
- When the Control Panel opens, select Appearance and Themes; then select Choose a Screen Saver.
- When the Display Properties dialog box appears, select the Screen Saver tab.
- Pull down the Screen Saver list and select the screensaver you want. (You can preview any selected screensaver by clicking the Preview button.)
- Click the Settings button to configure that screensaver’s specific settings (if available).
- Click OK when finished.
Organizing Desktop Icons
Both Windows Vista and Windows XP display a variety of desktop icons—those little pictures on your desktop that function as shortcuts for starting applications and opening documents. Placing a shortcut on your desktop is an alternative to launching items from the Start menu.
Creating New Shortcuts on the Desktop
To put a new shortcut on your desktop, follow these steps:
- From within any Windows Explorer (Vista) or from within any folder (XP), navigate to the application or document for which you want to create a shortcut.
- Right-click the file icon and then select Send To, Desktop (Create Shortcut).
To remove a shortcut icon from the desktop, just drag it into the Recycle Bin.
Changing the Name of a Shortcut
When you create a new shortcut icon, the word “Shortcut” (or, in XP, “Shortcut to ”) is automatically added to the icon’s name. You can get rid of this, if you want. To change the name of a shortcut, follow these steps:
- Right-click the shortcut on your desktop.
- When the pop-up menu appears, select Rename.
- The shortcut’s name is now highlighted on your desktop. Use the Delete or Backspace keys to erase parts of the existing name, and then type a new name. Press Enter when you’ve finished entering the new name.
Arranging Icons on the Desktop
All those desktop icons let you quickly open your most-used programs, but they can really clutter up the look of your Windows desktop. To better arrange your icons, right-click a blank area of the desktop, select View, Sort By (or, in Windows XP, select Arrange Icons By), and choose from one of the following options:
- Name—Sorts items alphabetically by filename.
- Size—Sorts items by file size, from smallest to largest.
- Type—Sorts items by file type so that files with the same extension are grouped together.
- Date Modified—Sorts items by date, from oldest to most recent.
In addition, you can click the View option and choose to Auto Arrange the items, which automatically arranges the icons along the left side of your desktop, or Align to Grid, which makes all your icons snap to an invisible grid.
Changing Start Menu
You use the Start menu every time you launch a program. Windows offers a few ways for you to customize the way the Start menu works for you.
Displaying More—or Fewer—Programs on the Start Menu
By default, the Start menu displays the five most-recent applications you’ve run. You can reconfigure the Start menu to display more (up to nine) or fewer (as few as zero) applications at a time. To display more or fewer programs, follow these steps:
- Right-click the Start button and select Properties from the pop-up menu.
- When the Taskbar and Start Menu Properties dialog box appears, select the Start Menu tab.
- Click the Customize button to display the Customize Start Menu dialog box. (If you’re using Windows XP, you should now select the General tab.)
- Select a new number from the Number of Recent Programs to Display (or, in XP, the Number of Programs on Start Menu) list.
- Click OK when finished.
Adding a Program to the Start Menu—Permanently
If you’re not totally comfortable with the way programs come and go from the Start menu, you can add any program to the Start menu—permanently. All you have to do is follow these steps:
- Click the Start button to display the Start menu.
- Click All Programs to open the Programs menu.
- Navigate to a specific program.
- Right-click that program to display the pop-up menu.
- Select Pin to Start Menu.
The program you selected now appears on the Start menu, just below the browser and email icons.
Resetting the Time and Date
The time and date for your system should be automatically set when you first turn on your computer. If you find that you need to change or reset the time or date settings, all you have to do is follow these steps; it’s easy. In Windows Vista, click the time display in the notification area of the taskbar; then select Change Date and Time Settings.
This opens the Date and Time dialog box. Select the Date and Time tab; then click the Change Date and Time button. When the Date and Time Settings dialog box appears, select the correct month and year; then use the clock control to set the correct time. Click OK when finished.
While you’re in the Date and Time dialog box, you can also set your time zone. Just click the Change Time Zone button and select your time zone from the pull-down list. This process is similar in Windows XP.
If you’re an XP user, double-click the time display in the system tray; then, when the Date and Time Properties dialog box appears, make the appropriate date, time, and time zone selections.
Setting Up Additional Users
Chances are you’re not the only person using your computer; it’s likely that you’ll be sharing your PC to some degree with your spouse and kids. Fortunately, you can configure Windows so that different people using your computer sign on with their own custom settings—and access to their own personal files.
You should assign each user in your household his own password-protected user account. Anyone trying to access another user’s account and files without the password will then be denied access. You can establish two different types of user accounts on your computer—computer administrator and standard user. (In XP, this is called a limited account.)
Only an administrator account can make systemwide changes to your PC, install software, and access all the files on the system. When you first configured Windows on your PC, you were set up as an administrator.
The other members of your household should be set up with standard accounts; they’ll be able to use the computer and access their own files but won’t be able to install software or mess up the main settings.
Creating a New Account
Only the computer administrator can add a new user to your system. To set up a new account, follow these steps:
- From the Start menu, select Control Panel.
- When the Control Panel opens, select Add or Remove User Accounts (in the User Accounts and Family Safety section).
- When the next window appears, click Create a New Account.
- When prompted, enter a name for the new account; then select whether this account is for a standard user or an account administrator.
- Click the Create Account button.
Windows now creates the new account and randomly assigns a picture that will appear next to the username.
Changing an Account
If you don’t like the picture assigned to an account, you can change this picture at any time by opening the Control Panel and selecting Add or Remove User Accounts. When the Manage Accounts window appears, select the account you want to change; then select the Change the Picture option.
By default, no password is assigned to the new account. If you want to assign a password, return to the Manage Accounts window, select the account, and then select the Create a Password option.

