Managing Files, Folders, and Disks On Windows Vista
Managing the data stored on your computer is vitally important. After you’ve saved a file, you may need to copy it to another computer, move it to a new location on your hard drive, rename it, or even delete it. You have to know how to perform all these operations—which means learning how to work with Windows’ files, folders, and disks.
Understanding Files and Folders
All the information on your computer is stored in files. A file is nothing more than a collection of digital data. The contents of a file can be a document (such as a Word memo or Excel spreadsheet), a digital photo or music track, or the executable code for a software program.
The contents of a file can be a document from an application (such as a Works worksheet or a Word document), or they can be the executable code for the application itself. Every file has its own unique name.
A defined structure exists for naming files, and its conventions must be followed for Windows to understand exactly what file you want when you try to access one. Each filename must consist of two parts, separated by a period—the name (to the left of the period) and the extension (to the right of the period).
A filename can consist of letters, numbers, spaces, and characters and looks something like this: filename.ext. Windows stores files in folders. A folder is like a master file; each folder can contain both files and additional folders. The exact location of a file is called its path and contains all the folders leading to the file.
For example, a file named filename.doc that exists in the system folder, that is itself contained in the windows folder on your c:\ drive, has a path that looks like this: c:\windows\system\filename.doc.
Learning how to use files and folders is a necessary skill for all computer users. You might need to copy files from one folder to another or from your hard disk to a floppy disk. You certainly need to delete files every now and then. To do this in Windows Vista, you use Windows Explorer; in Windows XP, you use the My Documents folder.
Viewing Folders and Files
In Windows Vista you can open any Windows Explorer to view the folders and files on your system. Perhaps the easiest Explorer to use is the Documents Explorer, which you open by clicking the Documents icon on the Start menu.
The Documents Explorer opens automatically to display the contents of the Documents folder on your computer’s hard disk. As you can see in Figure 1, the Documents Explorer displays not only individual files but also other folders—called subfolders—that themselves contain other files.
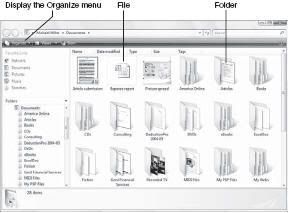
You can perform most file-related operations by clicking the Organize button to display the Organize menu, or by right-clicking a file icon to display the contextsensitive pop-up menu.
Changing the Way Files Are Displayed
You can choose to view the contents of a folder in a variety of ways. To change the file view, click the Views button on the Explorer toolbar; this displays a pull-down menu.
You can then select from the available views: Extra Large Icons, Large Icons, Medium Icons, Small Icons, List, Details, or Tiles. You can also move the slider up and down to change the size of the file/folder icons.
Sorting Files and Folders
When viewing files in the Documents Explorer, you can sort your files and folders in a number of ways. To do this, right-click anywhere in the Explorer window, select the Sort By option, and then choose to sort by Name, Date Modified, Type, Size, or Tags.
You can also choose to sort the items in either ascending or descending order. If you want to view your files in alphabetical order, choose to sort by Name. If you want to see all similar files grouped together, choose to sort by Type.
If you want to sort your files by the date and time they were last edited, choose the Date Modified option. And if you want to sort by a user-applied file tag (assuming you’ve done this in the file’s host program), choose the Tags option.
Grouping Files and Folders
You can also configure Windows to group the files in your folder, which can make it easier to identify particular files. For example, if you sorted your files by time and date modified, they’ll now be grouped by date (Today, Yesterday, Last Week, and so on).
If you sorted your files by type, they’ll be grouped by file extension, and so on. To turn on grouping, right-click anywhere in the Explorer window, select the Group By option, and then choose to group by Name, Date Modified, Type, Size, or Tags. Windows now groups your files and folders by the selected criteria.
Navigating Folders
You can navigate through all your folders and subfolders in several ways:
- To view the contents of a disk or folder, double-click the selected item.
- To move back to the disk or folder previously selected, click the Back button on the toolbar.
- To choose from the history of disks and folders previously viewed, click the down arrow in the Address bar at the top of the Explorer window and select a disk or folder.
- If you’ve moved back through multiple disks or folders, you can move forward to the next folder by clicking the Forward button on the toolbar.
- Go directly to any disk or folder by entering the path in the Address Bar (in the format x:\folder\subfolder) and pressing Enter.
- Move backward through the “bread crumb” path in the Address bar. Click any previous folder location (separated by arrows) to display that particular folder.
You can also go directly to key locations by using the list of locations in the navigation pane on the left side of the Explorer window. This pane displays the most common locations for files on your system.
The top part of the pane displays your Favorite Links—including the Documents, Pictures, and Music folders. The Folders section on the bottom of the pane displays all the contents of your system in a treelike outline. Double-click any section of the tree to display that item’s contents.
Searching for Files
As organized as you might be, you may not always be able to find the specific files you want. Fortunately, Windows Vista offers an easy way to locate difficult-to-find files, via the new Instant Search function.
Instant Search indexes all the files stored on your hard disk (including email messages) by type, title, and contents. So you can search for a file by extension, filename, or keywords within the document. To use the Instant Search feature, follow these steps:
- From within the Explorer window, locate the Search box at the top right of the window
- Enter one or more keywords into the search box.
- Press Enter, or click the Go button (looks like a magnifying glass).
Vista now displays a list of files that match your search criteria. Double-click any icon to open that file.
Creating New Folders
The more files you create, the harder it is to organize and find things on your hard disk. When the number of files you have becomes unmanageable, you need to create more folders— and subfolders—to better categorize your files. To create a new folder, follow these steps:
- Navigate to the drive or folder where you want to place the new folder.
- Click the Organize button to display the drop-down menu; then select New Folder.
- A new, empty folder now appears within the Explorer window, with the filename New Folder highlighted.
- Type a name for your folder (which overwrites the New Folder name), and press Enter.
Renaming Files and Folders
When you create a new file or folder, it helps to give it a name that somehow describes its contents. Sometimes, however, you might need to change a file’s name. Fortunately, Windows makes it relatively easy to rename an item. To rename a file (or folder), follow these steps:
- Click the file or folder you want to rename.
- Click the Organize button and then select Rename from the pull-down menu (or just press the F2 key on your keyboard); this highlights the filename.
- Type a new name for your folder (which overwrites the current name), and press Enter.
Copying Files
Now it’s time to address the most common things you do with files—copying and moving them from one location to another. It’s important to remember that copying is different from moving.
When you copy an item, the original item remains in its original location— plus you have the new copy. When you move an item, the original is no longer present in the original location—all you have is the item in the new location.
The Easy Way to Copy
To copy a file or a folder with Windows Vista, follow these steps:
- Select the item you want to copy.
- Click the Organize button and select Copy from the pull-down menu.
- Use Windows Explorer to navigate to the new location for the item.
- Click the Organize button and select Paste from the pull-down menu. That’s it. You’ve just copied the file from one location to another.
Other Ways to Copy
The method just presented is just one of many ways to copy a file. Windows Vista provides several other methods, including:
- Right-click a file and select Copy from the pop-up menu, then paste to the new location.
- Right-click a file and select Send To from the pop-up menu, then select a location from the choices listed.
- Hold down the Ctrl key and then use your mouse to drag the file or folder from one location to another within the Explorer window.
- Drag the file or folder while holding down the right mouse button. When you drop the file into a new location, you see a pop-up menu that asks whether you want to move it or copy it. Select the copy option.
Moving Files
Moving a file (or folder) is different from copying it. Moving cuts the item from its previous location and places it in a new location. Copying leaves the original item where it was and creates a copy of the item elsewhere. In other words, when you copy something you end up with two of it. When you move something, you only have the one thing.
The Easy Way to Move
To move a file, follow these steps:
- Select the item you want to move.
- Click the Organize button and select Cut from the pull-down menu.
- Use Windows Explorer to navigate to the new location for the item.
- Click the Organize button and select Paste from the pull-down menu.
Other Ways to Move a File
Just as Windows provides several other ways to copy a file, you also have a choice of alternative methods for moving a file, including the following:
- Right-click a filename and select Cut from the pop-up menu; then paste it to the new location.
- Use your mouse to drag the file from one location to another.
- Drag the file or folder while holding down the right mouse button. When you drop the file into a new location, you see a pop-up menu that asks whether you want to move it or copy it. Select the move option.
Deleting Files
Too many files eat up too much hard disk space—which is a bad thing, because you only have so much disk space. (Music and video files, in particular, can chew up big chunks of your hard drive.) Because you don’t want to waste disk space, you should periodically delete those files (and folders) you no longer need.
The Easy Way to Delete
Deleting a file is as easy as following these two simple steps:
- Select the file.
- Click the Organize button and select Delete from the pull-down menu.
This simple operation sends the file to the Windows Recycle Bin, which is kind of a trash can for deleted files. (It’s also a trash can that periodically needs to be dumped—as discussed later in this activity.)
Other Ways to Delete a File
As you might expect, there are other ways to delete files in Windows Vista. In particular, you can do the following:
- Highlight the file and press the Del key on your keyboard.
- Drag the file from the Explorer window onto the Recycle Bin icon on your desktop.
Restoring Deleted Files
Have you ever accidentally deleted the wrong file?
If so, you’re in luck. For a short period of time, Windows stores the files you delete in the Recycle Bin. The Recycle Bin is actually a special folder on your hard disk; if you’ve recently deleted a file, it should still be in the Recycle Bin folder. To “undelete” a file from the Recycle Bin, follow these steps:
- Double-click the Recycle Bin icon on your desktop to open the Recycle Bin folder.
- Click the file(s) you want to restore.
- Click the Restore This Item button on the toolbar.
This copies the deleted file back to its original location, ready for continued use.
Managing the Recycle Bin
Deleted files do not stay in the Recycle Bin indefinitely. By default, the deleted files in the Recycle Bin can occupy 10% of your hard disk space. When you’ve deleted enough files to exceed this 10%, the oldest files in the Recycle Bin are automatically and permanently deleted from your hard disk.
If you’d rather dump the Recycle Bin manually (and thus free up some hard disk space), follow these steps:
- Double-click the Recycle Bin icon on your desktop to open the Recycle Bin folder.
- Click the Empty the Recycle Bin button on the toolbar.
- When the confirmation dialog box appears, click Yes to completely erase the files, or click No to continue storing the files in the Recycle Bin.
Working with Compressed Folders
Really big files can be difficult to move or copy. They’re especially difficult to transfer to other users, whether by email or portable disk drive. Fortunately, Windows includes a way to make big files smaller.
Compressed folders take big files and compress their size, which makes them easier to copy or move. After the file has been transferred, you can then uncompress the file back to its original state. Compressing one or more files is a relatively easy task from within any Windows folder. Just follow these steps:
- Select the file(s) you want to compress.
- Right-click the file(s) to display the pop-up menu.
- Select Send to, Compressed (zipped) Folder.
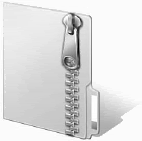
Windows now creates a new folder that contains compressed versions of the file(s) you selected. (This folder is distinguished by a little zipper on the folder icon, as shown in Figure 2.)
You can now copy, move, or email this folder, which is a lot smaller than the original file(s).
Extracting Files from a Compressed Folder
The process of decompressing a file is actually an extraction process. That’s because you extract the original file(s) from the compressed folder. In Windows XP and Windows Vista, this process is eased by the use of the Extraction Wizard. Follow these steps:
- Right-click the compressed folder to display the pop-up menu.
- Select Extract All.
- When the Extraction Wizard launches, select a location for the extracted files and then click the Extract button to complete the process.
Copying Files to Another Computer
Of course, you’re not limited to copying and moving files from one location to another on a single PC. You can also copy files to other PCs via either a network connection or some sort of portable disk drive.
Copying Files Over a Network
It’s important to know that if your PC is connected to a network and has file sharing activated, you can copy and move files from one network computer to another just as you can within folders on a single computer.
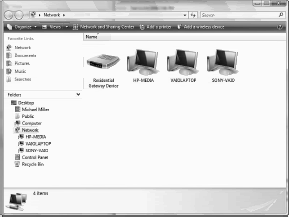
In Windows Vista, you access the other computers on your network by opening the Start menu and selecting Network. As you can see in Figure 3, each computer on your network is displayed in this window; double-click a PC’s icon to view the public (sharable) folders on this computer.
You can then copy files to or from any public folder on your network.
Copying Files with a Portable Drive
If you’re not on a network, you can use a portable drive to transport files from one computer to another. The most popular type of portable drive today is the USB drive, such as the one shown in Figure 4, which stores computer data in flash memory.
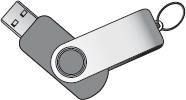
The drive itself is small enough to fit on a keychain, hence the nickname of “keychain drive.” (Some people also called them “thumb drives.”) You can find USB drives with capacities up to 4GB—more than big enough to hold even your biggest files.
To use a USB drive, simply insert the device into an open USB port on your computer. Once inserted, the drive appears as a new drive in the Computer Explorer (My Computer in Windows XP). Double-click the USB drive icon to view the contents of the drive; you can then copy and paste files from your hard drive to the USB drive and vice versa. When you’re finished copying files, just remove the USB device. It’s that simple.
Copying Files Via Email
Another popular way to send files from one computer to another is via email. You can send any file as an email attachment; a file is literally attached to an email message. When the message is sent, the recipient can open or save the attached file when reading the message.
Backing Up Important Files
Then there’s the issue of protecting your files. What do you do if your computer crashes, or your hard disk dies—are all your important files and documents totally lost? Not so if you’re prescient enough to back up your key files on a regular basis. The easiest way to do this is by connecting an external hard disk drive to your computer.
Get a big enough external disk (200GB or larger), and you can copy your entire hard disk to the external drive. Then, if your system ever crashes, you can restore your backed-up files from the external drive to your computer’s system unit. External hard drives can be purchased for as little as $100 and are easy to connect via either USB or FireWire.
You can use the proprietary backup software that comes with most external drives, or use Vista’s Windows Backup utility. Whichever program you use, you should back up your data at least weekly—if not daily. That way you won’t lose much fresh data if the worst happens.


