Windows Vista Basic
Windows is a type of software called an operating system. An operating system does what its name implies—operates your computer system, working in the background every time you turn on your PC. Equally important, Windows is what you see when you first turn on your computer, after everything turns on and boots up.
The “desktop” that fills your screen is part of Windows, as are the taskbar at the bottom of the screen and the big menu that pops up when you click the Start button. If you’ve recently purchased a new PC, the version of Windows on your PC is probably Windows Vista.
Microsoft released different versions of Windows over the years, and Vista is the latest—which is why it comes preinstalled on most new PCs. If you’ve used a previous version of Windows— such as Windows XP, Windows 2000, or Windows 98—on another PC, Windows Vista no doubt looks and acts differently from what you’re used to.
Don’t worry; everything that was in the old Windows is still in the new Windows—it’s just in a slightly different place. The most visible differences between Windows XP and Windows Vista are in the interface. Vista’s interface takes advantage of today’s more powerful video cards and offers a slick translucent 3D look.
It also enables some impressive threedimensional program switching, which gives the illusion that you really have separate windows stacked on your virtual desktop. Beneath the surface, Vista makes better use of the technology built into today’s PCs, putting all that extra speed and memory to good work.
A Vista-equipped PC starts up faster, loads programs faster, and crashes less frequently. It’s also more secure, with built-in anti-spyware and anti-phishing utilities working alongside the established Windows Firewall. You also get more and better applications with Vista than you did with Windows XP.
Vista includes updated versions of Internet Explorer, Windows Media Player, and Windows Movie Maker, as well as new Windows Mail, Windows Calendar, Windows Photo Gallery, and Windows DVD Maker programs. It’s safe to say that Vista is better for web browsing and for managing all digital media.
Different Versions of Windows Vista
There are actually several different versions of Windows Vista, each with a slightly different feature set. Which version you have depends on which was installed by your PC’s manufacturer. Here the different versions available in the U.S. market.
- Home Basic.
- Home Premium.
- Ultimate Business.
- Enterprise.
Put simply, the Home Basic edition is preinstalled on low-priced PCs. You’ll probably want the Home Premium edition, which has the better-looking Aero interface and a lot more useful applications. If you’re in a small business or corporation, you might be using the Business or Enterprise editions.
And if you want the version that has everything—essentially a superset of the other versions—you want Windows Vista Ultimate. Whichever version of Windows Vista you have installed on your PC, you can easily upgrade to another version by using the built-in Windows Anytime Upgrade feature, available from the Windows Control Panel.
All you have to do is select the version you want, make sure you’re connected to the Internet, and then give Microsoft your credit card number. The upgrade process is automatic, using files already installed on your PC’s hard drive.
Desktop Windows Vista
If you’re already familiar with Windows, you can start using Windows Vista without much training. However, if this is your first PC, or if Vista looks a little too different to you, take a few minutes to figure your way around the Vista desktop. As you can see in Figure 1, the Windows Vista desktop includes a number of key elements.
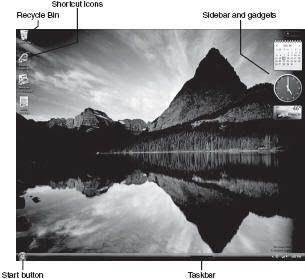
Get to know this desktop; you’re going to be seeing a lot of it from now on. The major parts of the Windows desktop include:
- Start button—Opens the Start menu, which is what you can use to open all your programs and documents.
- Taskbar—Displays buttons for your open applications and windows, as well as different toolbars for different tasks.
- Notification area—Formerly called the system tray, this part of the taskbar holds the clock, volume control, and icons for other utilities that run in the background of your system.
- Sidebar and gadgets—This area on the right side of the desktop holds various utilities, called gadgets, that sit on the desktop and perform specific operations.
- Shortcut icons—These are links to software programs you can place on your desktop; a “clean” desktop includes just one icon, for the Windows Recycle Bin.
- Recycle Bin—This is where you dump any files you want to delete.
Important Windows Operations
To use Windows efficiently, you must master a few simple operations, such as pointing and clicking, dragging and dropping, and right-clicking. You perform all these operations with your mouse.
- Pointing and Clicking - The most common mouse operation is pointing and clicking. Simply move the mouse so that the cursor is pointing to the object you want to select and then click the left mouse button once. Pointing and clicking is an effective way to select menu items, directories, and files.
- Double-Clicking - To launch a program or open a file folder, single-clicking isn’t enough. Instead, you need to double-click an item to activate an operation. This involves pointing at something onscreen with the cursor and then clicking the left mouse button twice in rapid succession. For example, to open program groups or launch individual programs, simply double-click a specific icon.
- Right-Clicking - Here’s one of the secret keys to efficient Windows operation. When you select an item and then click the right mouse button, you’ll often see a pop-up menu. This menu, when available, contains commands that directly relate to the selected object.
So, for example, if you right-click a file icon, you’ll see commands related to that file—copy, move, delete, and so forth. Refer to your individual programs to see whether and how they use the right mouse button.
- Dragging and Dropping - Dragging is a variation of clicking. To drag an object, point at it with the cursor and then press and hold down the left mouse button. Move the mouse without releasing the mouse button and drag the object to a new location.
When you’re finished moving the object, release the mouse button to drop it onto the new location. You can use dragging and dropping to move files from one folder to another or to delete files by dragging them onto the Recycle Bin icon.
- Hovering - When you position the cursor over an item without clicking your mouse, you’re hovering over that item. Many operations require you to hover your cursor and then perform some other action.
- Moving and Resizing Windows - Every software program you launch is displayed in a separate onscreen window. When you open more than one program, you get more than one window—and your desktop can quickly get cluttered.
There are many ways to deal with desktop clutter. One way is to move a window to a new position. You do this by positioning your cursor over a blank area at the top of the window frame and then clicking and holding down the left button on your mouse.
As long as this button is depressed, you can use your mouse to drag the window around the screen. When you release the mouse button, the window stays where you put it.
You also can change the size of most windows. You do this by positioning the cursor over the edge of the window—any edge. If you position the cursor on either side of the window, you can resize the width. If you position the cursor on the top or bottom edge, you can resize the height.
Finally, if you position the cursor on a corner, you can resize the width and height at the same time. After the cursor is positioned over the window’s edge, press and hold down the left mouse button; then drag the window border to its new size. Release the mouse button to lock in the newly sized window.
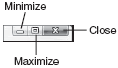
- Maximizing, Minimizing, and Closing Windows - Another way to manage a window in Windows is to make it display full-screen. You do this by maximizing the window. All you have to do is click the Maximize button at the upper-right corner of the window, as shown in Figure 2.
If the window is already maximized, the Maximize button changes to a Restore Down button. When you click the Restore Down button, the window resumes its previous (premaximized) dimensions.
If you would rather hide the window so that it doesn’t clutter your desktop, click the Minimize button. This shoves the window off the desktop, onto the taskbar. The program in the window is still running, however—it’s just not on the desktop.
To restore a minimized window, all you have to do is click the window’s button on the Windows taskbar (at the bottom of the screen). If what you really want to do is close the window (and close any program running within the window), just click the window’s Close button.
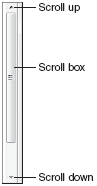
- Scrolling Through a Window - Many windows contain more information than can be displayed at once. When you have a long document or web page, only the first part of the document or page is displayed in the window.
To view the rest of the document or page, you have to scroll down through the window, using the various parts of the scrollbar. There are several ways to scroll through a window. To scroll up or down a line at a time, click the up or down arrow on the window’s scrollbar.
To move to a specific place in a long document, use your mouse to grab the scroll box (between the up and down arrows) and drag it to a new position. You can also click on the scrollbar between the scroll box and the end arrow, which scrolls you one screen at a time.
If your mouse has a scroll wheel, you can use it to scroll through a long document. Just roll the wheel back or forward to scroll down or up through a window.
- Using Menus - Many windows in Windows use a set of pull-down menus to store all the commands and operations you can perform. The menus are aligned across the top of the window, just below the title bar, in what is called a menu bar. You open (or pull down) a menu by clicking the menu’s name.
The full menu then appears just below the menu bar. You activate a command or select a menu item by clicking it with your mouse.
Some menu items have a little black arrow to the right of the label. This indicates that additional choices are available, displayed on a submenu. Click the menu item or the arrow to display the submenu.
Other menu items have three little dots (called an ellipsis) to the right of the label. This indicates that additional choices are available, displayed in a dialog box.
Click the menu item to display the dialog box. The nice thing is, after you get the hang of this menu thing in one program, the menus should be similar in all the other programs you use.
For example, most of the Office 2007 programs have an Office button that, when clicked, displays a pull-down menu of common fileoriented operations; older programs have a File menu that contains similar operations.
Although each program has menus and menu items specific to its own needs, these common menus make it easy to get up and running when you install new software programs on your system.
- Using Toolbars and Ribbons - Some Windows programs put the most frequently used operations on one or more toolbars, typically located just below the menu bar. (Figure 5 shows a typical Windows toolbar.)
A toolbar looks like a row of buttons, each with a small picture (called an icon) and maybe a bit of text. You activate the associated command or operation by clicking the button with your mouse.
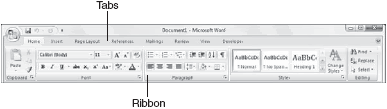
Other programs substitute a ribbon for the toolbar. For example, all the Office 2007 programs have a ribbon that contains buttons for the most-used operations. As you can see in Figure 6, each ribbon has different tabs, each containing a different collection of buttons.
Click the tab to see the ribbon buttons for that particular type of operation.

- Using Dialog Boxes, Tabs, and Buttons - When Windows or an application requires a complex set of inputs, you are often presented with a dialog box. A dialog box is similar to a form in which you can input various parameters and make various choices—and then register those inputs and choices when you click OK.
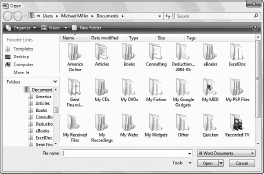
Figure 7 shows the Open dialog box, found in most Windows applications.
Windows has several different types of dialog boxes, each one customized to the task at hand. However, most dialog boxes share a set of common features, which include the following:
- Buttons—Most buttons either register your inputs or open an auxiliary dialog box. The most common buttons are OK (to register your inputs and close the dialog box), Cancel (to close the dialog box without registering your inputs), and Apply (to register your inputs without closing the dialog box). Click a button once to activate it.
- Tabs—These allow a single dialog box to display multiple “pages” of information. Think of each tab, arranged across the top of the dialog box, as a “thumbtab” to the individual page in the dialog box below it. Click the top of a tab to change to that particular page of information.
- Text boxes—These are empty boxes where you type in a response. Position your cursor over the empty input box, click your left mouse button, and begin typing.
- Lists—These are lists of available choices; lists can either scroll or drop down from what looks like an input box. Select an item from the list with your mouse; you can select multiple items in some lists by holding down the Ctrl key while clicking with your mouse.
- Check boxes—These are boxes that let you select (or deselect) various standalone options.
- Sliders—These are sliding bars that let you select increments between two extremes, similar to a sliding volume control on an audio system.