Adobe Acrobat Toolbar
Acrobat 8 Tools are grouped together in separate toolbars in the Toolbar Well below the menu bar. The default view when you launch Acrobat contains several toolbars visible in the Toolbar Well. You can remove various toolbars from the Well, move them around the Acrobat window, close them, and add different toolbars to the Toolbar Well.
The Toolbar Well, where the toolbars are contained, is collapsed and expanded according to the number of toolbars you add to it. When a toolbar is contained within the Toolbar Well, it is said to be docked. When a toolbar is dragged away from the Toolbar Well and rests atop the Acrobat window, it is said to be undocked and appears as a floating toolbar.
One of the many different toolbars in Acrobat is called the Tasks toolbar. This toolbar houses various Task buttons. In Figure below the tasks toolbar is shown with the label descriptions to describe each tool’s purpose.
![]()
Task buttons differ a little from other tools in that they all support pull-down menus where menu commands related to specific tasks are addressed.
The Tasks toolbar features commands for creating PDFs, working with comments and reviews, exporting PDFs to different formats, securing PDFs, working with forms, and digitally signing PDFs. The Tasks toolbar also features the new Task button containing commands for engaging in Acrobat Connect meetings.
The default tools you see in the Toolbar Well when you first open Acrobat is but a mere fraction of all the tools available to you. Fortunately in Acrobat 8, a nifty new window has been added to the program to help you easily manage tools. It’s important to realize that you have toolbars and tools.
Tools appear as individual icons contained in a given toolbar. You can choose to show only one tool in a toolbar or all the tools that belong to a given toolbar and anything in between. The tools within toolbars can be added and deleted from the parent toolbar.
If you’re familiar with earlier versions of Acrobat and you don’t find tools loaded in the various toolbars, your first stop is to open the More Tools menu at the top right corner of your screen. Select More Tools from a context menu opened on the Toolbar Well and the More Tools window opens as shown in Figure below.

Place a check mark beside any tool to be shown in a toolbar docked in the Toolbar Well or opened as a floating toolbar. Figure above shows you a small portion of available tools that appear in a scrollable window.
Toolbars themselves can be shown or hidden using the More Tools window. If you remove a check mark adjacent to a toolbar name to hide the toolbar, the toolbar and all the tools are hidden, even if the individual tools are all checked.
Yet another way to add and remove tools to and from toolbars is to simply open a context menu on a toolbar. Right-click (Windows) or Ctrl+click (Macintosh) on a toolbar either docked in the Toolbar Well or as a floating toolbar and a pop-up menu provides options for adding or removing tools to/from that toolbar group.
In Figure below a context menu is opened on the Edit toolbar. When Show/Hide Tools is selected a submenu displays all toolbars. Select an item unchecked to open the respective toolbar or select a checked toolbar to remove hide it. Note that hiding a toolbar is temporary and only hides the toolbar from view in the Toolbar Well.
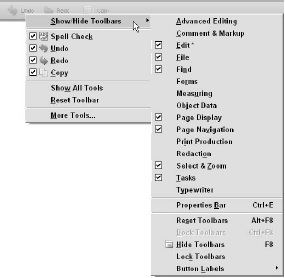
Open a context menu on a toolbar and select Show/Hide Toolbars to open a submenu where all toolbars can be opened or temporarily closed. If you want all tools within a given toolbar to be shown, select Show All Tools in the context menu.
The Show/Hide menu command in the context menu shown in Figure above provides the same commands you have available in the View >> Toolbars submenu. Either of these menus provides you a quick and easy way to show and hide toolbars. The last menu item in the context menu shown in Figure above is used to open the More Tools window where you can add/remove tools among all toolbars.
When you launch Acrobat for the first time or you set the toolbars to the default view, six different toolbars are docked in the Toolbar Well, including the Tasks toolbar discussed earlier in this section. The remaining default toolbars include:
- File toolbar. These tools are used for general document handling. The default File tools activate commands for Open, Save, Print, and Email. When all the tools are loaded in the File toolbar the Create PDF from web page and Attach a File tools are added to the toolbar.
- Page Navigation toolbar. The default tools in the Page Navigation toolbar shown on the left in Figure below contain tools for moving back and forth between PDF document pages.
The numbers indicate what page you are currently viewing out of the total number of pages in the document. When the toolbar is expanded to show all tools as you see on the right in Figure above, the First Page, Last Page, Previous View, and Next View tools are shown.
- Page Display toolbar. The Page Display toolbar is the home of many different tools used for page viewing, but only two of the tools appear in the default toolbar as shown in Figure below on the left. When you first open Acrobat, you see the Scrolling Pages and One Full Page tool.
After expanding the toolbar to show all tools as shown on the right in Figure above, the Single Page Continuous, Single Page, Two-Up, Two-Up Continuous, Full Screen Mode, Rotate Counterclockwise, Rotate Clockwise, and Line Weights tools are shown.
Users of earlier versions of Acrobat will note that the tool names for Single Page, Continuous, Continuous – Facing, and Facing Pages have changed names to Single Page, Single page Continuous, Two-Up Continuous, and Two-Up respectively.
In addition, these four tools previously appeared in a Status bar at the bottom of the Acrobat window in earlier versions of Acrobat. In Acrobat 8, the Status bar has been eliminated and all tools appear at the top of the Acrobat window.
- Select & Zoom toolbar. The tools in this group are used to select text/images, move the page in the Document pane, and zoom in and out of pages in the Document pane. The left side of Figure below shows the Select tool followed by the Hand tool then the Zoom Out, Zoom In, and Zoom Value tools.
When all tools are loaded the Actual Size, Fit Width, Fit Page, Pan & Zoom Window, Loupe tool, and Snapshot tool appear as shown in Figure above on the right.
- Find toolbar. Of all the default toolbars, the Find toolbar is the only one that does not have additional tools that can be added to the toolbar. However, a pull-down menu exists for making choices to refine your search for words in an open PDF document.
In addition to loading and unloading tools within toolbars, the toolbars can be moved, docked, and undocked from the Toolbar Well. Here’s a list of some of the things you can do with the default toolbars and any other toolbars you decide to view:
- Undocking toolbars. Toolbars can be relocated from within the Toolbar Well to another area within the Acrobat window. For example, you might find it more convenient to move a toolbar you frequently access during an editing session so it is positioned at the bottom of the Document pane.
If so, just place the cursor on top of the vertical separator bar adjacent to the first tool in a toolbar and drag it away from the Toolbar Well. This vertical line is the hot spot used to select the toolbar instead of a tool in the group. Clicking anywhere else in the toolbar selects a tool.
- Docking toolbars. To dock a toolbar back in the Toolbar Well once removed, drag the toolbar, again by the vertical separator bar adjacent to the first tool, on top of the Toolbar Well. The toolbar snaps to an available position in the Well.
If you drop the toolbar between two other toolbars, the toolbar you relocate back to the Toolbar Well snaps in position between the two docked toolbars. Toolbars can also be docked vertically on the left and right sides of the Document pane and at the bottom of the Acrobat window below the status bar.
For example, if you drag a toolbar to the left of the Navigation pane and release the mouse button, the toolbar snaps to a docking station and the tools display vertically.
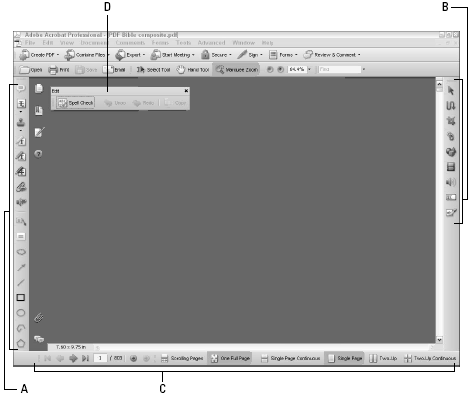
In Figure below you can see toolbars docked on the left (A), right (B), and bottom (C) of the Acrobat window with one floating toolbar (D) in the Document pane.
- Resetting toolbars. You can position toolbars around the Acrobat window and return them to the default positions with one menu command. This is particularly helpful if multiple users work on a single computer or you frequently change editing tasks that require using different tools during different editing sessions.
In many cases it’s easier to reset toolbars to the original default view, than open tools needed for a specific editing task. To set toolbars to their defaults, open a context menu from any toolbar or in the Toolbar Well by right-clicking (Ctrl+clicking on Macintosh), and select the menu item Reset Toolbars, you can press Alt/Option+F8.
- Hiding all toolbars. Toolbars can be hidden from view to offer you more room when editing a PDF document or browsing the contents of PDFs. To hide the toolbars from view, open a context menu from the Toolbar Well and choose Hide Toolbars.
When toolbars are hidden you won’t have access to a context menu to get the toolbars back in view. Instead, choose View >> Toolbars >> Show Toolbars to make all toolbars reappear. (Note that using this menu command also hides toolbars.)
- Hiding a single toolbar. You can hide a toolbar after it has been undocked from the Toolbar Well. Click the X in the top-right corner of the toolbar (Windows) or the small circle on the topleft side of the toolbar (Macintosh) to close it, and it disappears from view.
From a context menu opened on any toolbar or the Toolbar Well, you can open the toolbar and display it in the Acrobat window again.
Toolbars can also be hidden by using the More Tools window, opening a context menu on the Toolbar Well and selecting a toolbar with a check mark to hide it, and selecting toolbars in the View >> Toolbars submenu.
- Locking toolbars. The vertical separator bar used to move toolbars disappears when you select Lock Toolbars from a context menu. The toolbars cannot be inadvertently moved after you lock them. To unlock the toolbars, open a context menu and select Lock Toolbars again.
The check mark alongside the menu command becomes unchecked and the toolbars are unlocked in the Toolbar Well. If the toolbars are locked and you drag an undocked toolbar on top of the Toolbar Well, it won’t dock.
You need to first unlock the toolbars before you can redock them. Additionally, you need to unlock toolbars in order to use the Reset Toolbars command in a Toolbar Well context menu to return tools and toolbars back to the default position.
You can also lock toolbars that are undocked outside of the Toolbar Well. The separator bar on the toolbar disappears on floating toolbars the same as it does for toolbars docked in the Toolbar Well.
However, locking undocked toolbars does not prevent you from moving them around the Acrobat window. You can click and drag the title bar for any undocked toolbar and move it to another location.
- Setting new toolbar defaults. If you decide to reposition your toolbars and want to keep them fixed as new defaults, Acrobat can do so for you automatically. Move the toolbars to the desired locations and go about your work.
When you quit Acrobat and reopen the program, the toolbar positions remain as you last arranged them. Unfortunately, Acrobat does not have a Save Workspace command like you find in several Adobe Creative Suite applications.
If you are unfamiliar with many Acrobat tools, you can change the tool labels to show you a more descriptive label for each tool that offers you a hint of what the tool does.
To show more descriptive labels, open a context menu on the Acrobat Toolbar Well and choose Show Button Labels >> All Labels. The toolbars expand and show a text description for each tool’s name. Keep this option active until you are familiar with the tool names.


