Converting to PDF Format
Unlike almost every other computer program, Acrobat was never designed to support creating new files and editing pages to add content. Where Acrobat begins is with file conversion to the PDF format.
Users start with a document authored in another program and the resulting document is converted to PDF using either tools from within Acrobat or tools or commands within programs that support PDF conversion from native documents.
With Acrobat Standard and Acrobat Professional, the number of methods you can employ for converting documents to PDF is enormous. Any program file can be converted to PDF through a number of different methods offered by Acrobat, operating systems, and many different authoring applications.
The method you use to convert a document to PDF and the purpose for which the PDF is intended require you to become familiar with a number of different options at your disposal for PDF file creation.
You create PDF documents from within Acrobat primarily with default tools and with menu commands. In addition to the default tools, this tutorial makes use of the Snapshot tool, the Edit toolbar, and the Create PDF From Web Page tool in the File toolbar.
To regain the default toolbars, open a context menu on the Toolbar Well and select Reset Toolbars from the menu commands or press Alt/Option+F8. Open the More Tools menu from a context menu on the Toolbar Well. Scroll down to the File toolbar and check the box for Create PDF from web page.
Scroll further down the window to the Select & Zoom toolbar. Check the box for the Snapshot tool. If you intend to edit documents after PDF creation, you need to open toolbars specific to your editing session. Depending on the type of edits you anticipate, open toolbars as needed after you finish converting files to PDF.
For this now, click OK in the More Tools window and select Dock All Toolbars from a context menu opened on the Toolbar Well. Adjacent to the TouchUp Text tool in the Editing toolbar, click the down arrow to open the pull-down menu and select Expand this Button. The TouchUp Object tool becomes visible in the toolbar after making the menu selection.
You can use Acrobat Professional or Acrobat Standard to open various file formats in the viewer; the files are immediately converted to PDF. You can also print a file to the Adobe PDF printer, installed with your viewer, from just about any authoring program, and the native document is converted to PDF.
It all sounds like simple stuff, but two very important distinctions exist between these methods of conversion for certain file types that you need to understand before you start converting files to PDF. Quite simply, opening some files in Acrobat Professional or Acrobat Standard does not involve any intervention from companion programs.
On the other hand, using some file formats and using the Adobe PDF printer requires some help from the Acrobat Distiller software. To understand the fundamentals of document conversion you need to know a little bit about Acrobat Distiller.
Acrobat Distiller accepts either a PostScript file or an Encapsulated PostScript (EPS) file that it processes to produce a PDF document. Through the processing mechanism, Distiller applies different options during conversion. These options can include image sampling, font handling, color control, PDF format compatibility assignment, document encryption, hypertext linking, and a host of other settings.
Each of the settings is designed to produce PDF files for different purposes. Because so many different options can be applied to PDF conversion via the Distiller software, Distiller provides you the capability to save an assortment of specific settings to individual Adobe PDF Settings files.
When you save the files to a specific location on your hard drive, you can access them from a pull-down menu in Acrobat Distiller or from within authoring programs where Adobe PDF Settings are used. In addition to custom settings you can save to Adobe PDF Settings files.
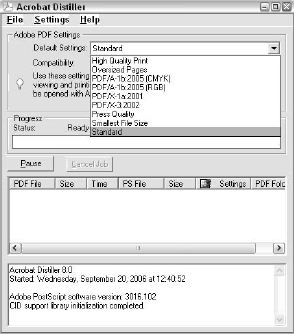
Acrobat Distiller, when installed with Acrobat Professional, has nine settings, and Acrobat Standard has five settings. When you create a PDF file that calls upon Distiller to produce the PDF document, the Adobe PDF Settings last used by Distiller control the options for your resulting PDF document.
The danger here is that if you intend to have a file created for printing, for example, and the settings are optimized for screen viewing, you wind up with a PDF document that won’t be suitable for printing. Therefore, it is imperative that you know what settings are applied to PDFs created with the Acrobat Distiller software.
Prior to the conversion process you’ll have an opportunity to make a choice for the Adobe PDF Settings that are applied during distillation. These choices may or may not be available depending on the type of files you convert to PDF. If the Adobe PDF Settings are not made available when you convert to PDF, the default settings in Acrobat Distiller are used.
You need to be certain you open Acrobat Distiller and change the defaults when conversion of a particular file type does not open Acrobat Distiller. Regardless of where you access the settings choices, the same options are always available. If you haven’t saved any custom settings, the defaults appear.
We’ll look at using the High Quality, Press Quality, Smallest File Size, and Standard settings. Without an elaborate definition of these settings, think of High Quality for business office printing, Press Quality as suited for commercial printing. Smallest File Size as suited for Web hosting and screen viewing, and the Standard settings as suited for everything else.
