Creating Index For PDF Files
After your files are optimized and saved in final form, it’s time to create the search index. Choose Advanced >> Document Processing >> Full Text Index with Catalog to open the Catalog dialog box. In the dialog box you make choices for creating a new index file or opening an existing index file.
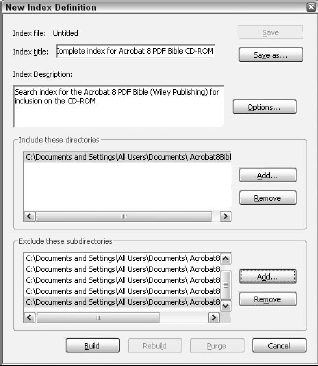
Click the New Index button to create a new index file. The New Index Definition dialog box shown in Figure below opens, in which you set specific attributes for your index and determine what folder(s) are to be indexed.
Index Title
The title that you place in this field is a title for the index, but not necessarily the name of the file you ultimately save. The name you enter here does not need to conform to any naming conventions because in most cases it won’t be the saved filename.
When you open an index file, you search your hard drive, server, or external media for a filename that ends with a .pdx extension. When you visit the Search window and select Look In >> Select Index, the Index Selection dialog box opens. What appears in the Index Selection dialog box is a list of indexes appearing according to the Index Title names. These names are derived from what you type in the Index Title field in Acrobat Catalog.
When you get ready to build a file, Acrobat prompts you for the index filename. By default the text you type in the Index Title field is listed in the File name field in the Save Index File dialog box. This dialog box opens when you click the Build button in the Catalog dialog box.
In most cases where you supply a name as a description in the Index Title, you’ll want to change the filename to a name consistent with standard DOS conventions (that is, eight-character maximum with a three-character maximum extension). Make this change when you are prompted to save the file.
If you see an index name grayed out, the index is not available to your Acrobat viewer. You may have moved the index file to another location on your hard drive, deleted the file, or tried to search an index on a CD-ROM that is not mounted.
In order to bring back the index and make it available to your viewer you need to delete the grayed out index name by clicking the Remove button and then add the file or rebuild and Add the file in the Index selection dialog box.
Index Description
You can supply as many as 256 characters in the Index Description field. Descriptive names and keywords should be provided so that the end user knows what each index contains. Index descriptions should be thought of as adding more information to the items mentioned earlier regarding document descriptions.
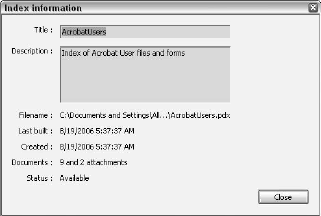
Index descriptions can help users find the index file that addresses their needs. When an index is loaded, the index title appears in the Select Indexes dialog box. To get more information about an index file, click the Info button. The Index information dialog box opens.
The Index information dialog box shows you the title from the Index Title field and the description added in Acrobat Catalog in the Index Description field.
Include These Directories
If you add nothing to the Include these directories field, Catalog won’t build an index because it won’t know where to look for the PDF files to be included in the index. Adding the directory path(s) is essential before you begin to build the index. Notice the first Add button on the right side of the dialog box.
After you click Add, a navigation dialog box opens, enabling you to identify the directory where the PDFs to be indexed are located. You can add many directories to the Include these directories list. These directories can be in different locations on your hard drive.
When a given directory is selected, all subfolders will also be indexed for all directory locations unless you choose to exclude certain folders. When the directories have been identified, the directory path and folder name will appear in the Include these directories field.
Exclude These Subdirectories
If you have files in a subdirectory within the directory you are indexing and want to exclude the subdirectory, you can do so in the Exclude these subdirectories field. The folder names and directory paths of excluded directories appear in the Exclude these subdirectories field.
Remove
If you decide to remove a directory from either the Include these directories or Exclude these subdirectories lists, select an item in the list and click the Remove button. You can add or delete directories in either list prior to building an index or when modifying an index.
Saving Index Definitions
Two buttons appear at the top-right corner of the Catalog dialog box for saving a definition. If you begin to develop an index file and supply the index title and a description and want to come back to Catalog later, you can save what you type in the Index Definition dialog box using the Save As button.
The Save button does not appear active until you have saved a file with the Save As option or you’re working on a file that has been built. Saving the file only saves the definition for the index. It does not create an index file. The Save As option enables you to prepare files for indexing and interrupt your session if you need to return later.
For example, suppose you add an index title and you write an index description. If you need to quit Acrobat at this point, click Save As and save the definition to disk. You can then return later and resume creating the index by adding the directories to be cataloged and building the index.
After you have saved a file you can update the file with the Save button. After a definition is saved, when you return to Acrobat Catalog, you can click the Open button in the Catalog dialog box and resume editing the definition file. When all the options for your search index have been determined, you click the Build button to actually create the index file.
Using Save As or Save is not required to create an index file. If you set all your attributes for the index and click the Build button, Acrobat Catalog prompts you in the Save Index File dialog box to supply a name for the index and save the definition. Essentially, Catalog is invoking the Save As command for you.
If at any time you click the Cancel button in the lower-right corner of the Index Definition dialog box, all edits are lost for the current session. If you add definition items without saving you’ll need to start over when you open the Index Definition dialog box again. If you start to work on a saved file and click Cancel without saving new edits, your file reverts to the last saved version.

