Creating PDF Files From Word Documents
Of all the Office applications, Microsoft Word gives you the best support for PDF file creation. Microsoft Word is the only word-processing application that provides access to the structural data of the document. The structural data of the Word document such as titles, heads, tables, paragraphs, figure captions, and so on can be converted to tagged Bookmarks.
Tagged Bookmarks give you much more control over the PDF content. You can navigate to the element structures, and move, copy, extract, and delete pages through menu commands in the Bookmarks tab. With Word, and all Microsoft Office programs you have several choices for PDF Conversion.
You can use the Create PDF From File command, use the Combine Files command, drag and drop Microsoft Office files on the Acrobat Document pane, print to PostScript and convert the PostScript in Acrobat Distiller, and use a tool developed by Adobe called the Acrobat PDFMaker.
This tool is installed in all Office programs and several other Microsoft programs. Of all the tools available to you, using PDFMaker is your best choice. Why?
Because PDFMaker provides you with more options settings to control the attributes in the converted file. If, for example, you want bookmarks to appear in the converted PDF, you need to use PDFMaker.
If you want to convert PowerPoint files with transitions and media effects, you need to use PDFMaker. If you want to create layered PDFs from Microsoft Visio, again, you need PDFMaker. Other PDF conversion options don’t provide you with support for many of these attributes.
PDFMaker offers several tools to control PDF file creation from within Microsoft Word and all other Microsoft programs that use the PDFMaker tools. After you install Acrobat and later open Word (or other Office programs), two Acrobat icons appear on the far left side of the toolbar.
The first of these two icons is the Convert to Adobe PDF tool. Clicking this icon opens a dialog box where you supply the filename and destination. Enter a name and choose a destination, and then click the Save button to create the PDF. The second tool installed in Microsoft Office Applications is Convert to Adobe PDF and Send for Review (Windows) or Convert to Adobe PDF and Email (Macintosh).
When you click the Convert to Adobe PDF and Send for Review tool (Windows), the Word document is converted to PDF, and a Send by Email for Review Wizard opens where you proceed through three steps:
- Using the PDF you’ve just created.
- Inviting reviewers where you add the e-mail addresses of recipients.
- Previewing the review invitation.
When you click Finish in the wizard, your file is attached to an e-mail message window in your default e-mail program. On the Mac, clicking the Convert to Adobe PDF and Email tool converts your Word document to PDF and attaches the resultant PDF as an Email attachment to a new e-mail message window.
In addition to tools, two menus (Windows only) are also installed with PDFMaker. The first is the Adobe PDF menu. The second is the Acrobat Comments menu. You have the a few menu selections in the Adobe PDF menu that provide some additional PDF conversion options.
From the Adobe PDF menu, the two tool options for Convert to Adobe PDF and Convert to Adobe PDF and Send for Review are also listed as menu commands. Notice in the menu you have two additional PDF conversion options. Convert to Adobe PDF and Email performs the same on Windows as the tool available on the Mac.
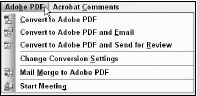
The second additional PDF conversion option on Windows in the Adobe PDF menu is Mail Merge to PDF. To use this feature you first need to create a data file and a mail merge document. You can create a data file easily in Microsoft Excel.
Just be certain to place labels in the first row at the top of an Excel worksheet such as name, address, city, state, zip, and so on. Save the file in native .xls format. After creating a data file and a Word template document such as a letter, from the Task pane just select Mail Merge and follow steps in a wizard to create the merge document.
Word provides you an easy wizard to help you create a letter, e-mail message, envelope, label, or directory. When the merge document is created, select Adobe PDF >> Mail Merge to Adobe PDF and the Adobe PDF Maker – Mail Merge dialog box opens.
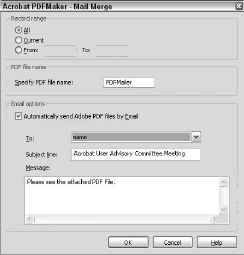
In the Adobe PDF – Mail Merge dialog box identify data field that includes an email address. Note that the data below the head in the Excel worksheet must be a valid e-mail address.
Type a Subject and then type the text you want to appear in the Message box. Optionally, you can specify a PDF filename by typing a new name in the text box. By default, the filename is PDFMailer.
Click OK in the dialog box and your document is merged with the database file producing individual PDF documents attached to separate e-mail messages.

