Using Index Files
One reason you create index files is for speed. When you search hundreds or thousands of pages, the amount of time to return found instances for searched words in index files is a matter of seconds compared to Searching folders in the Search window.
To search using an index file, you need to first load the index in the Search window. From the Look In pulldown menu, choose the Select Index menu option. The Index Selection dialog box opens after you make the menu selection. Click the Add button and the Open Index File dialog box opens.
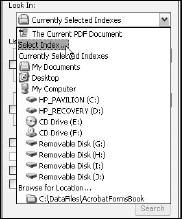
In this dialog box navigate your hard drive to find the folder where your index file is located. Click the index filename and click the Open button. After selecting the index to load, you are returned to the Index Selection dialog box. A list of all loaded indexes appears in the dialog box. To the left of each filename is a check box.
When a check mark is in view, the index file is active and can be searched. Those check boxes that are disabled have the index file loaded, but the file remains inactive. Search will not return results from the inactive index files. If an index file is grayed out, the file path has been disrupted and Acrobat can’t find the index file or the support files associated with the index.
If you see a filename grayed out, select the file in the list and click the Remove button. Click the Add button and relocate the index. If the support files are not found, an error is reported in a dialog box indicating the index file could not be opened.
If you can’t open a file, you need to return to the Catalog dialog box and click the Open button. Find the index file that you want to make active and rebuild the index. After rebuilding, you need to return to the Index selection dialog box and reload the index.
If you attempt to load an index file from a CD-ROM and the CD is not inserted into your CD-ROM drive, the index filename is grayed out in the Index Selection dialog box. After inserting the CD-ROM containing the index, the index filename becomes active.
If you know index files are loaded from CDs, don’t delete them from the Index Selection dialog box. Doing so requires you to reload the index file each time you insert a CD.
You can associate an index file with a particular document. Open the Document Properties dialog box (Ctrl/Ô+D) and click the Advanced tab. Adjacent to the Search Index item is a Browse button. Click Browse and the Open dialog box appears.
Navigate your hard drive to locate the index file created from a folder containing your document, select it, and click Open. When you save your file and reopen it, you can select Currently Selected Indexes in the Look In pull-down menu and your associated index file is automatically loaded for you.
If an index is to be eliminated from searches, you can deactivate the index by disabling its check box. In a later Acrobat session, you can go back and enable indexes listed in the Index Selection dialog box. You should always use this method rather than deleting an index if you intend to use it again in a later Acrobat session.
However, at times you may want to delete an index file. If the index will no longer be used, or you relocate your index to another drive or server, you may want to completely remove the old index. If this is the case, select the index file to be deleted and click the Remove button. Indexes may be enabled or disabled before you select Remove.
In either case, the index file is removed without warning. If you inadvertently delete an index, you can always reload the index by clicking the Add button. Placing index files in a directory where you can easily access them is a good idea. To avoid confusion, try to keep indexes in a common directory or a directory together with the indexed PDF files.
Acrobat doesn’t care where the index file is located on your hard drive or server—it just needs to know where the file is located and the file needs to keep the relative path with the support files. If you move the index file to a different directory, be certain to reestablish the connection in the Index Selection dialog box.
When a number of index files are installed on a computer or server, the names for the files may not be descriptive enough to determine which index you want to search. If more detailed information is desired, the information provided by the Index Information dialog box may help identify the index needed for a given search.
Index information may be particularly helpful in office environments where several people in different departments create PDFs and indexes are all placed on a common server. What may be intuitive to the author of an index file in terms of index name may not be as intuitive to other users.
Index information offers the capability for adding more descriptive information that can be understood by many users. Fortunately, you can explore more descriptive information about an index file by clicking the Info button in the Index Selection dialog box.
When you click the Info button, the Index information dialog box opens, displaying information about the index file. Some of the information displayed requires user entry at the time the index is built. Acrobat Catalog automatically creates other information in the dialog box when the index is built.
The Index information dialog box provides a description of the following:
- Title. The user supplies title information at the time the index is created. Titles usually consist of several words describing the index contents. Titles can be searched, so the title keywords should reflect the index content.
- Description. Description can be a few words or several sentences containing information about the index.
- Filename. The directory path for the index file’s location on a drive or server is displayed with the last item appearing as the index filename.
- Last built. If the index file is updated, the date of the last build is supplied here. If no updates have occurred, the date will be the same as the created date.
- Created. This date reflects the time and date the index file was originally created, and is therefore a fixed date. n Documents. Indexes are created from one or more PDF documents. The total number of PDF files from which the index file was created appears here.
- Status. If the index file has been identified and added to the list in the Index Selection dialog box, it will be Available. Unavailable indexes appear grayed out in the list and are described as Unavailable.
After your index file(s) is prepared and loaded in the Index selection dialog box, it is ready for use. You search index files in the Advanced Search window just as you search multiple files explained earlier in this chapter. From the Look In pull-down menu, select Currently Selected Indexes.
All the options discussed earlier for advanced searches are available to you. Select from the Return results containing pull-down menu, enter your search criteria, and select the options you want. Click the Search button and you’ll find the search results reported much faster than using other search methods.
Index files can be created from PDF collections contained on external media where the index file can remain on your computer without the need for copying the PDF documents to your hard drive. When you insert a media disk such as a CD-ROM, your search index is ready to use to search the media.
Practice searching your new index file using different options and search criteria. To compare the difference between using a search index file and using the advanced search options, you can choose the Browse for Location menu item and search the CD-ROM for the same criteria. Go back and forth to see the differences between searching folders and searching an index file.

