Zooming PDF Files
Zooming in and out of document pages is a fact of life with many different programs. Even when you type text in a word processor, you often need to zoom in on text that is set in a style suited for printing, but looks horrible at a 100% view on your computer monitor.
The same holds true for spreadsheets, all the imaging and layout programs, and any kind of program where page sizes grow beyond a standard letter-size page. Because Acrobat accommodates a page size of up to 200 × 200 inches, PDF documents sporting large page sizes need some industrial-strength zoom tools.
Acrobat Professional contains a few more tools than other Acrobat viewers; however, all viewers enable you to zoom in and out of document pages using many tools consistent across all the viewers. The Zoom In and Zoom Out tools used in all viewers permit views from 8.33 percent to 6,400 percent of a document page.
Several tools are available for zooming. By default the Marquee Zoom and the Dynamic Zoom tools appear in the Select & Zoom toolbar docked in the Toolbar Well. If you load all the zoom tools in the Select & Zoom toolbar you can select from one of six zoom tools in Acrobat Professional.
Four of the six tools are available in Acrobat Standard and Adobe Reader. In all viewers, you can also zoom by clicking the Zoom In or Zoom Out buttons in the Zoom toolbar (represented by a + and – symbol) or editing the zoom percentage field in the toolbar—just type a new value in the field box and press the Enter/Return key to zoom.
When you click the down-pointing arrow, the preset pull-down menu opens. The View menu also has a Zoom To command. Select it and the Zoom To dialog box opens where you can select fixed zoom levels from a pull-down menu or type in a value from 8.88 to 6,400 percent. However, this menu command is redundant because you can also use the Zoom toolbar in the same manner.
At first glance you may think that the menu command is useless and unnecessary. However, when viewing PDF documents where the menu bar is hidden or viewing files in Full Screen mode, you can use the keyboard shortcut Ctrl+M to open the Zoom To dialog box.
You can then change zoom levels without making the menu bar visible or exiting Full Screen mode. By default the Marquee Zoom tool appears in the Select & Zoom toolbar. This toolbar is loaded by default and appears when you open a context menu on the Toolbar Well and select Reset Toolbars.
The Marquee Zoom tool is new in Acrobat 8. In earlier Acrobat viewers you had the Zoom In and Zoom Out tools that performed the same function as the Marquee Zoom tool when using modifier keys. These two tools have been consolidated into a single tool.
Click the Marquee Zoom tool in the Select & Zoom toolbar and you have several ways you can use the tool using modifier keys that include:
- Click and drag. Drag the tool to create a marquee to zoom in to an area.
- Alt/Option +click and drag. Press the Alt/Option key to marquee and area and you zoom the page out.
- Click. Click the Marquee Zoom tool and the zoom jumps a fixed percentage.
- Alt/Option +click. Press the Alt/Option key and click and you zoom out at fixed percentages.
The Zoom In tool is restricted to its fixed position in the Zoom toolbar. Click the Zoom tool in the Zoom toolbar and you zoom in to the same fixed preset zooms as when using the Marquee Zoom tool.
The Zoom Out tool works in exactly the same way as the Zoom In tool, only it zooms out rather than in. It also has the same options associated with it as are associated with the Marquee Zoom tool when you press Alt/Option.
When you first use the Dynamic Zoom tool you may feel like you’re watching a George Lucas sci-fi movie. It’s downright mesmerizing. This tool is available in all Acrobat viewers and is much handier than drawing marquees with the Marquee Zoom tool. To use dynamic zooming, select the tool from the Select & Zoom toolbar.
Click and drag up to zoom in and down to zoom out. Stop at the desired zoom level by releasing the mouse button. Acrobat displays a proxy view while zooming in and out and only refreshes the screen when you release the mouse button. Using this tool, therefore, is much faster because each zoom increment does not require a new screen refresh.
You can easily toggle between the Marquee Zoom tool and the Dynamic Zoom tool using a modifier key. When the Marquee Zoom tool is selected, press the Shift key and the tool changes to the Dynamic Zoom tool. Release the Shift key and you return back to the Marquee Zoom tool.
If you use other Adobe programs, such as Adobe Photoshop, Adobe Illustrator, or Adobe InDesign, you know about the Navigator palette. In Acrobat Professional, the Loupe tool works similarly to the Navigator palette found in other Adobe programs but with a little twist.
Instead of viewing a complete page in the Loupe Tool window, you see just the zoom level of your selection while the page zoom remains static. This tool can be a great benefit by saving you time to refresh your monitor when you change screen views.
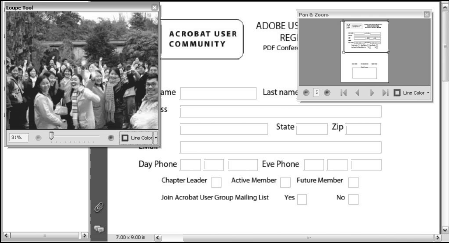
To use the Loupe tool, click in the Select & Zoom toolbar or press Z on your keyboard and then Shift+Z to toggle the Marquee Zoom tool, the Dynamic Zoom tool, and the Loupe tool. Move the cursor to an area on a page you want to zoom to and click the mouse button. The Loupe tool window opens and displays the zoomed area you selected, as shown in Figure below.
You can increase or decrease the magnification of the zoom area by adjusting the slider bar in the Loupe window or clicking the minus or plus symbols in the window. Clicking these symbols offers you smaller incremental changes than when using the same symbols in the Select & Zoom toolbar.
If you want the Loupe tool to show a larger portion, you can resize the Loupe Tool dialog box by grabbing a corner of the box and dragging. When you click in the Document pane with the Loupe tool, a rectangle appears around the area zoomed into the Loupe window .
You can place the cursor inside this rectangle and move it around the Document pane to view different areas at the same zoom level. As you zoom in, the rectangle reduces in size. At some point it would be impractical to select the rectangle on the page.
If you can’t find it, zoom out a little in the Loupe tool window until you see the rectangle on the page. Click and drag it to a new position and you can adjust your zoom. Notice also in Figure above the four handles (squares) on the corners of the rectangle marking the Loupe tool zoom area.
You can drag the handles in or out to zoom in or out, respectively. If you have oversized documents that take a long time to refresh, using the Loupe tool helps speed up your PDF viewing.
You can keep the document page in the Document pane at a reduced view while using the Loupe tool to examine areas in detail, which won’t necessitate screen refreshes. The Loupe window displays the zoom level on an open document and remains fixed to that document until you target a new area.
When you have multiple documents open, you can zoom in on one document and switch views in the Document pane to another document; the zoom display in the Loupe tool window remains fixed to the original document view. What you wind up with appears as if it’s a picture-in-picture view such as you might see on a television set.
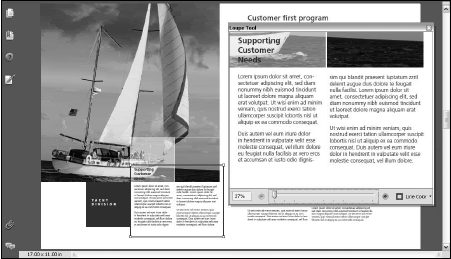
Whereas the Loupe tool displays the zoom view in its own window and the page in the Document pane remains static, the Pan & Zoom Window works in the opposite manner. The zoom level changes on the page in the Document pane while the original page view remains static in the Pan & Zoom Window.
The zoom area is highlighted with a red rectangle in the Pan & Zoom Window. You can change the default red color of the zoom rectangle by opening the Line Color pull-down menu in the window and choosing from preset colors or choosing a custom color. To use the Pan & Zoom Window, select the tool from the Zoom toolbar.
The window displays a full page with the red rectangle showing the zoom area. If you open the Pan & Zoom Window when your PDF page is in Fit Page view, the page and the red rectangle are the same size.
To zoom a view in the Pan & Zoom Window, select one of the four handles on a corner of the rectangle and resize the rectangle by dragging in or out to zoom in or out, respectively. The page thumbnail view in the Pan & Zoom Window remains the same size while the rectangle is sized, as shown in Figure below. .
Also contained in the Pan & Zoom Window are navigation buttons. You can establish a zoom view and then scroll pages in your document with the page tools in the window. As you do so, the page views in the Document pane hold the same zoom level you set in the Pan & Zoom Window.
A few specific differences exist between the Loupe tool and the Pan & Zoom tool that you should know. The Loupe tool targets an area on an open document and the zoom is fixed to that document while it remains open or until you target a new area.
Regardless of the number of files you open, the Loupe tool window displaying your target view stays intact even if another document is brought to the front of the Document pane. If you close a file where the Loupe tool was set to view a zoom, the Loupe tool window clears and displays no view.
The Pan & Zoom tool always shows a target view of the active document brought forward in the Document pane. If you have multiple documents open, open the Pan & Zoom tool, then close a file, the page in view in the next file appears in the Pan & Zoom Window. If you close all files, the Pan & Zoom Window clears.
If you close a file during an Acrobat session, both the Loupe tool and the Pan & Zoom tool return you to the same views. The Pan & Zoom tool displays the opening page at the same zoom level as was last established in the window. The Loupe tool displays the same view last created with the tool.
For example, if you zoom to 200% on page 25 of a file, close the file, and then reopen it, the Loupe tool window displays page 25 at 200% while the Document pane displays the opening page. You can use both tools together to display different views in different documents.
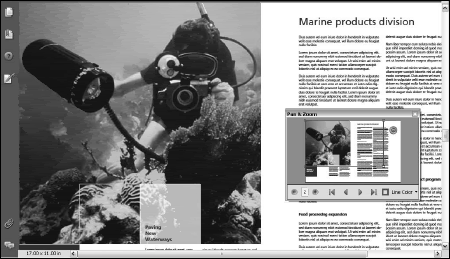
If the page in view in the Loupe window is not the current active document brought forward in the Document pane, you can still manage zooming on the hidden page. Use the slider between the minus/plus symbols to change zoom levels. In Figure below, you can see the Loupe tool and the Pan & Zoom tool used together in different documents.
The Loupe tool shows a zoom view on one page in a document while the Pan & Zoom tool shows a zoom view on a page in another document.
The page views for Actual Size, Fit Width, and Fit Page are static views that you want to access frequently when navigating through a PDF document. Acrobat viewers provide several ways to change a page view. Three tools appear in the Select & Zoom toolbar for toggling different page views. The different views include:
- Actual Size. Displays the PDF page at actual size (a 100 percent view).
- Fit Width. The data on a PDF page are displayed horizontally without clipping. If the page is large and data appear only in the center of the page, the page zooms to fit the data. The white space at the page edges is ignored.
- Fit Page. Displays the page at the maximum size that fits within the viewer Document pane. If the Acrobat viewer window is sized up or down, the Fit Page view conforms to the size of the Document pane.
One of the keyboard shortcuts you’ll want to remember is Ctrl+0 (zero). This enables you to view a page in a Fit Page view. As you browse pages in a PDF document, the page views are specific to the individual pages and not the document. Therefore, scrolling PDF files with different page sizes may require you to frequently change views if you want to see the full page in the Document pane.
By using the keyboard shortcuts, you can reset page views much faster. Page views can be established for the opening page according to user specified zoom views. Setting these attributes was referred to as Open Options in earlier versions of Acrobat. In Acrobat 6 and later, they are referred to as Initial View.


