Converting PDF in Windows
When you install Acrobat Professional or Acrobat Standard, the Adobe PDF printer is installed in your Printers folder. As a printer driver, the file is accessible from any program capable of printing, including your computer accessories and utilities.
Like any other printer you install on Windows 2000 with Service Pak 4, Windows XP Professional, Windows XP Home Edition, or Tablet PC with Service Pak 2, you can set the Adobe PDF printer as the default printer. Once set as the default printer, you don’t need to make a printer selection each time you want to create a PDF document.
You may also have the Acrobat Distiller printer installed in your Printer’s folder. The features associated with the Adobe PDF printer and the Acrobat Distiller printer are identical. To convert any application document to PDF, choose File >> Print or access the Print dialog box with the menu command in your authoring program.
Some dedicated vertical market programs, such as accounting and other office programs, may have print commands located in menus other than the File menu. When you arrive at the Print dialog box, the various printer drivers installed on your computer are shown. Select the Adobe PDF printer in the Print dialog box.
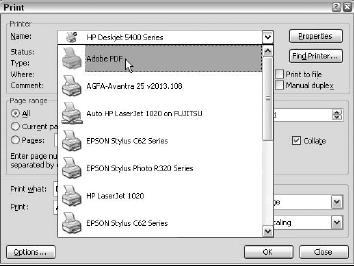
Before printing to the Adobe PDF printer, check your output options by clicking the Preferences button. In Windows 2000 and earlier, you will see Properties appear in the Print dialog box. If you see Properties, click the Properties button. The Adobe PDF Document Properties dialog box opens.
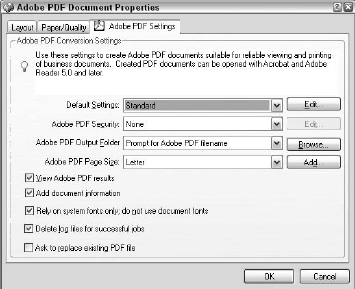
In this dialog box you choose options for the resulting PDF document. Click the Adobe PDF Settings tab to choose the PDF options. Choices you can make about the PDF file and handling the PDF conversion are contained in the Adobe PDF Settings window. Items you’ll want to control include the following:
- Default Settings. This item relates to the discussion in the previous section concerning the Acrobat Distiller Adobe PDF Settings. The choices you have from the pull-down menu are the same nine preset choices (Acrobat Professional) or four choices (Acrobat Standard) provided with your Acrobat installation and any custom settings, if you’ve created them.
It’s important to make the proper choice for the options you want. When you print to the Adobe PDF printer, Acrobat Distiller is used in the background and applies the settings you specify in this dialog box.
- Adobe PDF Security. If you want to password-protect your document, you can apply security settings at the time the PDF is created. Choose the security options from the choices in the pulldown menu. The default choice for None results in PDF documents created without any password protection.
- Adobe PDF Output Folder. Choose to save PDF files to a fixed folder and directory path or be prompted for a filename and directory path for the saved file.
- Adobe PDF Page Size. A pull-down menu offers an extensive list of page sizes derived from the printer driver and not the PPD (PostScript Printer Description file) for your printer. If you don’t have a custom size that matches your document page, click the Add Custom Page button adjacent to the pull-down menu.
The Add Custom Paper Size dialog box opens where you make choices for the custom page size and to add the new page option in the pull-down menu. Acrobat accepts sizes up to 200 × 200 inches (5,080 × 5,080 millimeters/14,400 × 14,400 points).
Enter your new custom page size in the units of measure desired and click the Add/Modify button. Your new page size is added to the Adobe PDF Page Size pull-down menu and selected for you after you click the Add/Modify button.
If you want to delete a page after it has been created, click Add Custom Page in the Printing Preferences dialog box and select the page you want to delete from the Add Custom Paper Size dialog box. Click the Delete button and the page is deleted from both pull-down menus.
Clicking Cancel (or pressing the Esc key) in the dialog box returns you to the Adobe PDF Document Properties dialog box without affecting any changes.
- View Adobe PDF results. When the check box is enabled, the resulting PDF document opens in the Acrobat Document pane. If Acrobat is not open, the program launches after the PDF is created.
- Add document information. This item is a little misleading. You are not prompted in a dialog box to add document information. However, when using applications that support certain kinds of document information such as document title and author, the information from the native document is added to the Document Properties Description fields.
The document properties in your native document are not translated precisely, though. You may have a Word file with custom properties set up in the Word Document Properties dialog box like a Title, Subject, Author, Keywords, and so on.
When the Word file is converted to PDF you’ll find your Title information in Acrobat to be the name of the saved Word file and the Author is your computer log-on name.
Regardless of the custom properties you add to the Document Properties text boxes in Word, the results in Acrobat default to descriptions you can’t control. If you remove the check box for this setting, all the Document Properties Descriptions in the PDF file are blank.
- Rely on system fonts only; do not use document fonts. What this check box does is control whether fonts are put into the PostScript stream that are sent to the Adobe PDF printer. Since 99.9% of the time those fonts are resident on your system, there is no value in having them also embedded in the PostScript stream - it just makes the process of printing to Adobe PDF slower. By default the check box to ON—it’s faster. Leave this setting at the default.
- Delete log files for successful jobs. During PDF creation, the processing information is written to a log file in the form of ASCII text. You can open the log file in any text editor and review the steps used to produce the PDF. Each time a PDF is successfully created, the log file is deleted. In the event you want to review the PDF creation process logged in the text file, disable the check box and open the log file in a text editor.
- Ask to replace existing PDF file. If you elect to not have Acrobat prompt you for a filename, the PDF file is created using the authoring document filename. If you make changes in the document and want to create a new PDF document, the second creation overwrites the first file if the check box is disabled. If you’re creating different versions of PDF files and want to have them all saved to disk, be certain to enable the check box.
After you review all the options in the Adobe PDF Printing Preferences dialog box, click OK. You are returned to the Print dialog box and are ready to create the PDF document. Click Print in the dialog box and the PDF is produced with the options you chose in the Adobe PDF Settings dialog box.
If the check box was enabled for View Adobe PDF results, the PDF opens in Acrobat. Because this method of PDF creation uses a printer driver, you can create a PDF document from virtually any application program. The only requirement is that the program is capable of printing.
If you use programs such as Microsoft Office, other Adobe programs, certain CAD drawing programs, high-end imaging programs, or a host of other applications, you may have other methods for creating PDF documents depending on the level of PDF support for the program.
It is important to understand when to use the Adobe PDF printer and other methods available to you from different applications. Before you integrate using the Adobe PDF printer into your workflow, be certain to review the next articles because they discuss other options for creating PDF documents.


