Importing PDF files into Photoshop
PDF documents may be composed of many different elements depending on the design of the original file. If you design a page in a layout program for which you create text, import Photoshop images, and also import EPS illustrations, the different elements retain their characteristics when converted to PDF.
Text, for example, remains as text, raster images such as Photoshop files remain as raster images, and EPS illustrations remain as EPS vector objects. Although the images, text, and line art may be compressed when distilled in Acrobat Distiller, all the text and line art remain as vector elements.
In Photoshop, if you open an illustration or text created in any program other than Photoshop, the document elements are rasterized and lose their vector-based attributes. Photoshop rasterizes PDF documents much as it does with any EPS file.
In Photoshop, you have several methods of handling PDF imports. PDF documents opened in Photoshop are handled with the File > Open command, File > Place command, File > Import command, and through a File > Automate command. Each of the methods offers different options, so let’s take the methods individually.
Opening PDF files in Photoshop
When you choose File > Open, select a PDF file, click Open and the Import PDF dialog box appears. If your PDF document has multiple pages you can select one, all, or any number of pages to open. Press Ctrl/Ô and click individual page thumbnails in the Import PDF dialog box shown in Figure 1 to select pages in a noncontiguous order.
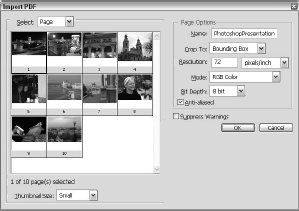
Click the first page, press the Shift key, and click the last page to select all pages. Options choices in the Import PDF dialog box include the following:
- Crop To. There are six choices you can make from the pull-down menu. For Photoshop files, the choices typically show no difference. Files are imported the same size no matter which option you select. The options are more significant when using Adobe InDesign.
- Resolution. The default resolution regardless of the size is 72 ppi. You can choose to supply a user-defined resolution in this dialog box. If the original raster images were at a resolution different from the amount supplied in this dialog box, the images are resampled. Text and line art will be rasterized according to the amount you define in the dialog box without interpolation.
- Mode. Choose a color mode—Grayscale, RGB, CMYK, or Lab color—from the pull-down menu.
- Bit Depth. Choose either 8- or 16-bit for the bit depth. If the PDF contains photos, changing an 8-bit depth file to 16-bit won’t add more data to the file. Any tone adjustments using Photoshop’s Levels and Curves result in the same data loss on 16-bit as you find with 8-bit images, if the original image file(s) was 8-bit.
- Anti-Aliased. Use this option to smooth edges of text, line art, and images that are interpolated through resampling. If you disable this option, text appears with jagged edges. Text in PDF files rasterized in Photoshop looks best when anti-aliased and when the display is more consistent with the original font used when the PDF was created.
- Suppress warnings. Check this box to open the files without your having to respond to any warning dialog boxes that might report problems with the pages.
One problem you may encounter when rasterizing PDF documents in Photoshop is maintaining font integrity. Photoshop displays a warning dialog box when it encounters a font that is not installed on your system, which presents problems when you attempt to rasterize the font.
If such a problem exists, the font can be eliminated from the document or changed after you open the file in Photoshop and edit the type layer. When files are password-protected, users are prevented from opening a PDF file in Photoshop or any other application without a password to open the file. If you attempt to open a secure document, an alert dialog box opens prompting you for a password.
Placing PDF files in Photoshop
Instead of opening a PDF file through the File > Open command, you can use File > Place to add a PDF to an open Photoshop document. Placing PDFs in all versions of Photoshop prior to CS2 rasterized the placed file. In Photoshop CS2, placed PDF files retain all vector attributes. When you select Place, the Place PDF dialog box opens, as shown in Figure 2.
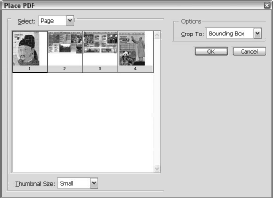
The file appears within a bounding box containing handles in each corner, as shown in Figure 3.

Click and drag a handle to resize the placed image. You can size the image up or down in the Photoshop document window. When finished scaling, press the Enter (Windows) or Return (Macintosh) key. Pressing the key does not rasterize the file. All vector attributes are retained.
Using comments in Photoshop
Photoshop supports the use of Comment tools. You can create a note or sound attachment in Photoshop much like you do in Acrobat. The comment is an object and won’t be rasterized with any other Photoshop data. You can delete the annotation at any time by selecting the Note icon or Attach Sound icon and pressing the Backspace (Windows) or Delete (Macintosh) key.
You can also import comments from PDF files into Photoshop. You must use the Comment Note tool because Photoshop does not support the other comment types available in Acrobat. If a Note is contained in a PDF document and you want to import the Note into Photoshop, choose File > Import > Annotations. Photoshop can import an annotation only from PDF formatted files.


