Setting Custom Page Sizes in PDF
The most common page size and output for Word files is standard letter or A4 page sizes that are printed to desktop printers. On occasion, documents are created for output to commercial printing equipment. Manuals, reports, books, and more are sometimes designed for printing on commercial printing machines for offset press or on demand printing.
A few problems arise when Word files are created for this kind of output. The first problem is outputting documents using nonstandard page sizes. If you set up a document for a 7 × 9–inch page size for example, Word doesn’t have a matching page size available in the print dialog box.
As a result, you need to create a custom page size to format the document and print the custom formatted page size. Second, files need to be printed with crop marks so the print shop knows where to cut the paper when it comes off press. As a word processor, Word is not designed for use as a page layout program.
Professional layout programs such as Adobe InDesign have all the tools and features you need to print documents with crop marks and other attributes designed for output on commercial printing equipment.
One solution is to take the Word document and import it into a program such as Adobe InDesign. But doing so requires a lot of work on your part. You have to reformat the document for a custom page size before you can print it. Fortunately, there’s a much easier way.
You can format the document in Word with a custom page size, export to PDF using PDFMaker, and use Acrobat to create the necessary crop marks and make the file print-ready.
The steps for setting up custom page sizes differ a little between Windows and the Macintosh. Let’s first take a look at creating custom pages on Windows, and then I’ll move on to creating custom page sizes on the Mac.
On Windows
On Windows you have two different ways to configure Word for formatting and printing custom page sizes. You can use the Page Setup dialog box in Word to create a custom page size or you can add a custom page size to your printer driver.
Adding a custom page size to the printer driver makes that page size available to all applications using the driver. Creating the custom page size in Word limits the page size to Word files. For a more flexible use, create a custom page size in the Adobe PDF printer driver and you’ll have the page size available for use with all applications.
Here’s how to do it:
- Open the Adobe PDF Properties. From the Start menu select Settings >> Printers and Faxes. You should see icons for all printing devices installed on your computer when the Printers and Faxes window opens. Among the printer drivers, you’ll find the Adobe PDF printer driver.
Select this driver and either select File >> Properties in the Printers and Faxes window or right-click the Adobe PDF driver to open a context menu and select Properties.
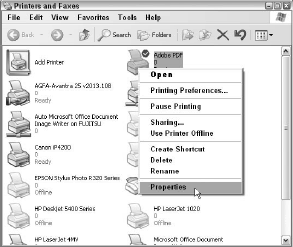
- The Adobe PDF Properties dialog box opens. Note that the default tab selected in the Adobe PDF Properties dialog box is the General tab.
- Open the Printing Preferences. In the Adobe PDF Properties dialog box, click the Printing Preferences button. The Adobe Printing Preferences dialog box opens. In this dialog box, click Adobe PDF Settings.
- Add a new custom page size. Click the Add button and the Add Custom Paper Size dialog box opens.
- Edit the Custom Page Size. Type the width and height values in the Width and Height text boxes and select the unit of measure from the three choices in the Unit section of the dialog box. Type a name for the custom paper size in the Paper Name text box. Use a name that defines the page size.
- Save the new custom page size. Click the Add/Modify button in the Add Custom Paper Size dialog box and you return to the Adobe PDF Printing Preferences dialog box. Click OK and your new custom page size is available each time you use the Adobe PDF printer driver.
- Set up a Word document with a custom page size. Open Microsoft Word and open a file or create a new document. Select File >> Page Setup. In the Page Setup dialog box click Paper and from the Paper size pull-down menu select the custom page size you created. Your Word document will be reformatted for the new custom page size.
- Convert to Adobe PDF. Click the Convert to Adobe PDF tool in the Word Toolbar Well. If you enabled View Adobe PDF result in the Acrobat PDFMaker Settings tab, the resulting PDF opens in Acrobat.
Creating custom page sizes is particularly important for programs such as Microsoft Visio, Microsoft Project, and AutoCAD where non-standard sizes are commonly used. Acrobat supports a page size of up to 200 inches square. Make certain you have the proper page size defined for the Adobe PDF printer before attempting to Convert to Adobe PDF.
On Macintosh
The process for creating custom page sizes on the Mac is much the same as on Windows, but the dialog boxes are a little different. For custom page size creation on the Mac, use the following steps:
- Open Microsoft Word. You can create a custom page size on the Mac from within any program. Because we’re talking about Word here, I’ll use Word as my starting point with a document open in the Word window that I want to reformat for a custom page size.
- Open the Page Setup dialog box. Select File >> Page Setup to open the Page Setup dialog box. In the Page Setup dialog box select Adobe PDF 8.0 from the Format for pull-down menu. Open the Paper Size pull-down menu and select Manage Custom Sizes. Making the menu selection for Manage Custom Sizes automatically opens the Custom Page Sizes dialog box.
- Create a new custom page size. Click the plus (+) symbol in the lower-left corner of the dialog box. Your new paper size is listed as Untitled. Double-click Untitled in the list to select the name, and type a descriptive name for your new page size. My preference is to use the paper sizes for names. Type the Width and Height values in the text boxes up in the top-right corner of the Custom Page Size dialog box.
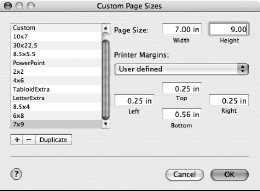
- Use a custom page size. Click OK in the Custom Page Sizes dialog box and you return to the Page Setup dialog box. Select the Adobe PDF 8.0 printer and your new page size in the Paper Size pull-down menu. Your document is then reformatted for the custom page size.
- Export to PDF. Click the Convert to Adobe PDF tool and your Word file is converted to PDF using the new custom page size.
If you begin with a document created on a standard letter page size or another page size and reformat the document to fit on another page size, you should review all document pages. As the document is reformatted you may find page breaks, headers and footers, tables, and other document elements needing some adjustments before converting to PDF.

