Creating PDF Presentations
All the features for Photoshop discussed thus far are derived from the top-level menu commands directly in Photoshop. You can also use Adobe Bridge to convert image files to PDF. Among options you find in Adobe Bridge is a command for converting image files to a PDF Presentation.
In the Bridge window you can select files to choose in your presentation, invoke a menu command and Photoshop does the work to create a presentation complete with slide transitions and user defined time intervals. If you have Photoshop you also have Adobe Bridge. Open Adobe Bridge and follow the steps below to create a presentation.
- Select image files to include in a PDF Presentation. Open Adobe Bridge and open the folder containing images you want to include in a presentation. You can add files from other folders, but your task is a little easier if you first copy all the files you want to include in the presentation to a common folder.
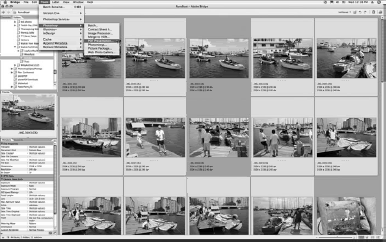
- Select Tools > Photoshop > PDF Presentation. With the files selected in the Bridge window, open the menu command, as shown in Figure 3.
- Set the Presentation attributes. The PDF Presentation dialog box opens. Click Presentation for the Output Options and make a choice for the time interval for advancing slides by editing the Advance Every text box.
If you want the presentation to run in a continuous loop, check Loop after last page. If you want transitions, select a transition effect from the Transition pull-down menu. Note that you can also click the Browse button if you want to add more files to your presentation than those viewed in the Bridge window.
- Save the Presentation. Click Save and the Save Adobe PDF dialog box opens. Adjust settings as you like in the various panes in the dialog box.
You might want to use some image downsampling in the Compression pane if you build a presentation from images taken with a digital camera. If you shot Camera Raw files with a camera of five or more megapixels, use the Compression options for lowering image resolution.
- View the presentation. Click Save and Photoshop opens each image, samples the image, and converts to PDF. When the save is completed, open the file in Acrobat. Your presentation appears in Full Screen mode and slides change according to the interval specified in Step 3.

