Adobe Premiere’s Windows
A video production is a multifaceted undertaking. In one production, you may need to capture video, edit video, and create titles, transitions, and special effects. Premiere’s windows help keep these tasks separated and organized for you.
Because the History, Navigator, Video/Audio Effects, and Transitions windows float above all other windows, they are treated separately in the section about Premiere palettes. Although Premiere’s primary windows open automatically onscreen from time to time, you may wish to close one of them.
To close a window, simply click on its close box (Windows users: click on the close window X icon). If you try to close the Project window, Premiere assumes that you want to close the entire project, and prompts you to save your work before closing.
If you wish to open the Timeline, or Monitor or Audio Mixer windows, open the Window menu, then click on the Window Name. The size and elements that actually appear in the Project, Timeline, and Monitor windows can be changed to suit your specific production needs.
For instance, you can choose to show filenames instead of icons in the Timeline. To change default settings, choose Window»Window Options. Then choose whether you wish to change options for the Project, Timeline, Monitor, or Audio windows.
If you have your windows and palettes set up in specific positions at specific sizes, you can save this configuration by choosing Window»Workspace Save. After you name your workspace and save it, the name of the workspace appears in the Window»Workspace submenu.
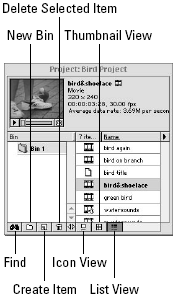
Any time you wish to use that workspace, simply click its name. If you’ve ever worked on a project with many clips and production elements, you’ll soon appreciate Premiere’s Project window, which is shown in Figure below.
The Project window provides a quick bird’s-eye view of your production elements, and enables you to preview a clip right from the project window.
To keep your production materials well organized, you can create bins to store similar elements. For instance, you might create a bin for all sound elements, or a bin for all interview clips.
If the bin gets stuffed, you can see more elements at one time by switching from the default thumbnail view to list view, which lists each item, but doesn’t show a thumbnail image.
The Timeline shown in Figure 2 is the foundation of your video production. It provides a graphic and temporal overview of your entire project.
Fortunately, the Timeline is not for viewing only—it’s interactive. Using your mouse, you can quickly begin building your production by dragging video and audio clips, graphics, and titles from the Project window to the Timeline. 
By using Timeline tools, you can rearrange the clips, cut them, and extend them. By clicking and dragging on the work area markers at either end of the work area bar—the yellow bar at the top of the Timeline—you can control what area of the Timeline Premiere previews or exports.
The thin, colored bar beneath the work area bar indicates whether a preview file for the project exists: red indicates no preview exists; green indicates a video preview has been created.
If an audio preview exists, a thinner, light-green bar appears. The Timeline also includes icons for hiding or viewing tracks. Click the Eye icon to hide a track while you preview your production; click it again to make the track visible.
Clicking the Speaker icon turns audio tracks on and off. The icons in the top-left corner are editing tools that you can use to quickly edit scenes.
For instance, you can click the Razor Blade tool over a video or audio segment to cut it, and then click the Selection tool to select and move the segments apart.
At the bottom of the window, the Time Zoom Level pop-up menu enables you to change the time interval that appears on the Timeline.
For example, if you choose one frame as the zoom level, each video frame of your clip appears as a block in the clip. If you want your production to consume less Timeline space, choose to view the Timeline in seconds or minutes.
