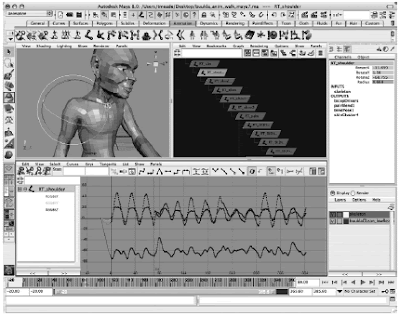
Maya Interface - The Workspace

The Channel Box appears on the right side of the UI. This type of window layout may suit the needs of an animator pretty well. In this example, the RT_shoulder object is selected. Its transform node is displayed in its hierarchy in the Hypergraph while the animation data for the object is displayed in the Graph Editor.
With all of these panels available, an animator can select objects in the Perspective view window or the Hypergraph and use the Perspective view, Graph Editor, and Channel Box to analyze or make edits to the animation data. The Channel Box lets you view, edit, and keyframe all of the keyable attributes on any node of the object that is selected.
A keyable attribute is an attribute that a keyframe can set on to enable that attribute to be animated. You will soon learn that most nodes contain a lot more attributes than those displayed in the Channel Box. However, by default, only certain attributes are set up to be animatable.
You can edit the values for the attributes in the Channel Box in two ways. You can click in the field containing the current value, type in a new value, and press ENTER (RETURN). Or you can click the attribute’s name in the Channel Box to highlight it, and then middle-mousebutton- drag (MMB-drag from here on) anywhere in the view window. The value will change as if it were being controlled by an invisible or virtual slider.
Just below the Channel Box is the Layer Editor. You can use the Layer Editor to organize your scene by grouping objects into layers. Layering provides you with a quick and easy way to hide or show groups of objects by making a layer invisible or visible, or by making it renderable or unrenderable.
What happens depends on whether the objects are grouped to a display layer or to a render layer. Click the Create New Layer button in the Layer Editor to create a new layer. Each layer is named and listed in the Layer Editor.
Click the boxes to the left of the layer name to turn on or off the visibility of the layer (V) and to cycle through Selectable (the blank box), which makes the layer selectable, Template (T), in which the object can be seen as a wireframe and is not selectable, and Reference (R), in which the object can be seen as shaded and can be rendered but is not selectable.
You can double-click a layer in this list to bring up that layer’s Properties window. This window lets you rename the layer and assign a color to it. When a color is assigned to a layer, the objects in that layer will display their wireframe in that color in the view window. This does not, however, have any effect on the rendered color of any object.
The Time Slider and the Range Slider
You can scrub through an animation by clicking and dragging the Time Slider along the timeline. To play the animation forward or in reverse, you can use the DVD-like playback controls (the usual arrow buttons). You can set the total length of the animation by keying in the start and end times in their respective fields.
The Range Slider sets the range of frames that will be displayed in the Time Slider. Use the Range Slider to limit how much of the total animation time you want to play back. This is especially helpful when you want to work on a small section of a longer animation.
The Command Line and Script Editor Button
You use the command line near the bottom of the Maya window, shown next, to type in Maya Embedded Language (MEL) commands. If you are more of a programmer type than an artist type, the command line is a real plus. You type the commands on the left side, and any error message or feedback is displayed at the right.
The tiny box icon to the right of the feedback line is the Script Editor button, which lets you create and edit long MEL scripts. The Script Editor also shows all the errors and warnings for a particular piece of script.
The Help Line
The light-gray bar across the bottom of the Maya window is the help line, shown next. If you move your mouse cursor around Maya’s user interface, the help line displays what each part of the interface does. When you use actions and tools, the help line tells you which tool you are using and what you should do next.
The Hotbox
If you hold down the SPACEBAR, the Hotbox will open. The Hotbox is a group of menus that provides an easy-to-access interface that you can place anywhere on your screen. The Hotbox is highly customizable to meet your particular needs.
You can click Hotbox Controls in the Hotbox and then choose Show All to show all the menus available in Maya at once. Because you can potentially access all of Maya’s tools and commands from the Hotbox, you could conceivably hide all of the other interface elements by choosing Display | UI Elements and disabling all of the checked items in that list. This means that you could display just the Workspace and nothing else.