Handling Common Windows Troubleshooting
Computers aren’t perfect. It’s possible—although unlikely—that at some point in time, something will go wrong with your PC. It might refuse to start, it might freeze up, it might crash and go dead. Yikes!
When something goes wrong with your computer, there’s no need to panic. (Even though that’s what you’ll probably feel like doing.) Most PC problems have easy-to-find causes and simple solutions. The key thing is to keep your wits about you, and attack the situation calmly and logically.
No matter what kind of computer-related problem you’re experiencing, there are six basic steps you should take to track down the cause of the problem. Work through these steps calmly and deliberately, and you’re likely to find what’s causing the current problem—and then be in a good position to fix it yourself:
- Don’t panic!—Just because there’s something wrong with your PC is no reason to fly off the handle. Chances are there’s nothing seriously wrong. Besides, getting all panicky won’t solve anything. Keep your wits about you and proceed logically, and you can probably find what’s causing your problem and get it fixed.
- Check for operator errors—In other words, something you did wrong. Maybe you clicked the wrong button, or pressed the wrong key, or plugged something into the wrong jack or port. Retrace your steps and try to duplicate your problem. Chances are the problem won’t recur if you don’t make the same mistake twice.
- Check that everything is plugged into the proper place and that the system unit itself is getting power—Take special care to ensure that all your cables are securely connected—loose connections can cause all sorts of strange results.
- Make sure you have the latest versions of all the software installed on your system—While you’re at it, make sure you have the latest versions of device drivers installed for all the peripherals on your system.
- Try to isolate the problem by when and how it occurs—Walk through each step of the process to see if you can identify a particular program or driver that might be causing the problem.
- When all else fails, call in professional help—If you think it’s a Windows-related problem, contact Microsoft’s technical support department. If you think it’s a problem with a particular program, contact the tech support department of the program’s manufacturer.
If you think it’s a hardwarerelated problem, contact the manufacturer of your PC or the dealer you bought it from. (And don’t rule out where you purchased the computer—many computer dealers have helpful tech support departments.) The pros are there for a reason—when you need technical support, go and get it.
Using Windows Troubleshooters
Windows includes several interactive utilities that can help you diagnose and fix common system problems. These utilities are called Troubleshooters, and they walk you step-by-step through a series of questions. All you have to do is answer the questions in the Troubleshooter, and you’ll be led to the probable solution to your problem.
To run a Troubleshooter, open the Start menu and select Help and Support. In Windows Vista, click the Troubleshooting icon; in Windows XP, click the Fixing a Problem link.
When the next screen appears, click the link for the type of problem you’re having, and then click the link to start a specific Troubleshooter. All you have to do now is follow the interactive directions to troubleshoot your particular hardware problem.
Troubleshooting in Safe Mode
If you’re having trouble getting Windows to start, it’s probably because some setting is set wrong or some driver is malfunctioning. The problem is, how do you get into Windows to fix what’s wrong, when you can’t even start Windows?
The solution is to hijack your computer before Windows gets hold of it and force it to start without whatever is causing the problem. You do this by watching the screen as your computer boots up and pressing the F8 key just before Windows starts to load. This displays the Windows startup menu, where you select Safe mode.
Safe mode is a special mode of operation that loads Windows in a very simple configuration. Once in Safe mode, you can look for device conflicts, restore incorrect or corrupted device drivers, or restore your system to a prior working configuration.
What to Do When Windows Freezes
Probably the most common computer trouble is the freeze-up. That’s what happens when your PC just stops dead in its tracks. The screen looks normal, but nothing works—you can’t type onscreen, you can’t click any buttons, nothing’s happening.
If your system happens to freeze up, the good news is that there’s probably nothing wrong with your computer hardware. The bad news is that there’s probably something funky happening with your operating system.
This doesn’t mean your system is broken. It’s just a glitch. And you can recover from glitches. Just remember not to panic and to approach the situation calmly and rationally.
What Causes Windows to Freeze?
There can be many different causes of a Windows freeze, including the following:
- You might be running an older software program or game that isn’t compatible with your version of Windows. If so, upgrade the program.
- A memory conflict might exist between applications, or between an application and Windows itself. Try running fewer programs at once, or running problematic programs one at a time to avoid potential memory conflicts.
- You might not have enough memory installed on your system. Upgrade the amount of memory in your PC.
- You might not have enough free hard disk space on your computer. Delete any unnecessary files from your hard drive.
- Your hard disk might be developing errors or bad sectors. Check your hard disk for errors.
Dealing with Frozen Windows
When Windows freezes, you need to get it unfrozen and up and running again. The way to do this is to shut down your computer. You may be able to do this by pressing Ctrl+Alt+Del to display the Windows Task Manager, and then selecting Shut Down from the toolbar.
If that doesn’t work, press and hold down the power button on the front of your PC’s system unit until your system shuts off. You can then start up your computer again; chances are everything will be working just fine this time around.
If your system crashes or freezes frequently, however, you should call in a pro. These kinds of problems can be tough to track down by yourself when you’re dealing with Windows.
Dealing with a Frozen Program
Sometimes Windows works fine but an individual software program freezes. Fortunately, Windows XP is an exceptionally safe environment. When an individual application crashes or freezes, it seldom messes up your entire system.
You can use a utility called the Windows Task Manager to close the problem application without affecting other Windows programs. When a Windows application freezes or crashes, press Ctrl+Alt+Del; this opens the Windows Task Manager, shown in Figure below.
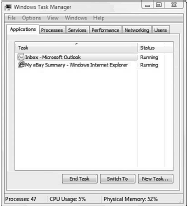
Select the Applications tab and then select the frozen application from the list.
Now click the End Task button. After a few seconds, a Wait/Shutdown window appears; confirm that you want to shut down the selected application; then, click the End Task button.
This closes the offending application and lets you continue your work in Windows.
If you have multiple applications that crash on a regular basis, the situation probably can be attributed to insufficient memory. See your computer dealer about adding more RAM to your system.
Dealing with a Major Crash
Perhaps the worst thing that can happen to your computer system is that it crashes—completely shuts down, without any warning. If this happens to you, start by not panicking. Stay calm, take a few deep breaths, and then get ready to get going again.
You should always wait about 60 seconds after a computer crashes before you try to turn on your system again. This gives all the components time to settle down and— in some cases—reset themselves. Just sit back and count to 60 (slowly), then press your system unit’s “on” button.
Nine times out of ten, your system will boot up normally, as if nothing unusual has happened. If this is what happens for you, great! If, on the other hand, your system doesn’t come back up normally, you’ll need to start troubleshooting the underlying problem.
Even if your system comes back up as usual, the sudden crash might have done some damage. A system crash can sometimes damage any software program that was running at the time, as well as any documents that were open when the crash occurred. You might have to reinstall a damaged program or recover a damaged document from a backup file.
Undoing the Damage with System Restore
Perhaps the best course of action when your system crashes is to use Microsoft’s System Restore utility. This utility can automatically restore your system to the state it was in before the crash occurred—and save you the trouble of reinstalling any damaged software programs. It’s a great safety net for when things go wrong.
Setting System Restore Points
System Restore works by monitoring your system and noting any changes that are made when you install new applications. Each time it notes a change, it automatically creates what it calls a restore point. A restore point is basically a “snapshot” of key system files just before the new application is installed.
Just to be safe, System Restore also creates a new restore point after every 10 hours of system use. You can also choose to manually create a new restore point at any moment in time. It’s a good idea to do this whenever you make any major change to your system, such as installing a new piece of hardware.
To set a manual restore point, follow these steps:
- Click the Start button to display the Start menu.
- Select All Programs, Accessories, System Tools, System Restore to open the System Restore window.
- Select Create a Restore Point and click Next.
- You are prompted to enter a description for this new restore point; do this.
- Click the Create button.
That’s all you have to do. Windows notes the appropriate system settings and stores them in its System Restore database.
Restoring Your System
If something in your system goes bad, you can run System Restore to set things right. Pick a restore point before the problem occurred (such as right before a new installation), and System Restore will then undo any changes made to monitored files since the restore point was created. This restores your system to its preinstallation— that is, working—condition.
To restore your system from a restore point, follow these steps:
- Click the Start button to display the Start menu.
- Select All Programs, Accessories, System Tools, System Restore to open the System Restore window.
- When the System Restore window appears, as shown in Figure below, you can choose to restore to Windows’ recommended restore point or to a different restore point. Make your choice and click Next.
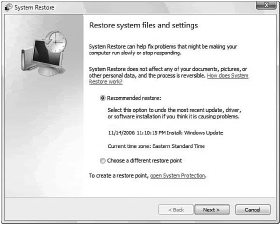
- If you select Choose a Different Restore Point, you are presented with a list of available restore points. Make your choice and click Next.
- When the confirmation screen appears, click the Finish button.
Windows now starts to restore your system. You should make sure that all open programs are closed because Windows will need to be restarted during this process. When the process is complete, your system should be back in tip-top shape.
Note, however, that it might take a half-hour or more to complete a system restore—so you’ll have time to order a pizza and eat dinner before the operation is done!

