Installing New Hardware to Windows System
If you just purchased a brand-new, right-out-of-the-box personal computer, it probably came equipped with all the components you could ever want—or so you think.
At some point in the future, however, you might want to expand your system—by adding a second printer, a scanner, an external hard drive, better speakers, a different keyboard, or something equally new and exciting. Adding new hardware to your system is relatively easy if you know what you’re doing.
Most Popular Hardware
When it comes to adding stuff to your PC, what are the most popular peripherals? Here’s a list of hardware you can add to or upgrade on your system:
- Hard drive—To add more storage capacity to your system, or to perform periodic backups from your main hard disk. You can add either an internal hard drive (inside your PC’s system unit) or an external model. (External hard drives are easiest to add and are great for backing up your data; they connect to your PC via either USB or FireWire cable and cost just a few hundred bucks.)
- Memory card reader—So you can read data from devices (such as digital cameras) that use various types of flash memory cards.
- USB memory device—To provide gigabytes of removable storage; you can transport the USB memory device from one computer to another, connecting to each PC’s USB port.
- Monitor—To upgrade to a larger viewing area or even to a widescreen display— great for viewing DVD movies.
- Video card—To display higher-resolution pictures and graphics, provide smoother playback with visually demanding PC games, or power a second monitor for some high-end programming or development activities.
- Sound card—To improve the audio capabilities of your systems; this is particularly important if you’re playing state-of-the-art PC games, listening to CDs or MP3 files, watching surround-sound DVD movies, or mixing and recording your own digital audio.
- Speakers—To upgrade the quality of your computer’s sound system. (Surround-sound speaker systems with subwoofers are particularly popular.)
- Keyboard—To upgrade to a more ergonomic or wireless model.
- Mouse—To upgrade to a different type of controller (such as a trackball), a more fully featured unit, or a wireless model.
- Joystick or other game controller—To get better action with your favorite games.
- Broadband modem—To obtain high-speed DSL or cable Internet service.
- CD-R/RW drive (burner)—To add recordable/rewritable capabilities to your system.
- DVD—To add DVD capability to your system. (DVD drives can also play CDs.)
- DVD-R/RW (burner)—To burn your own DVD movies or to back up entire hard disks. (DVD burners can also be used to burn CDs, so you don’t need two separate burners in your system.)
- Printer—To improve the quality of your printouts, to add color to your printouts, or to add photo-quality printing to your system. You can even add specialty label printers, which are great if you do a lot of mailing or eBay shipping.
- Scanner—So that you can scan photographs and documents into a digital format to store on your computer’s hard drive.
- PC camera—So that you can send real-time video to friends and family or create your own Webcam on the Internet.
- Network card—So that you can connect your computer to other computers in a small home network.
- Wireless router—So that you can create a wireless network in your home— and share your broadband Internet connection among multiple computers.
- Wireless network adapter—So that you can connect your computer to any wireless network.
- Digital media server—To connect your PC to your home audio system so that you can listen to digital audio files and Internet radio on your home system.
- Media Center extender—Another way to listen to your PC’s music on your home audio system—or even share recorded TV shows.
PC System Ports
Everything that’s hooked up to your PC is connected via some type of port. A port is simply an interface between your PC and another device—either internally (inside your PC’s system unit) or externally (via a connector on the back of the system unit).
Internal ports are automatically assigned when you plug a new card in to its slot inside the system unit. As for external ports, many types are available—each optimized to send and receive specific types of data. Different types of hardware connect via different types of ports. The most common types of external ports are shown below:
Adding New External Hardware
The easiest way to add a new device to your system is to connect it externally—which saves you the trouble of opening your PC’s case.
Connecting Via a USB or FireWire Port
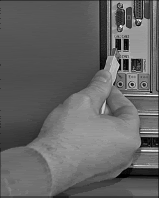
The most common external connector today is the USB port. USB is a great concept (and truly “universal”) in that virtually every type of new peripheral comes in a USB version. Want to add a second hard disk? Don’t open the PC case; get the USB version.
Want to add a new printer? Forget the parallel port; get the USB version. Want to add a wireless network adapter? Don’t bother with Ethernet cards; get the USB version. USB is popular because it’s so easy to use.
When you’re connecting a USB device, not only do you not have to open your PC’s case, but also you don’t even have to turn off your system when you add the new device. That’s because USB devices are hot swappable. That means you can just plug the new device in to the port, and Windows will automatically recognize it in realtime.
The original USB standard, version 1.1, has been around for awhile and, if your PC is more than four or five years old, is probably the type of USB you have installed. The newer USB 2.0 protocol is much faster than USB 1.1 and is standard on all newer computers.
For what it’s worth, newer USB 2.0 ports are fully backward compatible with older USB 1.1 devices. You want to use newer USB 2.0 connections when you’re installing devices that transfer a lot of data, such as external hard drives. And let’s not forget FireWire.
Like USB devices, FireWire devices are hot-swappable, and very easy to connect. Like USB 2.0, FireWire is a very fast standard, which makes it ideal for connecting devices that move a lot of data, such as hard drives and camcorders. (It’s also a little more expensive, which is why USB is still preferred for most devices.)
To connect a new USB or FireWire device, follow these steps:
- Find a free USB or FireWire port on your system unit and connect the new peripheral.
- Windows should automatically recognize the new peripheral and either install the proper device driver automatically or prompt you to provide a CD or disk containing the driver file. Follow the onscreen instructions to finish installing the driver.
That’s it! The only variation on this procedure is if the peripheral’s manufacturer recommends using its own installation program, typically provided on an installation CD. If this is the case, follow the manufacturer’s instructions to perform the installation and setup.
Connecting Via a Parallel or Serial Port
Connecting a new device to a parallel or serial port is slightly more involved than using USB or FireWire. These ports are not hot-swappable, which means that you have to turn off your system first, connect the new device, and then restart your system. Follow these steps:
- Close Windows and turn off your computer.
- Find an open port on the back of your system unit and connect the new peripheral.
- Restart your system.
- As Windows starts, it should recognize the new device and either install the proper drivers automatically or ask you to supply the device drivers (via CDROM or disk).
- Windows installs the drivers and finishes the startup procedure. Your new device should now be operational.
Adding New Internal Hardware
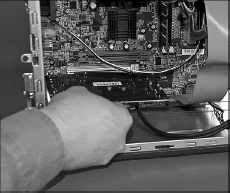
Adding an internal device—usually through a plug-in card—is much more difficult than adding an external device primarily. That’s because you have to use a screwdriver and get “under the hood” of your system unit. Other than the extra screwing and plugging, however, the process is much the same as with external devices.
Follow these steps to add a new card to your system:
- Turn off your computer, and unplug the power cable.
- Take the case off your system unit, per the manufacturer’s instructions
- If the new card has switches or jumpers that need to be configured, do this before inserting the card into your system unit.
- Find an open card slot inside the system unit and insert the new card according to the manufacturer’s instructions.
- After the card is appropriately seated and screwed in, put the case back on the system unit, plug back in the power, and restart your system.
- After Windows starts, it should recognize the new device and automatically install the appropriate driver.
Connecting Portable Devices
These days, a lot of the devices you connect to your PC really aren’t computer peripherals. Instead, these are gadgets that you use on their own but plug in to your PC to share files.
What kinds of portable devices are we talking about? Here’s a short list:
- Portable music players, such as Apple’s popular iPod player.
- Digital cameras.
- Digital camcorders.
- USB keychain memory devices.
- Personal digital assistants (PDAs), such as Palm and Pocket PC devices.
Most of these devices connect to a USB port on your PC; some camcorders use a FireWire connection instead. As you remember, both USB and FireWire ports are hotswappable, which means that all you have to do is connect the device to the proper port—no major configuration necessary.
In most cases, the first time you connect your device to your PC, you’ll need to run some sort of installation utility to install the device’s software on your PC’s hard drive. Each subsequent time you connect the device, your PC should recognize it automatically and launch the appropriate software program.
Once your portable device is connected to your PC, what you do next is up to you. Most of the time, you’ll be transferring files either from your PC to the portable device, or vice versa. Use the device’s software program to perform these operations, or use Windows Explorer to copy files back and forth.
For example, you can use a USB memory device as a removable and portable memory storage system. One of these USB drives is smaller than a pack of chewing gum and can hold several gigabytes worth of data in electronic flash memory.
Plug a USB memory device into your PC’s USB port, and your PC recognizes it just as if it were another disk drive. You can then copy files from your PC to the USB drive to take your work (or your digital music or photo files) with you. For more detailed information, see the instructions that came with your portable device.


