Using Microsoft Word
When you want to write a letter, fire off a quick memo, create a report, or create a newsletter, you use a type of software program called a word processor. For most computer users, Microsoft Word is the word processing program of choice.
Word is a full-featured word processor, and it’s included with Microsoft Office and many versions of Microsoft Works. You can use Word for all your writing needs—from basic letters to fancy newsletters, and everything in between. Word isn’t the only word processor out there, of course.
For very basic word processing, the Works Word Processor included in Microsoft Works is often adequate. And if you’re not a Microsoft fan, Corel’s WordPerfect offers the same kind of professional features you find in Microsoft Word, and works in a similar fashion.
But it you want maximum document compatibility with your friends, family, and co-workers, Word is the way to go.
Microsoft Word Interface
Before we get started, let’s take a quick tour of the Word workspace—so you know what’s what and what’s where.
You start Word either from the Windows Start menu (with Word 2007, select Start, All Programs, Microsoft Office, Microsoft Office Word 2007; with Word 2003, select Start, All Programs, Microsoft Word) or, if you’re using Microsoft Works (with Word installed), from the Works Task Launcher.
When Word launches, a blank document appears in the Word workspace.
What’s New in Word 2007
When you open a new document in Word 2007, you see a document contained within a workspace. The key features of the workspace, shown in Figure 15.1, include:
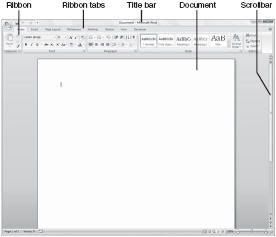
- Title bar—This is where you find the filename of the current document, as well as buttons to minimize, maximize, and close the window for the current Word document.
- Ribbon—In Word 2007, Microsoft has abandoned the traditional menus, toolbars, and sidebars found in previous versions of the program.
Instead, it puts all of its functions on what it calls the Ribbon, which is a collection of buttons and controls that run along the top of the Word workspace. Different tabs on the Ribbon display different collections of functions.
- Document—This main space displays your current Word document.
- Scrollbars—The scrollbar at the bottom of the page lets you scroll left and right through the current page; the scrollbar along the side of the workspace lets you scroll through a document from top to bottom.
What’s New in Word 2003
If you’re using Word 2003, the previous version of the program, the workspace looks a bit different. For one thing, there’s no Ribbon; all the functions are found on traditional pull-down menus, toolbars, and a useful sidebar found on the right side of the screen.
Figure 2 details the parts of the Word 2003 workspace, includes many of the same elements found in Word 2007, along with the following unique elements:
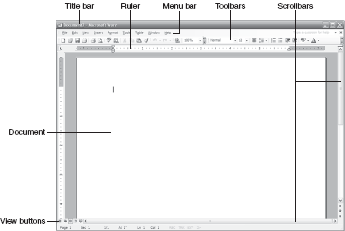
- Menu bar—This collection of pull-down menus contains virtually all of Word 2003’s commands. Use your mouse to click a menu item, and then the menu pulls down to display a full range of commands and options.
- Toolbars—By default, two toolbars— Standard and Formatting—are docked at the top of the workspace, just underneath the menu bar. Word 2003 includes a number of different toolbars that you can display anywhere in the Word workspace.
Click a button on any toolbar to initiate the associated command or operation. (To display additional toolbars, pull down the View menu and select Toolbars; when the list of toolbars appears, check those toolbars you want to display, and uncheck those you want to hide.)
- View buttons—The View buttons let you switch between different document views.
Viewing a Word Document
Word can display your document in one of five different views. You select a view by clicking one of the View buttons at the bottom of the Word window. Each view is a particular way of looking at your document:
- Draft (Normal in Word 2003)—This is primarily a text-based view, because certain types of graphic objects—backgrounds, headers and footers, and some pictures—aren’t displayed. This is not a good view for laying out the elements on your page.
- Print Layout—This is the view you use to lay out the pages of your document— with all elements visible, including graphics and backgrounds.
- Full Screen Reading (Reading in Word 2003)—This view makes it easier to read documents that you don’t need to edit by hiding all toolbars and resizing the text for better viewing.
- Web Layout—This is the view you use when you’re creating a document to be displayed on the Web. In this view all the elements in your document (including graphics and backgrounds) are displayed as they would be if viewed by a web browser.
- Outline—This is a great view for looking at the structure of your document, presenting your text (but not graphics!) in classic outline fashion. In this view you can collapse an outlined document to see only the main headings or expand a document to show all (or selected) headings and body text.
Zooming to View
If Word displays a document too large or too small for your tastes, it’s easy to change the size of the document display. In Word 2007, you can zoom the display with the Zoom slider at the bottom-right corner of the screen.
In Word 2003, use the pull-down Zoom list on the Standard toolbar. Choose the setting that fits as much of the document onscreen as you want.
Working with Documents
Anything you create with Word is called a document. A document is nothing more than a computer file that can be copied, moved, and deleted—or edited, from within Word.
Creating a New Document
Any new Word document you create is based on what Word calls a template. A template combines selected styles and document settings—and, in some cases, prewritten text or calculated fields—to create the building blocks for a specific type of document. You can use templates to give yourself a head start on specific types of documents.
To create a new document in Word 2007 based on a specific template, follow these steps:
- Click the Office button and select New.
- When the New Document window appears, select a type of template from the Templates list on the left side of the window. You can choose from Installed Templates on your PC, or additional templates found on Microsoft Office Online.
- Available templates for that category are now displayed in the middle pane of the window, and a sample document appears in the preview pane on the right. Doubleclick the template you want to use.
To create a new document in Word 2003, select File, New. This displays the New Document pane; go the Templates section and click On My Computer. When the Templates dialog box appears, select the template you want to use; then click OK.
If you don’t know which template to use for your new document, just select Blank and Recent from the Templates list, and then select Blank Document. This opens a new document using Word’s Normal template. This is a basic template, with just a few text styles defined—a good starting point for any new document.
Opening an Existing Document
To open a previously created document in Word 2007, click the Office button and select Open; in Word 2003, select File, Open. When the Open dialog box appears, navigate to and select the file you want to open; then click the Open button.
Saving the Document
Every document you make—that you want to keep—must be saved to a file. The first time you save a file, you have to specify a filename and location. Do this in Word 2007 by clicking the Office button and selecting Save As; in Word 2003, select File, Save As.
When the Save As dialog box appears, select a file format, click the Browse Folders button to select a location to save the file, then enter a filename and click the Save button. When you make additional changes to a document, you must save those changes.
Fortunately, after you’ve saved a file once, you don’t need to go through the whole Save As routine again. To “fast save” an existing file, all you have to do is click the Save button on Word 2007’s Quick Access toolbar, or Word 2003’s Standard toolbar. Alternatively, you can click the Office button (Word 2007) or File menu (Word 2003) and then select Save.
Working with Text
Now that you know how to create and save Word documents, let’s examine how you put specific words on paper—or, rather, onscreen.
Entering Text
You enter text in a Word document at the insertion point, which appears onscreen as a blinking cursor. When you start typing on your keyboard, the new text is added at the insertion point.
You move the insertion point with your mouse by clicking on a new position in your text. You move the insertion point with your keyboard by using your keyboard’s arrow keys.
Editing Text
After you’ve entered your text, it’s time to edit. With Word you can delete, cut, copy, and paste text—or graphics—to and from anywhere in your document, or between documents. Before you can edit text, though, you have to select the text to edit.
The easiest way to select text is with your mouse; just hold down your mouse button and drag the cursor over the text you want to select. You also can select text using your keyboard; use the Shift key—in combination with other keys—to highlight blocks of text.
For example, Shift+Left Arrow selects one character to the left; Shift+End selects all text to the end of the current line. Any text you select appears as white text against a black highlight. After you’ve selected a block of text, you can then edit it in a number of ways:
- Delete - Del
- Copy - Ctrl+Ins or Ctrl+C
- Cut - Shift+Del or Ctrl+X
- Paste - Shift+Ins or Ctrl+V
Formatting Text
After your text is entered and edited, you can use Word’s numerous formatting options to add some pizzazz to your document. It’s easiest to edit text when you’re working in Print Layout view because this displays your document as it will look when printed. To switch to this view, pull down the View menu and select Print Layout.
Formatting text is easy—and most achievable from the Home Ribbon in Word 2007 or the Formatting toolbar in Word 2003. Both of these items include buttons for bold, italic, and underline, as well as font, font size, and font color. To format a block of text, highlight the text and then click the desired format button.
Checking Spelling and Grammar
If you’re not a great speller, you’ll appreciate Word’s automatic spell checking. You can see it right onscreen; just deliberately misspell a word, and you’ll see a squiggly red line under the misspelling. That’s Word telling you you’ve made a spelling error.
When you see that squiggly red line, position your cursor on top of the misspelled word, and then right-click your mouse. Word now displays a pop-up menu with its suggestions for spelling corrections. You can choose a replacement word from the list, or return to your document and manually change the misspelling.
Sometimes Word meets a word it doesn’t recognize, even though the word is spelled correctly. In these instances, you can add the new word to Word’s spelling dictionary by right-clicking the word and selecting Add from the pop-up menu.
Word also includes a built-in grammar checker. When Word identifies bad grammar in your document, it underlines the offending passage with a green squiggly line. Right-click anywhere in the passage to view Word’s grammatical suggestions.
Printing a Document
When you’ve finished editing your document, you can instruct Word to send a copy to your printer.
Previewing Before You Print
It’s a good idea, however, to preview the printed document onscreen before you print it—so you can make any last-minute changes without wasting a lot of paper. To view your document with Word’s Print Preview, click the Office Button and select Print, Print Preview. (In Word 2003, select File, Print Preview.)
The to-be-printed document appears onscreen with each page of the document presented as a small thumbnail. To zoom in or out of the preview document, click the Magnifier button and then click the magnifier cursor anywhere on your document. When you’re done previewing your document, click the Close button.
Basic Printing
The fastest way to print a document is with Word’s quick print option. You activate a fast print by clicking the Office button and selecting Print, Quick Print. (Or, in Word 2003, click the Print button on Word’s Standard toolbar.)
When you do a fast print of your document, you send your document directly to your default printer. This bypasses the Print dialog box (discussed next) and all other configuration options.
Changing Print Options
Sometimes fast printing isn’t the best way to print. For example, you might want to print multiple copies, or print to a different (non-default) printer. For these and similar situations, you need to use Word’s Print dialog box.
You open the Print dialog box, shown in Figure 3, by clicking the Office button and selecting Print, Print. (In Word 2003, select File, Print.)
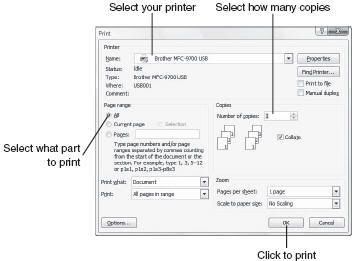
After you have the Print dialog box displayed, you can choose any one of a number of options specific to this particular print job. After you’ve made your choices, click the OK button to start printing.
Formatting Document
When you’re creating a complex document, you need to format more than just a few words here and there.
Formatting Paragraphs
When you need to format complete paragraphs, you use Word 2007’s Page Layout Ribbon. Just click the Page Layout tab on the Ribbon, and you’ll see all manner of page formatting options—margins, orientation, columns, page color, borders, and so forth.
In Word 2003, most of these same options are found in the Paragraph dialog box. You open this dialog box by positioning your cursor within a paragraph, pulling down the Format menu, and then selecting Paragraph.
Using Word Styles
If you have a preferred paragraph formatting you use over and over and over, you don’t have to format each paragraph individually. Instead, you can assign all your formatting to a paragraph style and then assign that style to specific paragraphs throughout your document.
Most templates come with a selection of predesigned styles; you can modify these built-in styles or create your own custom styles. Styles include formatting for fonts, paragraphs, tabs, borders, numbering, and more.
To apply a style to a paragraph in Word 2007, position the insertion point anywhere in the paragraph and then click the style you want in the Styles section of the Ribbon. You can select a different set of styles by clicking the Change Styles button, selecting Style Set, and then making a selection.
Working with an Outline
If you have a really long document, you might find it easier to work with the various sections in the form of an outline. For this purpose, Word lets you view your document in Outline view, as shown in Figure below.
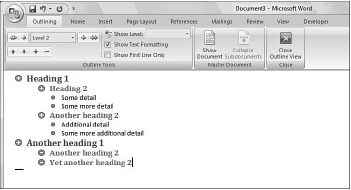
Just click the Outline button at the bottom of the Word window. When you’re in Outline view, Word displays your headings as different outline levels. Text formatted with the Heading 1 style appears as Level 1 headings in your outline, text formatted as Heading 2 appears as Level 2 headings, and so on.
To make your outline easier to work with, you can select how many levels of headings are displayed. (Just pull down the Outline Level list and select the appropriate level number.) You also can choose to expand or contract various sections of the outline by clicking the plus and minus icons to the side of each Level text in your outline.
Outline view makes rearranging sections of your document extremely easy. When you’re in Outline view, you can move an entire section from one place to another by selecting the Level heading and then clicking the up and down arrow buttons. (You also can drag sections from one position to another within the outline.)
Working with Pictures
Although memos and letters might look fine if they contain nothing but text, other types of documents—newsletters, reports, and so on—can be jazzed up with pictures and other graphic elements.
Inserting a Picture from the Clip Art Gallery
The easiest way to add a graphic to your document is to use Word’s built-in Clip Art Gallery. The Clip Art Gallery is a collection of ready-to-use illustrations and photos, organized by topic that can be pasted directly into your Word documents.
To insert a piece of clip art in Word 2007, select the Insert Ribbon and click the Clip Art button. (In Word 2003, select Insert, Picture, Clip Art.) This displays the Clip Art pane.
Enter one or more keywords into the Search For box; then click Search. Pictures matching your criteria are now displayed in the Clip Art pane. Double-click a graphic to insert it into your document.
Inserting Other Types of Picture Files
You’re not limited to using graphics from the Clip Art Gallery. Word lets you insert any type of graphics file into your document— including GIF, JPG, BMP, TIF, and other popular graphic formats.
To insert a graphics file into your Word 2007 document, select the Insert Ribbon and click the Picture button. (In Word 2003, select Insert, Picture, From File.) When the Insert Picture dialog box appears, navigate to and select the picture you want to insert; then click Insert.
Formatting the Picture
After you’ve inserted a picture in your document, you might need to format it for best appearance. To format the picture in Word 2007, start by clicking the picture. This displays the Format Ribbon.
From here you can select different types of picture frames, change the picture’s brightness and contrast, edit the position and text wrapping of the picture, and even crop the picture to a new size.
To move your picture to another position in your document, use your mouse to drag it to its new position. You also can resize the graphic by clicking the picture and then dragging a selection handle to resize that side or corner of the graphic.

