Adobe Acrobat Advanced Toolbars
The default toolbars represent a fraction of the tools available to you in Acrobat. Many of the other toolbars remain hidden from view. The reason for this is obvious when you load all the toolbars in the Toolbar Well. You lose a lot of viewing real estate when all toolbars are docked in the Toolbar Well.
Unless you have a large display monitor or a second monitor, working on a file in the Document pane when all toolbars are in view gives little room to see document pages. Fortunately, by managing the toolbars you can elect to show only the tools you want to work with and you can move them around the Acrobat window, allowing for the best view.
You open toolbars from menu commands in the Tools menu or by opening a context menu. If you’re a seasoned Acrobat user, your first encounter with Acrobat viewers 6 and above might be a bit frustrating if you don’t know how to access the tools you want to use. “Where is that Form tool?” you may ask.
Don’t worry; it’s there. You just have to poke around and search for it or, better yet, look over the following descriptions to understand more about how these other tools are grouped into separate toolbars. For the purpose of discussion, I’ll refer to the non-default toolbars as advanced toolbars.
Acrobat does not refer to all these tools as advanced tools. Some of the tools labeled in the menu commands are not referred to as advanced tools. For clarity, though, consider all the following toolbars as advanced toolbars.
You can use three methods for displaying toolbars not visible when you open Acrobat. You can open the View >> Toolbars menu where you find a list of tools in submenus. Select a submenu item to open a toolbar as a floating toolbar in the Acrobat window.
Another method is to open a context menu on the Toolbar Well and open toolbars from commands in the menu. A third option, and one that provides more options for viewing all tools and toolbars in a single window, is to use the More Tools menu command when you open a context menu on the Toolbar Well.
As a matter of routine, you should use this option when preparing an Acrobat session that requires you to use several tools and toolbars. All tools except the Form tools (Acrobat Professional only) are accessible from the context menu.
- Advanced Editing Toolbar
The Advanced Editing toolbar shown in Figure below is one you’ll use in just about all Acrobat editing sessions. Tools include the Select Object tool that is used to select content you add in Acrobat such as comment markups and form fields. The Article tool is used to create article threads, the Crop, Link, 3D, Movie, and Sound tools follow.
![]()
The TouchUp Text tool is used to edit text on a page and the last tool is the TouchUp Object tool that is used to select content that was originally created in an authoring program and converted to PDF.
- Comment & Markup Toolbar
When you open either the View >> Toolbars submenu menus or a context menu on the Toolbar Well, the first menu option after the default Advanced Editing toolbar is the Comment & Markup toolbar. Select the menu option and the Comment and Markup tools open in their own toolbar.
Open a context menu on the toolbar and select Add/Remove Tools >> Show All Tools. The toolbar appears as you see in Figure below when all tools are loaded.
![]()
Now in Acrobat 8 you have the opportunity to load just the tools you want to use in a review session from both the former Commenting and the Drawing & Markup toolbars.
Acrobat 8 nests all these tools together nicely in a single toolbar. This arrangement affords you the opportunity to view just those tools you commonly use in a review session—a great new feature.
When you select the Comment & Markup tools from the More Tools window and check the boxes for all tools, all the tools are loaded except the Paste a copied image as stamp tool.
To show the tool in the Comment & Markup toolbar, open the Comment & Markup toolbar and open a context menu on any tool in the toolbar. Select Show All Tools and the Paste a copied image as stamp tool is added to the toolbar.
- Edit Toolbar
The Edit toolbar is the home of a miscellaneous group of editing tools, such as spell checking, copy, paste, undo, and redo. See figure below!
![]()
- Forms toolbar (Acrobat Professional only)
From a context menu in the Toolbar Well or the View >> Toolbars submenu select Forms toolbar to open the Forms tools. The eight forms tools shown in Figure below opens where you can access tools to create form fields.
![]()
In addition to the same form tools you had available in Acrobat 7, a new tool is added to the toolbar to create bar code fields. In addition two other new tools are added to the Forms toolbar.
The Edit Layout tool changes from a preview mode to a form editing mode and the Distribute tool used to distribute forms for an ad hoc data collection and enable the distributed forms for Adobe Reader users.
- Measuring Tools
The Measuring tools include the Distance tool used for measuring linear distances, the Perimeter tool for measuring linear distances of angles and objects, and an Area tool for measuring the surface area of objects. The Measuring toolbar, shown in Figure below, might be used for examining measurements in engineering and scientific drawings.
![]()
- Object Data Tool
The Object Data tool (see Figure below) is used to select objects on a document page. When you select an object that has object data associated with it, the Object Data dialog box opens.
![]()
This dialog box contains object metadata such as creation date, copyright information, color mode, resolution, and other file attributes similar to the kind of metadata you can view in programs such as Microsoft Visio, Microsoft Project, and AutoDesk AutoCAD.
- Redaction
A new toolbar has been added to Acrobat 8. The Redaction tools are particularly helpful for users working in the legal industry who need to remove text content from documents to protect sensitive data such as the names of minors, personal privacy information, and data breeching security policies.
When you open the Redaction toolbar you’ll see four tools to help you redact PDF documents as shown in Figure below.
![]()
- Typewriter Toolbar
The Typewriter tool was added to all Acrobat viewers in a maintenance upgrade during the Acrobat 7 life cycle. This toolbar, shown in Figure below, contains tools for typing text on PDF documents. It’s particularly helpful when filling out PDF forms that don’t have form fields.
![]()
- Properties Bar
You use the Properties Bar in conjunction with several different tools. After you create comments, links, buttons, and similar content in a PDF document, the selected comment, link, button, and so on displays current properties such as colors, fonts, and line weights in the Properties Bar.
![]()
You can make changes in the Properties Bar without visiting the Properties dialog box. You can quickly open the Properties Bar with a keyboard shortcut or via a context menu opened on the Toolbar Well.
Plug-ins
All Acrobat viewers support a plug-in architecture. Plug-ins are installed during your Acrobat installation and loaded when you launch Acrobat. Many of the features you find when exercising commands and using tools are made possible by the use of plug-ins.
To view the current plug-ins loaded with the viewer you use, choose Help >> About Adobe Plug-ins. The About Adobe Plug-Ins dialog box opens as shown in Figure below.

The list in the left side of the dialog box lists the names of the installed plug-ins. Click a name to see a description for the plug-in, including whether the plug-in is certified, the version number, creation date, text description, and dependencies.
To examine different plug-ins, select them in the left pane and view the description on the right side of the dialog box. Acrobat plug-ins are developed by Adobe Systems and third-party developers. All plug-ins developed by Adobe Systems are certified plug-ins.
No third-party plug-ins are certified. Some features in Acrobat require that only certified plug-ins be loaded before the feature is enabled. Working with eBooks is one example where only certified plug-ins can be used.
Any time a document has Adobe DRM (Digital Rights Management) protection such as eBooks and/or documents protected with the Adobe Policy Server, the viewer is launched in certified plug-in mode. This mode loads only Adobe plug-ins and disables all third party plug-ins.
In order to instruct your Acrobat viewer to open with only certified plug-ins, open the Preferences dialog box by choosing Edit >> Preferences. Select General in the left pane and select the Use only certified plugins check box, as shown in Figure below. When you quit your Acrobat viewer and relaunch the program, only certified plug-ins will load.

Plug-ins developed by third-party developers can also be loaded. The list of available resources for adding to Acrobat functionality in the form of add-ons and plug-ins is almost limitless.
For a single source where you can view a list of plug-ins, download demonstration copies, and make purchases, visit the Planet PDF store, the Adobe Store and click on the Store link, or The PowerXChange. On several Web sites you’ll find product descriptions and workflow solutions for almost any third-party product designed to work with Acrobat.
When you visit one of the Web sites and review the products, be certain the product you purchase is upgraded to work with Acrobat 8.0 and the viewer you use. All products are listed with links to the manufacturer’s Web sites, so you can find information on product descriptions, version numbers, and compatibility issues.
Most plug-ins you acquire from third-party manufacturers are accompanied by an installer program. Installing plug-ins is easy. Open the folder for a plug-in you download from a Web site and double-click on the installer icon. The installer routine finds the plug-ins folder inside your Acrobat folder and the plug-in is loaded when you launch Acrobat.
If a plug-in is not accompanied by an installer program, you need to manually add the plug-in to your Acrobat plug-ins folder. On Windows, open the Program Files\Adobe\Acrobat 8.0\Acrobat\plug_ins folder. Copy the plug-in you want to install to this folder.
On the Macintosh, open your Applications folder. Open the Acrobat 8 Professional (or Standard) folder from within the Applications folder. Press and hold the Control key and click the program icon (Adobe Acrobat 8 Professional or Adobe Acrobat 8 Standard) to open a context menu, as shown in Figure below.
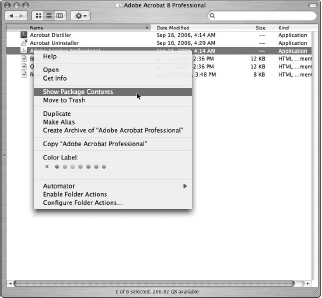
From the menu items, select Show Package Contents. When you open the Package Contents, the Contents folder appears in a single window. Double-click the folder to open it. Several folders appear within the Contents folder, one of which is named Plug-ins. Open this folder and copy your plug-in to it.
If your plug-in is not accompanied by an uninstaller program, you need to either disable the plug-in or physically remove it from the Acrobat plug-ins folder. A temporary solution is to disable third-party plugins by opening the Preferences dialog box, clicking on Startup, and selecting the check box for Use only certified plug-ins.
To permanently remove a plug-in, open the plug-ins folder as described above, and drag the plug-in out of the Acrobat plug-ins folder. Some plug-ins are installed in their own folder.
To remove a plug-in, drag the folder where the plug-in is installed out of the Acrobat plug-ins folder. Be certain not to remove the Acrobat plug-ins folder from within the Acrobat folder. Doing so disables all tools and menu commands using plug-ins.
At times you may find a plug-in conflict among several third-party products or a plug-in that may have a bug. If your Acrobat functionality is impaired and you can’t launch the program, hold down the Shift key while double-clicking the program icon to launch your viewer.
All plug-ins are disabled when you use the modifier key. Open the Preferences dialog box again and select the Use only certified plug-ins check box. Quit and relaunch the program, and the offending plug-in is eliminated during startup.
If a plug-in is creating a problem, you may need to use a process of elimination to figure out which one it is by opening your plug-ins folder and removing all plug-ins. Then add several plug-ins at a time back to the plug-ins folder and launch your viewer. Keep adding plug-ins back to the plug-ins folder until you discover the plug-in that produces the error.
There are many different plug-ins that provide you more features when working with Adobe Acrobat and Adobe Reader. To pick one out among the many is a hard choice. For your own workflow, visit the Planet PDF Store, Adobe Store, the PowerXChange, or the Acrobat User Community and explore various plug-ins available for download.
Try to find a plug-in that offers at least a demo trial period and download it. Almost all plug-ins come with a ReadMe file or user manual. Before installing a plug-in, be certain to review the installation recommendations by the developer. Install the plug-in and give it a try.

