Adobe Reader
As a PDF author you need to be aware of the capabilities and the limitations of the Adobe Reader software. In some situations you can distribute PDF documents to users of the free Adobe Reader software for active participation in your workflow without all your clients and colleagues needing to purchase the full version of Acrobat Standard or Acrobat Professional.
In other situations where the Adobe Reader software does not contain tools or commands to properly edit a file for a given workflow, you may need to recommend to others which commercial viewer they need to purchase. Regardless of where you are with PDF creation and editing, at one time or another you’ll be called upon to explain some of the differences between the viewers.
Adobe Reader has matured as a product and the newest release offers users much more functionality than any previous version. Features that have long been requested by users such as being able to save form data and add digital signatures are now available in Adobe Reader 8.
However, the features are document-specific and require at least one person in a workflow attempting to use these new tools to author a file in Acrobat 8 Professional. The first change you notice when launching Adobe Reader 8 is the welcome screen.
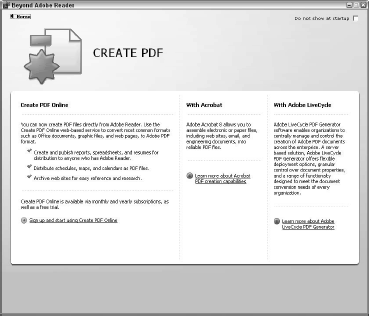
The Beyond Adobe Reader welcome screen shown in Figure below opens when you first launch the program.
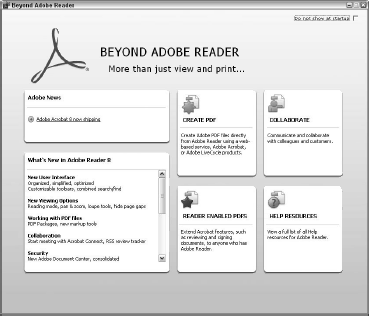
Each time you launch Reader the same screen opens unless you check the box “Do not show at start up.” If you dismiss the screen by checking the box for all subsequent launches of Reader, you can bring the screen back any time by selecting Help >> Beyond Adobe Reader.
Alternately, you can also bring the Beyond Adobe Reader screen back by opening a context menu on the Toolbar Well and selecting Beyond Adobe Reader. Another method for showing the Beyond Adobe Reader window is to load the Beyond Adobe Reader tool from the More Tools window.
The Beyond Adobe Reader window is similar to the Getting Started with Adobe Acrobat window that opens when you launch Acrobat Standard and Acrobat Professional. Like the other Acrobat viewers, clicking one of the item links opens another pane in the window where some help information and directions are provided.
On the left side of the window are some topics related to what’s new in Adobe Reader 8. On the right are four separate links to panes describing features in Adobe Reader 8. Click Create PDF and you see the Create PDF pane shown in Figure below.
The information describes PDF creation for Adobe Reader users such as how to create PDFs online. In addition, information is provided for PDF creation in the Adobe Acrobat and Adobe Server products.
Clicking the Learn more links opens your default Web browser and takes you to pages on Adobe’s Web site where more information is provided about Acrobat and Adobe Server products.
Notice the Home link in the top-left corner of the Create PDF pane. Any time you click a link that opens another pane, you can easily return to the default Home page view in Beyond Adobe Reader by clicking Home. Click Home and you return to the opening screen.
Click the Collaborate item on the Home page and the Collaborate pane opens. This pane describes information related to review sessions and how Adobe Reader users can participate in reviews. In the center column, you see information related to tracking reviews.
Like the Create PDF pane, click the Learn more links and your Web browser opens a page on Adobe’s Web site where more information is provided about the topic.
In the right column some information is provided about Acrobat Connect and participating in online meetings. Again, clicking links in this area opens a Web page on Adobe’s Web site where you can find more information on starting meetings and participating in online meetings.
Click the Home link and you return to the Home pane. In the lower-left corner, a link to information related to working with Adobe Reader–enabled files appears. Click Reader Enabled PDFs and the Reader Enabled PDF Files pane opens. This pane details information about files enabled with special usage rights and information on Adobe LiveCycle server products.
Like the other panes in the Beyond Adobe Reader screen, clicking links opens Web pages where more detail is provided about the respective items. Click the text links on the left side of the pane and the items expand providing some detail on Forms, Reviews, and Security.
On the right side of the pane are links to Web pages where Reader enablement in Acrobat and Adobe LiveCycle Server products are explained. Click Home and click Help Resources and you see the final pane offering help information.
For Adobe Reader users, you might want to refer the Reader user to this pane when viewing your PDFs. This pane offers some valuable help information on using Adobe Reader. A variety of help topics appear in this pane. In the left column are some text descriptions and a few links that take the user to Web pages for online support and user forums.
In the center column you see links for paid support programs. In the right column are Web links containing PDF documents providing information on Adobe Customization Wizard and Adobe PDF Security. Adobe Customization Wizard is particularly helpful for IT managers who want to customize Acrobat and Reader installations in large-scale deployments.
Setting Critical Preferences
Like the Acrobat viewers, Adobe Reader has an enormous number of different preference options designed to add more functionality to the program and to help you tailor your workspace and tools to suit personal workflows. In previous versions of Acrobat you had at least one behavior common to all viewers in all versions prior to version 8.
Acrobat and Reader were fixed environments where documents all opened in the same workspace. You could open multiple files, use the same tools and menus, bring documents forward in the Document pane, and all the views were maximized to fit your monitor size by default.
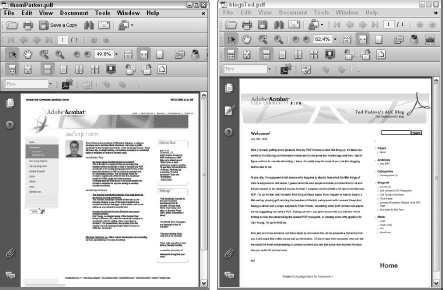
The view you’re used to seeing in Acrobat viewers has changed. By default, documents now open in individual windows that are minimized and don’t occupy the entire monitor size. When you open additional documents, the files open in separate windows, all having individual toolbars and menus attached to the individual files.
Figure below shows how two PDF documents appear as a default in Acrobat Professional.
You may like the new look of the Acrobat viewers when working on PDFs. Personally, I found this to be the most aggravating view when working with my documents—especially in Acrobat Professional when I want to exchange content between documents.
It may have its uses, but I personally like the traditional view of the Acrobat workspace. If you’re like me, you’ll want to immediately change the view. Fortunately, Adobe did not forget us old timers and added a preference setting for you to toggle the view.
Open the Preferences dialog box In the Left pane of the Preferences dialog box, click Documents. Check the first check box in the right pane where you see Show each document in its own window (requires restart), as in Figure below.
Notice the label for the check box indicates you need to restart Acrobat before the preference item will take effect. After you click OK, quit Adobe Reader and then relaunch the program. When you open two documents and tile the views, you see a workspace like you had available with earlier Acrobat viewers.
Preferences settings are detailed here is that specifically relate to tools and commands. Just a couple of other preference options you want to start with in Reader include some settings to help you prepare for some of the features described later.
Open the Preferences dialog box and click General in the left pane. Check Use single-key accelerators to access tools at the top of the right pane. When this check box is checked, you can access tools by pressing a key on your keyboard. For example, when another tool is selected, you can access the Hand tool by pressing the H key.
You’ll also want to edit Identity preferences. When you engage in comment reviews and add comments in review sessions, you’re prompted to edit your Identity preferences. To prepare your work environment, take time now to add your Identity information.
Press Ctrl+K to open the Preferences dialog box and click Identity in the left pane. In the right pane, fill in the text boxes with your personal identity information.
There are many more preferences you can adjust, but these few changes will get the Adobe Reader going for a good many viewing and editing sessions. After you make your edits in the Preferences dialog box, click OK, and then quit Adobe Reader. You’ll want to quit and relaunch the program before doing anything else.
In the unlikely event you experience a program crash after making preference changes, all your new preference changes are lost. The best way to guard against losing the preference changes is to quit and restart Reader before you experience a program crash.
Tools
What distinguishes Adobe Reader and other viewers is, in part, the tools. Knowing what the user can do with the Reader tools and what tools are not available in Reader is helpful if you intend to distribute documents to Reader users.
All tools available in Adobe Reader have counterparts in Acrobat Standard and Acrobat Professional. The Reader tools are the same in the other viewers; however, some of the Adobe Reader tools offer more limited features than the same tool used in the other viewers.
Before you take a look at the individual tools you have available in Reader, you’ll want to know how you go about loading tools and toolbars. A toolbar contains one or more tools that can be added or temporarily removed from a toolbar.
You have one of two ways to access a window where toolbars are loaded and tools respective to a toolbar are added and removed. Select Tools >> Customize Toolbars or open a context menu on the toolbar window (right-click on Windows or Ctrl+click on the Mac) and select More Tools.
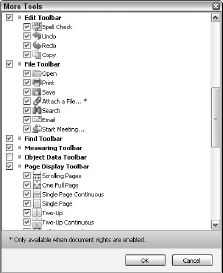
Accessing either the Customize Toolbars or the More Tools menu command opens the More Tools window. The More Tools window is a new feature in all Acrobat viewers.
The More Tools window is a scrollable window listing the various toolbars available to Adobe Reader. Below the bold type for most of the toolbars is a list of tools that can be loaded or unloaded from the respective toolbar. Click the check mark adjacent to a toolbar name and the toolbar opens as a floating toolbar in the Document pane.
All tools marked with a check mark appear loaded in the toolbar. To hide tools from a given toolbar, uncheck the tools you want to remain hidden. Notice that you can also load tools from a context menu and a few tools from the Tools menu. However, to customize the toolbars you need to open the More Tools window.
Once a toolbar is opened in Reader, you can dock the toolbar(s) by opening a context menu from the Toolbar Well and selecting Dock Toolbars. The toolbars are then organized within the Toolbar Well.
If you set up your workspace to show each document in its own window, loading toolbars is respective to the window where you load the tools. Theoretically you can have several files open in Adobe Reader in its own window and you can have different tools appearing in each window.
The first thing to understand about tools in Adobe Reader is that you have two different tool sets dependent on the kind of PDF file you open. In addition, you have a few different menu commands depending on the kind of PDF file you open.
If you open a PDF document with no special usage rights, you have fewer accessible tools and menu commands than when you open PDFs having special features. Notice that when you open the More Tools window, the second toolbar you see is the Comment & Markup toolbar.
If you open a PDF file that isn’t enabled for commenting, you can’t open the Comment & Markup Toolbar. If you open a file that has special usage rights for Adobe Reader for commenting, then the Comment & Markup tools can be opened.
These optional toolbars and tools are noted with an “*” to help you understand that they will only appear when the PDF allows the functionality to work.
Default Tools
To start off a discussion on Adobe Reader tools, let’s first take a look at the tools you have available when opening a PDF document with no special features. In this section, I refer to these tools as the default tools. Later, We’ll talk about the additional tools you have available when opening files having special features.
The Adobe Reader tools available to you when working on PDFs without special usage rights include the following:
- Beyond Adobe Reader toolbar. Open this tool and keep it docked in the Toolbar Well if you want to access the Beyond Adobe Reader window frequently.
- Edit toolbar. The Edit tools include Spell Check, Undo, Redo, and Copy.
- File toolbar. The File tools include Open, Print, Save a Copy, Search, E-mail, and Start Meeting. The Save a Copy tool saves a duplicate copy of the PDF document. You might use the tool for saving a PDF from an inline view in a Web browser. When files have been enabled with usage rights, the Save a Copy tool changes to the Save tool.
- Find toolbar. The Find tool enables you to perform a text search in the open PDF document.
- Object Data toolbar. The Object Data toolbar is used to select objects (text, images, or vector) on a document page. When you select an object with this tool, the Object Data dialog box opens and displays information about an object that was originally supplied in an authoring program.
The Object Data tool works only with objects where certain metadata were originally supplied in another program such as AutoCAD or Microsoft Visio.
- Page Display. The tools all relate to the document display in the Reader workspace. You can view pages as single page layouts, continuous, facing, and so on. The Full Screen tool takes you into Full Screen mode. Tools for rotating pages and viewing line weights at 1-pixel widths are also included in this toolbar.
- Page Navigation toolbar. This toolbar contains the First Page, Previous Page, Next Page, Last Page, Previous View, and Next View tools. Additionally, you can type a number in the text box to jump to a page.
- Select & Zoom toolbar. The tools include Select, Hand, Marquee Zoom, Dynamic Zoom, Zoom Out, Zoom In, Actual Size, Fit Width, Fit Page, Pan and Zoom Window, Loupe, and Snapshot.
The Select tool is used for selecting text and images, the zoom tools are used for page zooms, and the page layout tools are used for fitting the page to different sizes. New to Adobe Reader in version 8 are the Pan and Zoom Window and Loupe tools.
- Comment & Markup toolbar. All the tools in this toolbar are used for commenting on PDF documents enabled with special usage rights.
- Measuring toolbar. This toolbar contains tools also used for commenting. The tools are used for measuring distances and areas in engineering drawings.
- Properties Bar. Even though Adobe Reader does have a Properties Bar you can open on PDFs that are not enabled with usage rights, none of the default tools have options that appear in the Properties Bar.
The Properties Bar is used in PDF documents carrying usage rights for commenting. When used in conjunction with the Comment & Markup tools, you see comment properties appearing in the toolbar.
- Tasks toolbar. The Tasks toolbar includes the Sign and Review & Comment tasks. These tools work with documents enabled with usage rights.
- Typewriter toolbar. The Typewriter tool is used to type text on forms where no form fields are available.
In addition to the aforementioned tools, Adobe Reader contains tabs docked in the Navigation pane. To view all the Navigation Panels select View >> Navigation Panels. A submenu contains all the Navigation Panels you can access in Reader. Depending on the type of PDF you have open, some panels may or may not be accessible.
Usage Rights
One of the best new additions to the Adobe Reader software is the ability to save form data and add digital signatures to PDFs that have been deployed with certain usage rights. To create a Reader-enabled document for certain usage rights, you need Acrobat Professional or Adobe LiveCycle Reader Extensions Server.
In Acrobat Professional you can add usage rights that enable an Adobe Reader user to comment on a PDF file, save the comments, invite Reader users to participate in an e-mail–based review or shared review, save form data, and add digital signatures.
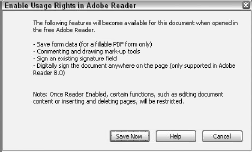
All the comment and forms usage rights are enabled in Acrobat Professional. When you want to distribute a document for Reader users to mark up and comment, choose Comments >> Enable for Commenting in Adobe Reader. The Enable Usage Rights in Adobe Reader dialog box opens.
Click the Save Now button and the PDF is enabled for commenting, saving form data, and adding digital signatures.
Commenting
Be certain you are aware of the fact that you need to grant a PDF document usage rights in Acrobat Professional by choosing Comments >> Enable for Commenting in Adobe Reader before a Reader user can make comments. When the file is enabled with usage rights, the Comment & Markup tools are accessible.
If an Adobe Reader user opens a PDF document without usage rights enabled, the comment tools are not accessible. Notice that Adobe Reader users have access to all comment and markup tools, as well as the ability to create and use custom stamps.
When an Adobe Reader user marks up a document with the commenting tools, the file can be saved and the comments preserved. Documents enabled with usage rights also include a File >> Save command. By default, Adobe Reader permits saving an unedited copy of a PDF document only if usage rights are not enabled.
File Attachments
A file attachment is an external file that can be a PDF document or any other document saved from any program. The PDF acts as a wrapper container for the file attachment. File attachments can be extracted and saved to disk outside the PDF or opened in the native application in which the original document was created.
In order to view a document in a native application, the original authoring program must be installed on your computer. Another feature available in Adobe Reader is the ability to extract file attachments. Files can be attached to a PDF by a Reader user when a PDF document is enabled with usage rights for Adobe Reader users.
When an Acrobat user attaches a file to a PDF, Adobe Reader users can extract the file attachments. A separate tab in the Navigation pane enables the Reader user to open, save, and search file attachments. Click the Attachments tab to open a panel where you can access tools to manage the attachments.
One great feature in all Acrobat viewers is the ability to attach any file type to a PDF document and secure the PDF with password protection.
After a PDF has been encrypted with password security, the end user needs the access password in order to either open the PDF document or extract the attachment. With the process accessible to Adobe Reader users, business professionals in all industries will find much greater use for Adobe Reader 8.
Working with Forms
The other half of enabling PDF documents for Adobe Reader users involves adding usage rights for saving PDF forms and adding digital signatures. This feature has long been requested by many Acrobat users and has now been introduced in Acrobat 8.
When you select Advanced >> Enable Usage Rights in Adobe Reader and click the Save Now button your files are enabled for commenting, saving form data, and using digital signatures n Adobe Reader. As soon as you open a PDF with usage rights, you’ll notice the Save command available in the File menu.
Any form data you add to form fields can then be saved by the Reader user. In addition to saving form data, you can also create and use digital signatures on documents enabled with usage rights.
When you enable files for Reader users so the users can save form data, some restrictions apply. You need to be aware of the stipulations in the End User License Agreement (EULA) and the limitations detailed in this agreement.
