Dreamweaver CS3 Interface
When creating a Web page, Webmasters do two things repeatedly: They insert an element—whether text, image, or layer—and then they modify it. Dreamweaver excels at such Web page creation. The Dreamweaver workspace combines a series of windows, panels, and inspectors to make the process as fluid as possible, thereby speeding up the Webmaster’s work.
Easy Text Entry
Although much of the World Wide Web’s glitz comes from multimedia elements such as images and sound, Web pages are primarily a text-based medium. Dreamweaver recognizes this and makes the text cursor the default tool. To add text, just click in Dreamweaver’s main workspace—the Document window—and start typing.
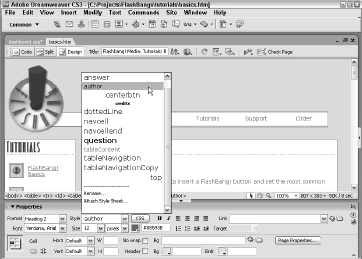
As shown below, the Text Property inspector even enables you to change characteristics of the text, such as the size, font, position, or color by assigning a Cascading Style Sheet (CSS) style.
Dreamweaver even helps you along by automatically creating a style if none has been previously assigned.
Drag-and-Drop Data Fields
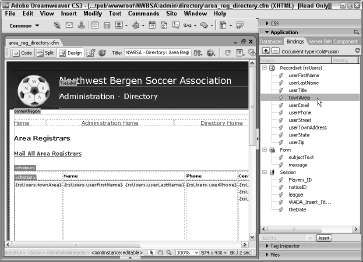
It’s one thing to make a connection to a data source; it’s quite another to actually insert the dynamic data in the proper place on the Web page. Dreamweaver makes drag-and-drop easy with the Bindings panel. All the available data sources for a page are displayed in an expandable tree outline in the Bindings panel, as shown below.
You can insert an instance of any dynamic field displayed in the panel onto the page by either dropping it into place or clicking the Insert button.
One-stop Object Modification
You can select Web page elements other than text from the Insert bar. Adding a picture to a Web page is as easy as clicking the Image icon from the Insert bar. Dreamweaver asks you to select the file for the image, and your image appears at your current cursor position.
After your graphic is onscreen, selecting it brings up the appropriate Property inspector to enable you to make modifications. The same technique works for all inserted elements—from <div> tags to Shockwave movies.
Accessing and Managing Resources
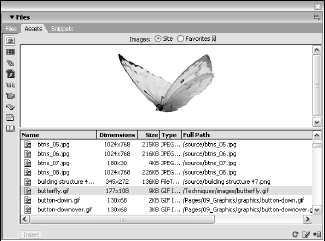
One standout addition to Dreamweaver’s interface is the Assets panel. The Assets panel gathers all the various elements used in an individual site: images, background and text colors, external URLs, included scripts, Flash movies, Shockwave content, and QuickTime media, as well as Dreamweaver templates and library items.
Sizeable thumbnails of graphics and media are displayed in the preview pane of the Assets panel—you can even play Flash, Shockwave, and QuickTime elements in preview before dragging them onto the page. Moreover, often-used resources can be listed in a Favorites category, distinguishing them from the rest of the assets found in the site.
Complete Custom Environment
Dreamweaver enables you to customize your workspace to suit yourself. Much of Dreamweaver’s power derives from the various windows, panels, and inspectors, all of which are movable. Just drag them wherever you want them onscreen or keep them docked to the side.
Want to see your page by itself? You can hide all windows at the touch of a function button; press it again, and your controls are revealed. Got your working environment just the way you like it? Create a custom workspace and reset it at any time with a simple menu selection.
Dreamweaver’s customization capabilities extend even further. If you find that you are repeatedly inserting something, such as a QuickTime video or WAV sound file, you can add that element to your Insert bar. Dreamweaver even enables you to add a specific element—a Home button, for example—to the Insert bar.
In fact, you can add entire categories of objects if you like. Moreover, Dreamweaver CS3 exposes the entire menu structure for customization—not only can you change keyboard shortcuts; you can also add custom menus.
Managing Keyboard Shortcuts
Keyboard shortcuts are great in theory: Just press a key combination to activate an essential feature. Unfortunately, in reality, there are too many essential features, too few single-purpose keys on the keyboard and, most important, too few brain cells to retain all the widely varied keyboard combinations that the working designer must master.
Adobe has taken steps to ease keyboard-shortcut overload across its entire product line, and Dreamweaver’s no exception. Dreamweaver offers a Keyboard Shortcut Editor that enables you to both standardize and customize the key combinations used in the program.
Choose from the Dreamweaver standard set or use sets taken from BBEdit, Dreamweaver MX 2004, or HomeSite. If you’re a ColdFusion Studio user switching to Dreamweaver, you’ll really appreciate the capability to add keyboard shortcuts to snippets.
You can even select a set from an entirely different program such as HomeSite or BBEdit. Best of all, any keyboard shortcut can be personalized to represent a combination that’s easy for you to remember.
Simple Selection Process
As with most modern layout programs, to modify anything in Dreamweaver, you must select it first. The usual process to do this is to click an object to highlight it or to click and drag over a block of text to select it.
Dreamweaver adds another selection option with the Tag Selector feature. Click anywhere on a Web page under construction and then look at Dreamweaver’s status bar. The applicable tags appear on the left side of the status bar.
Enhanced Layout Options
Dreamweaver works much more like a desktop publishing program than do many other visual HTML editors. Today’s browser capabilities permit images and text to be placed in specific locations on the Web page—a concept known as absolute positioning.
To enable you to take full advantage of this power, Dreamweaver includes guides, rulers, and grids. Both vertical and horizontal guides are supported. You can specify the type of measurement to be used (inches, pixels, or centimeters), as well as the spacing and appearance of the grid lines. You can even have objects snap to the guides or grid for easy alignment.
The capability to magnify all or any portion of the page is now available, complementing Dreamweaver’s other layout tools. Choose from a select set of magnifications from a menu or keyboard shortcut or use the Zoom tool to magnify a desired area. You can also opt to view the full page or hone in on any selected object.
Plugin Media Preview
For a browser to display anything beyond standard format graphics, a plugin is generally required. Plugins extend the capability of most browsers to show animations, play music, or even explore 3D worlds.
Dreamweaver is one of the first Web authoring tools to enable you to design your Web page with an active plugin playing the extended file; with all other systems, you have to preview your page in a browser to see the active content.
The active content feature in Dreamweaver enables the playback of plugins such as Adobe Flash, Shockwave, and others. However, this feature extends beyond that. Many Web pages are coded with serverside includes, which traditionally require the page to be viewed through a Web server.
Dreamweaver translates much of the server-side information so that the entire page—server-side includes and all—can be viewed in its entirety at design time.
Extended Find and Replace
The Web is a fluid medium. Pages are constantly in flux, and because changes are relatively easy to effect, corrections and additions are the norm. Quite often, a Web designer needs to update or alter an existing page—or series of pages.
Dreamweaver’s enhanced Find and Replace feature is a real power tool when it comes to making modifications. Find and Replace works in the Document window, whether in Design view or Code view, as well as in the Code inspector to alter code and regular content.
Moreover, changes are applicable to a selected section, the current page, the working site, selected Web pages, or an entire folder of pages, regardless of the number. Complex Find and Replace queries can be stored and retrieved later to further automate your work.


