Using Microsoft PowerPoint
When you need to present information to a group of people, the hip way to do it is with a PowerPoint presentation. Whether you use an overhead projector, traditional slides, or a computer projector, PowerPoint can help you create great-looking graphic and bullet-point presentations.
If you work in an office, you probably see at least one PowerPoint presentation a week. Teachers use PowerPoint to present lesson materials in class. Kids even use PowerPoint to prepare what used to be oral reports. So get with the program—and learn how to create your own greatlooking presentations with PowerPoint!
Microsoft PowerPoint Basic
Microsoft PowerPoint is a presentation program included with most versions of Microsoft Office. We’ll look at the latest version of the program, PowerPoint 2007— although the previous version, PowerPoint 2003, works similarly (but with menus and toolbars instead of the 2007 Ribbon).
PowerPoint Workspace
As you can see in Figure 1, PowerPoint 2007 looks like most other Office 2007 applications. The workspace is dominated by the Ribbon at the top of the screen, with the current slide displayed in the middle.

One the left side of the workspace is something unique to PowerPoint—the Slides/Outline pane, which displays all the slides in your presentation in either text (Outline) or graphic (Slides) views.
Below the current slide is a Notes pane, which lets you enter presentation notes. And at the very bottom of the window, near the right-hand corner, are the View buttons, which you use to switch between different views of your presentation.
Changing Views
The default view of the PowerPoint workspace is called, not surprising, Normal view. PowerPoint offers three different ways to view your presentation, all selectable from either the View buttons or the View menu. These views include:
- Normal, which is the default view complete with Outline/Slides and Notes panes.
- Slide Sorter, which displays thumbnails of all the slides in your presentation.
- Slide Show, which launches a live full-screen “slideshow” of your entire presentation.
Creating a New Presentation
When you launch PowerPoint, a blank presentation is loaded and ready for your input.
If you’d rather create a presentation based on a predesigned template (more on these next), click the Office button in PowerPoint 2007 and select New; this displays the New Presentation window, which lets you choose from a list of available templates. Click a template to get started.
Applying a Theme
You don’t have to reinvent the wheel when it comes to designing the look of your presentation. PowerPoint 2007 includes a number of slide themes that you can apply to any presentation, blank or otherwise. A theme specifies the color scheme, fonts, layout, and background for each slide you create in your presentation.
To apply a new theme to your current presentation, select the Design Ribbon (shown in Figure 2) and select a new theme from the Themes section. Make sure that you scroll through all available themes; you can also choose to apply only color, font, and effect schemes by using the controls to the right of the Themes section.

It’s that simple. All the colors, fonts, and everything else from the theme are automatically applied to all the slides in your presentation—and every new slide you add will also carry the selected design.
Inserting New Slides
When you create a new presentation, PowerPoint starts with a single slide—the title slide. Naturally, you’ll need to insert additional slides to create a complete presentation. PowerPoint lets you insert different types of slides, with different types of layouts for different types of information.
To insert a new slide in PowerPoint 2007, follow these steps:
- Click the down button next to the New Slide button on the Ribbon.
- A variety of different slide layouts are now displayed in a drop-down visual menu; click the type of slide you want to insert.
Continue adding as many slides as you need to complete your presentation.
Working from an Outline
Rather than creating a presentation one slide at a time, some people find it easier to outline their entire presentation in advance. To this end, PowerPoint offers the Outline pane, located at the left of the workspace. Select the Outline tab and PowerPoint displays each slide of your presentation, in outline fashion.
To enter text for an outline level, all you have to do is type. To add another slide in your outline, press the Enter key. To add bullet text to a slide, press the Tab key. To add a sub-bullet, press Tab again. When you’re done entering bullets, press Shift+Tab to move up the hierarchy and create a new slide.
Adding Text
As you’ve just seen, one way to add text to your slides is via the Outline pane. You can also enter text directly into each slide. When PowerPoint creates a new slide, the areas for text entry are designated with boilerplate text—“Click to add title” (for the slide’s title) or “Click to add text” (for regular text or bullet points).
Adding text is as easy as clicking the boilerplate text and then entering your own words and numbers. Press Enter to move to a new line or bullet. To enter a sub-bullet, press the Tab key first; to back up a level, press Shift-Tab.
Formatting Slides
You’ve already seen how to use design templates to format your entire presentation in one go. You can also format slides individually.
Formatting Text
Formatting text on a slide is just like formatting text in a word processing document. Select the text you want to format and then click the appropriate button in the Font section of the Ribbon (PowerPoint 2007) or on the Formatting menu (PowerPoint 2003).
Changing Backgrounds
Don’t like the slide background from the current template? Then change it! You can create single-color backgrounds, backgrounds that gradate between two different colors, and even backgrounds that incorporate a graphic or photograph.
To apply a new background to all the slides in your PowerPoint 2007 presentation, simply select the Design Ribbon and click the Background Styles button. This displays a variety of different backgrounds; select the one you want, and it will be applied to your entire presentation.
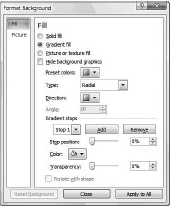
If you want even more background options, click the Background Styles button and then select the Format Background option. This displays the Format Background dialog box, shown in Figure 3, where you can choose from various types of fill and picture backgrounds.
Adding Graphics
An all-text presentation is a little boring. To spice up your slides, you need to add some graphics!
Inserting Pictures
You can insert any type of drawing or photograph into a PowerPoint slide. It’s easiest to start with a slide layout that anticipates the addition of a picture, however. Follow these steps:
- From a blank slide, go to the Slides section of the Ribbon and click the Layout button; then select the Title and Content layout. This formats the slide ready to accept different types of content.
- To add clip art to the slide, click the Clip Art icon; then search for the clip art you want from the Clip Art pane.
- To add a picture to your slide, click the Insert Picture from File icon; then navigate to and select a specific picture.
- To add icons, buttons, and similar graphics to your slide, click the Insert SmallArt Graphic icon; then select a graphic from the resulting dialog box.
After the graphic is added, you can now format it in a number of ways. To rotate the graphic, grab the green handle above the graphic and turn it to the left or right. To recolor the graphic, add a border style, insert a drop shadow, or crop the graphic, select the Design Ribbon and use the options there.
Creating Charts
Another way to spice up your presentation is to display numerical data in chart format. The easiest way to create a chart in PowerPoint 2007 is to start with the Title and Content slide layout and then follow these steps:
- Click the chart icon.
- When the Insert Chart dialog box appears, choose a chart type.
- An Excel spreadsheet now opens onscreen. Enter the data for your chart into this spreadsheet and close the spreadsheet when you’re finished.
- Your chart now appears on the slide. Select the Design Ribbon to select a different chart layout or style, or use the Layout Ribbon to format different aspects of the chart.
Applying Slide Animations
If you’re presenting your slideshow electronically, via a computer attached to a large monitor or projector, you need to do one more thing—add animated transitions between each slide.
PowerPoint lets you use a wide variety of slide transitions, all of which are more interesting than just cutting from one slide to the next. To apply animated transitions in PowerPoint 2007, select the Animations Ribbon, shown in Figure 4.

Select from the wide variety of transitions in the Transition to This Slide section; make sure that you click the scrollbar to view all the available transitions.
You can also use the Animations Ribbon to apply a sound to the transition or to adjust the transition speed. You can also apply this transition to all slides or just to selected slides. Have fun!
Start the Show!
To run your slideshow, complete with transitions, click the Slide Show button at the bottom of the PowerPoint workspace, or on the Slide Transition pane. To move from one slide to the next, all you have to do is click your mouse.

