Using Menu Commands for Navigation
The View menu contains all the page navigation commands contained in the Navigation toolbar. Notice that the View menu clearly describes viewing operations, and new users should be easily able to find menu commands associated with views.
In as much as the View menu enables you to select menu commands that perform the same operations as those performed with the Navigation toolbar, you might opt for using the toolbar or keyboard shortcuts to navigate pages because other methods for page navigation are much easier than returning to menu commands.
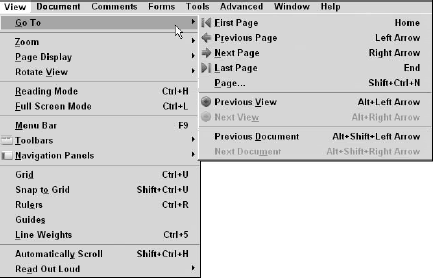
The real value in the View menu is all the other viewing commands you have accessible. The View menu contains many commands for viewing not only pages, but also toolbars and task buttons. When you choose View >> Go To, the page navigation commands appear in a submenu.
Those viewing commands, apart from the same options you have for navigation with the Navigation toolbar, include commands for viewing tools, for various page views, and alternatives to viewing such as the Reading mode, Read Out Loud, and scrolling pages automatically. Following is a list of what you can find in the View menu.
Go To
The commands that are equal to the actions you perform with the Navigation tools are contained in the Go To submenu. You can choose any of the Navigation commands in this menu and the results are the same as using tools and keyboard shortcuts.
You’ll probably avoid using the Navigation commands because using any one of the other methods to scroll through pages is so much easier. The exception is the Go To >> Page command. When you select Go To >> Page, the Go To Page dialog box opens. Type a number in the text box and click OK and you jump to that page number.
Zoom
A submenu provides menu options for zooming to different views. In addition to zooming in and out with tools and commands, the View >> Zoom submenu has a command for reflowing documents.
- Reflow. Document reflow enables users to view PDF documents on adaptive devices for the visually impaired and it is used when copying PDF files to handheld devices and tablets. When you reflow text onscreen or when using other devices, the text in the PDF wraps according to the zoom level of the page or the device viewing area.
Therefore, when you zoom in on a paragraph of text and the text moves off the viewing area of your screen, you can use the Reflow command to make the text automatically scroll to your window size. Reflow only works with tagged PDF documents in Acrobat viewers earlier than version 7.
Acrobat 7 and 8 viewers can reflow any PDF document whether it is a tagged file or not. When you copy PDF documents to handheld devices such as Palm Pilots, Adobe Reader for Palm software wraps text to fit the width of the screen for untagged as well as tagged documents.
Rotate View
If your PDF opens in Acrobat with a rotated view, you can rotate pages clockwise or counterclockwise from two submenu commands. The same rotations are also available in the Page Display tools.
Rotate View commands and tools rotate all pages in your PDF document and come in handy if the PDF pages are rotated on the initial view or if you want to view PDFs on eBook readers, tablets, or laptop computers.
However, changes made with the Rotate View tools or the View menu commands are temporary and any saves you make do not record the rotated views. Another set of rotation commands is available in the Document menu.
When you select Document >> Rotate Pages, a dialog box opens where you can choose Counterclockwise 90 degrees, Clockwise 90 degrees, or 180 degrees. When using the Document menu and the Rotate pages dialog box, the rotation views can be saved with the file.
Full Screen Mode
Full Screen mode displays your documents without toolbars, menu bar, and Navigation panel. Many options exist for using Full Screen mode.
Menu Bar
Select View >> Menu Bar or press F9 and the menu bar is temporarily hidden. To bring back the menu bar, press F9.
Toolbars
Open the View >> Toolbars menu command and a submenu displays all the toolbars and menu options you have when opening a context menu on the Toolbar Well. This menu is just an identical repeat for the same items contained in the context menu.
To access the complete set of tools and options for loading and unloading tools from toolbars, select More tools at the bottom of either menu. Additionally you have options for selecting toolbars from the Tools menu. At the bottom of the Tools menu you find the Customize Toolbars command.
Selecting this command is the same as selecting More Tools in either the View >> Toolbars submenu or a context menu opened on the Toolbar Well. Any one of the three menu selections opens the More Tools window.
Navigation Tabs
Choose View >> Navigation Panels and a submenu displays all the palettes that can be opened as floating palettes or docked in the Navigation panel.
Grid (Acrobat Professional only)
If you need to examine drawings, a grid may help in your analysis. In Acrobat Professional, you can choose to view your file displaying a grid. Grids can be useful when you’re authoring PDF files, particularly PDF forms. For viewing purposes they can be useful where relationships to objects require some careful examination.
To show a grid, choose View >> Grid. By default, the grid displays in the Document pane with blue lines at fixed major and minor gridlines.
If you want to change the distances for the major gridlines and the number of divisions for the minor gridlines, open the Preferences dialog box and select Units & Guides in the left pane. The preference settings enable you to change the units of measure and attributes for the grid layout.
Snap to Grid (Acrobat Professional only)
When you choose View >> Snap to Grid, objects you draw snap to the major and minor gridlines. This feature can be particularly helpful with form designs and engineering drawings.
Rulers (Acrobat Professional only)
Acrobat Professional supports viewing rulers, and you can turn them on via the View menu or using the keyboard shortcut Ctrl+R. When you choose View >> Ruler or use the keyboard shortcut, rulers appear on the top and left side of the Document pane. Inside the top and left ruler is an inexhaustible supply of guidelines.
To add a guideline on the document page, place the cursor within the top or left ruler, press the mouse button and drag away from the ruler in the Document pane. Continue adding as many guidelines as you want by returning to the ruler wells and dragging out more guidelines.
Guides
When you draw guidelines the View >> Guides menu command is turned on. You can toggle the view of guidelines on and off by selecting View >> Guides.
Line Weights
Formerly labeled Wireframe in Acrobat 7, this item appears in both the View menu and the Page Display toolbar. When you zoom in and out of a drawing, the line weights zoom according to the zoom level. For example, a 1-point line zoomed in 400 percent produces a line weight view at four points.
Zooming out reduces the line weight sizes to where lines can appear almost invisible. When you click the Line Weights tool or select View >> Line Weights, all lines appear at a one point size regardless of the zoom level.
Automatically Scroll
Automatic scrolling scrolls pages in the open file at a user-defined speed in all Acrobat viewers. When you select the command, Acrobat automatically switches the Single Page layout view to Single Page Continuous view and Two-Up views to Two-Up Continuous views. The pages in the document scroll up, permitting you to read the text without using any keys or the mouse.

