Sending and Receiving Email
Email is a modern way to communicate with friends, family, and colleagues. An email message is like a regular letter, except that it’s composed electronically and delivered almost immediately via the Internet. You can use several programs to send and receive email messages.
If you’re in a corporate environment, or running Microsoft Office, you can use Microsoft Outlook for your email. (Outlook is also a scheduler and personal information manager.) If you’re connecting from home, the simpler Windows Mail (in Windows Vista) or Outlook Express (in Windows XP) might be a better choice; these programs are easier to learn and use than their bigger brother, Outlook.
Because Windows Mail is included free with all Windows Vista PCs, that’s the one we’ll cover in this chapter. Know, however, that it’s almost identical to the older Outlook Express, so if you’re a Windows XP user, most of what you see here is directly applicable to the program you’re using. In fact, most of what’s here also works with Microsoft Outlook; all of these email programs look and act similarly.
Setting Up Your Email Account
Back in “Connecting to the Internet,” you learned how to configure your computer for your particular Internet service provider. When you did your main configuration, you should have entered information about your email account.
If you later change email providers, or add a new email account, you’ll have to access your email settings separately. To configure Windows Mail for a new email account, you’ll need to know the following information:
- The email address assigned by your ISP, in the format name@domain.com.
- The type of email server you’ll be using; it’s probably a POP3 server. (It could also be an HTTP or IMAP server, but POP3 is more common.)
- The name or address of the incoming email and outgoing email servers.
- The account name and password you use to connect to the email servers.
After you have this information (which should be supplied by your ISP), you can enter it manually into Windows Mail by following these steps:
- From within Windows Mail, select Tools, Accounts to display the Internet Accounts dialog box.
- When the Internet Accounts dialog box appears, click Add.
- When prompted, choose to add an E-mail Account and then click Next.
- When the next dialog box appears, enter your name and then click Next.
- When the next dialog box appears, enter the email address assigned by your ISP; then click Next.
- When the next dialog box appears, select the type of email server you’re using (typically POP3), the incoming email server name or address, and the outgoing email server name or address. Click Next.
- When the next dialog box appears, enter your email username and password and then click Next.
- When the final dialog box appears, click Finish.
You’re now ready to send and receive email.
Windows Mail Window
Before we start working with email, let’s take a look at the Windows Mail window. As you can see in Figure 1, the basic Windows Mail window is divided into three panes.
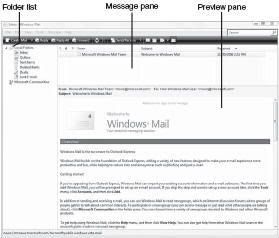
The pane on the left is called the folder list, and it’s where you access your Inbox and other message folders. The top pane on the right is the message pane, and it lists all the messages stored in the selected folder. Below that is the preview pane, and it displays the contents of the selected message.
The way it all works is that you select a location in the Folder List (typically your inbox), select a message header in the Message pane, and view the contents of that message in the Preview pane.
Managing Your Email
Using Windows Mail is easy—and composing a new email message isn’t much different from writing a memo in Microsoft Word. You just have to know which buttons to push!
Composing a Message
It’s easy to create a new email message. Just follow these steps:
- Click the Create Mail button on the Windows Mail toolbar; this launches a New Message window, similar to the one shown in Figure 2.

- Enter the email address of the recipient(s) in the To field and then enter the address of anyone you want to receive a carbon copy in the Cc box. You can enter multiple addresses, as long as you separate multiple addresses with a semicolon (;), like this: mmiller@computergroup.com;geoson@gmail.com.
- Move your cursor to the main message area and type your message.
- When your message is complete, send it to the Outbox by clicking the Send button.
Now you need to send the message from your Outbox over the Internet to the intended recipient (you!). You do this by clicking the Send/Receive button on the Windows Mail toolbar. Assuming your computer is connected to the Internet, your message will now be sent.
Reading New Messages
When you receive new email messages, they’re stored in the Windows Mail Inbox. To display all new messages, select the Inbox icon from the Folders list. All waiting messages now appear in the Message pane. To read a specific message, select its header in the Message pane. The contents of that message are displayed in the Preview pane.
Replying to a Message
To reply to an email message, follow these steps:
- Select the message header in the Message pane.
- Click the Reply button on the Windows Mail toolbar; this opens a Re: window, which is just like a New Message window except with the text from the original message “quoted” in the text area and the email address of the recipient (the person who sent the original message) pre-entered in the To field.
- Enter your reply text in the message window.
- Click the Send button to send your reply back to the original sender.
Sending Files Via Email
The easiest way to share a file with another user is via email, as an attachment. To send a file via email, you attach that file to a standard email message. When the message is sent, the file travels along with it; when the message is received, the file is right there, waiting to be opened.
To attach a file to an outgoing email message, follow these steps:
- Start with a new message and then click the Attach button in the message’s toolbar; this displays the Insert Attachment dialog box.
- Click the Browse button to locate and select the file you want to send.
- Click Attach.
The attached file is now listed in a new Attach: field below the Subject: field in the message window. When you click the Send button, the email message and its attached file are sent together to your Outbox.
Opening an Email Attachment
When you receive a message that contains a file attachment, you’ll see a paper clip icon in the message header and a paper clip button in the preview pane header. You can choose to view (open) the attached file or save it to your hard disk.
To view or open an attachment, click the paper clip button in the preview pane header, and then click the attachment’s filename. (At this point you may be prompted by a security message; make sure you know where the attachment came from before you proceed.) This opens the attachment in its associated application.
If you’re asked whether you want to save or view the attachment, select view. To save an attachment to your hard disk, click the paper clip button in the preview pane header, and then select Save Attachments. When the Save Attachments dialog box appears, select a location for the file and click the Save button.
Protecting Against Spam, Phishing Scams, and Viruses
Although Windows Mail may look a lot like its predecessor, Outlook Express, it’s much improved under the hood. Some of the most important improvements have to do with security—in particular, the capability to block spam, phishing scams, and email viruses.
Spam Blocking
If you’re like most users, you get more than your fair share of junk email messages—also known as spam. These spam messages can fill up your inbox and are a major annoyance. To help stop the flood of spam email messages, Windows Mail includes a powerful Junk Mail Filter.
This new filter uses Bayesian filtering, which analyzes the probability of any given word being included in spam messages and then applies that analysis to all incoming messages. Emails that include high-probability spam words are automatically routed to the Junk E-mail folder.
You can open the Junk E-mail folder to view your spam messages, or just delete the messages without review. In either case, you don’t have to deal with them clogging your inbox!
Phishing Filter
Also new in Windows Vista is the inclusion of anti-phishing technology. Microsoft’s Phishing Filter helps protect you from identity theft by warning you of the fake email messages common to phishing scams.
Phishing is a technique used by online scam artists to steal your identity by tricking you into disclosing valuable personal information, such as passwords, credit card numbers, and other financial data. A phishing scam typically starts with a phony email message that appears to be from a legitimate source, such as your bank, eBay, or PayPal.
When you click the link in the phishing email, you’re taken to a fake website masquerading as the real site, complete with logos and official-looking text. You’re encouraged to enter your personal information into the forms on the web page; when you do so, your information is sent to the scammer, and you become a victim of identity theft.
When your data falls into the hands of criminals, it can be used to hack into your online accounts, make unauthorized charges on your credit card, and maybe even drain your bank account. Microsoft’s Phishing Filter compares all the links in your Windows Mail email messages to an online list of known phishing websites.
If the link matches a fraudulent site, Windows Mail blocks the links in the email and displays a warning message at the top of the message. When you see this type of message, just delete the email— and never, never click through any of the links!
Virus Protection
Computer viruses are files that can attack your system and damage your programs and documents. Most viruses are spread when someone sends you an email message with an unexpected file attachment—and then you open the file.
It’s just too easy to receive an email message with a file attached, click the file to open it, and then launch the virus file. Boom! Your computer is infected. Viruses can be found in many types of files. The most common file types for viruses are .EXE, .VBS, .PIF, and .COM.
Viruses can also be embedded in Word (.DOC) or Excel (.XLS) files. You can’t catch a virus from a picture file, so viewing a .JPG, .GIF, .TIF, and .BMP file is completely safe. The best way to avoid catching a virus via email is to not open any files attached to incoming email messages. Period.
That includes messages where you know the sender, because some viruses are capable of taking over an email program and “spoofing” other users’ addresses. An email message might look like it’s coming from a friend, but it’s really coming from another machine and includes a virus. (Pretty tricky, eh?)
By default, Windows Mail is configured to automatically reject files that might contain viruses. You can verify this setting (or turn it off, if you want to receive a file), by opening the Options dialog box, selecting the Security tab, and checking both options in the Virus Protection section.
Using Address Book to Manage Contacts
Windows includes a contact manager application, called Windows Contacts, that you can use to store information about your friends, family, and business associates. (In older versions of Windows, this was called the Address Book.) You can then import this contact information into Windows Mail (to send email), Windows Calendar (to remind you of birthdays), and Microsoft Word (to personalize letters and address envelopes and labels).
To add a new contact to your Windows Contacts, click the New button on the Windows Contacts toolbar and then select New Contact. Enter all the information you know (you don’t have to fill in all the blanks) and click OK. (You can also add a contact directly from Windows Mail by selecting File, New, Contact.)
You can also add contacts from any email messages you receive. Just right-click the sender’s name in the email message and select Add to Contacts. This creates a new contact for that person; you can then go to Windows Contacts and add more detailed information later—as described next.
To send email to one of your contacts, all you have to do is click the To button in your new Windows Mail message. This displays the Select Recipients dialog box, shown in Figure 3.
Select the contact( s) you want and click either the To, Cc, or Bcc buttons. Click OK when you’re finished adding names.


