What Is Excel For?
Excel, as you probably know, is the world’s most widely-used spreadsheet program, and is part of the Microsoft Office suite. Other spreadsheet programs are available, but Excel is by far the most popular and has become the world standard. Much of the appeal of Excel is due to the fact that it’s so versatile.
Excel’s forte, of course, is performing numerical calculations, but Excel is also very useful for non-numerical applications. Here are just a few of the uses for Excel:
- Number crunching: Create budgets, analyze survey results, and perform just about any type of financial analysis you can think of.
- Creating charts: Create a wide variety of highly customizable charts.
- Organizing lists: Use the row-and-column layout to store lists efficiently.
- Accessing other data: Import data from a wide variety of sources.
- Creating graphics and diagrams: Use Shapes and the new SmartArt to create professional-looking diagrams.
- Automating complex tasks: Perform a tedious task with a single mouse click with Excel’s macro capabilities.
The work you do in Excel is performed in a workbook file, which appears in its own window. You can have as many workbooks open as you need. By default, Excel 2007 workbooks use an XLSX file extension. Each workbook is comprised of one or more worksheets, and each worksheet is made up of individual cells.
Each cell contains a value, a formula, or text. A worksheet also has an invisible draw layer, which holds charts, images, and diagrams. Each worksheet in a workbook is accessible by clicking the tab at the bottom of the workbook window. In addition, workbooks can store chart sheets.
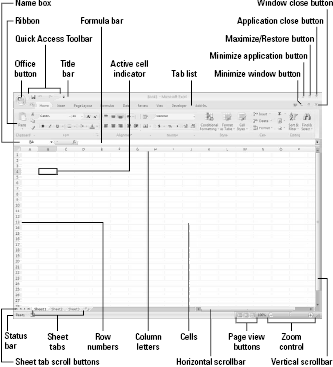
A chart sheet displays a single chart and is also accessible by clicking a tab. Newcomers to Excel are often intimidated by all the different elements that appear within Excel’s window. Once you become familiar with the various parts, it all starts to make sense. Figure below shows you the more important bits and pieces of Excel.
As you look at the figure, refer to list below for a brief explanation of the items shown in the figure.
- Active cell indicator - This dark outline indicates the currently active cell (one of the 17,179,869,184 cells on each worksheet).
- Application close button - Clicking this button closes Excel.
- Window close button - Clicking this button closes the active workbook window.
- Column letters - Letters range from A to IXFD—one for each of the 16,384 columns in the worksheet. You can click a column heading to select an entire column of cells.
- Office button - This button leads to lots of options for working with your document, or Excel in general.
- Formula bar - When you enter information or formulas into Excel, they appear in this line.
- Horizontal scrollbar - Enables you to scroll the sheet horizontally.
- Maximize/Restore button - Clicking this button increases the workbook window’s size to fill Excel’s complete workspace. If the window is already maximized, clicking this button “unmaximizes” Excel’s window so that it no longer fills the entire screen.
- Minimize application button - Clicking this button minimizes Excel’s window.
- Minimize window button - Clicking this button minimizes the workbook window.
- Name box - Displays the active cell address or the name of the selected cell, range, or object.
- Page view buttons - Change the way the worksheet is displayed by clicking one of these buttons.
- Quick Access Toolbar - A toolbar that you customize to hold commonly-used commands.
- Ribbon - The main location to find Excel’s commands. Clicking an item in the Tab list changes the ribbon that’s displayed.
- Row numbers - Numbers range from 1 to 1,048,576—one for each row in the worksheet. You can click a row number to select an entire row of cells.
- Sheet tabs - Each of these notebook-like tabs represents a different sheet in the workbook. A workbook can have any number of sheets, and each sheet has its name displayed in a sheet tab. By default, each new workbook that you create contains three sheets. Add a new sheet by clicking the Insert Worksheet button (which is displayed after the last sheet tab).
- Sheet tab scroll buttons - These buttons let you scroll the sheet tabs to display tabs that aren’t visible.
- Status bar - This bar displays various messages as well as the status of the Num Lock, Caps Lock, and Scroll Lock keys on your keyboard. It also shows summary information about the range of cells that is selected. Right-click the status bar to change the information that’s displayed.
- Tab list - Commands that display a different ribbon, similar to a menu.
- Title bar - All Windows programs have a title bar, which displays the name of the program and the name of the current workbook and also holds some control buttons that you can use to modify the window.
- Vertical scrollbar - Lets you scroll the sheet vertically.
- Zoom control - A scroller that lets you zoom your worksheet in and out.
Every worksheet consists of rows (numbered 1 through 1,048,576) and columns (labeled A through XFD). After column Z comes column AA, which is followed by AB, AC, and so on. After column AZ comes BA, BB, and so on. After column ZZ is AAA, AAB, and so on.
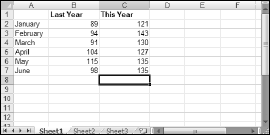
The intersection of a row and a column is a single cell. At any given time, one cell is the active cell. You can identify the active cell by its darker border, as shown below.
Its address (its column letter and row number) appears in the Name box. Depending on the technique that you use to navigate through a workbook, you may or may not change the active cell when you navigate. Notice that the row and column headings of the active cell appear in different colors to make it easier to identify the row and column of the active cell.
As you probably already know, you can use the standard navigational keys on your keyboard to move around a worksheet. These keys work just as you’d expect: The down arrow moves the active cell down one row, the right arrow moves it one column to the right, and so on. PgUp and PgDn move the active cell up or down one full window. (The actual number of rows moved depends on the number of rows displayed in the window.)
The Num Lock key on your keyboard controls how the keys on the numeric keypad behave. When Num Lock is on, Excel displays Num Lock in the status bar, and the keys on your numeric keypad generate numbers. Most keyboards have a separate set of navigational (arrow) keys located to the left of the numeric keypad. The state of the Num Lock key doesn’t affect these keys.
List below summarizes all the worksheet movement keys available in Excel.
- Up arrow - Moves the active cell up one row.
- Down arrow - Moves the active cell down one row.
- Left arrow of Shift+Tab - Moves the active cell one column to the left.
- Right arrow or Tab - Moves the active cell one column to the right.
- PgUp - Moves the active cell up one screen.
- PgDn - Moves the active cell down one screen.
- Alt+PgDn - Moves the active cell right one screen.
- Alt+PgUp - Moves the active cell left one screen.
- Ctrl+Backspace - Scrolls the screen so that the active cell is visible.
- Up arrow* - Scrolls the screen up one row (active cell does not change).
- Down arrow* - Scrolls the screen down one row (active cell does not change).
- Left arrow* - Scrolls the screen left one column (active cell does not change).
- Right arrow* - Scrolls the screen right one column (active cell does not change).
To change the active cell by using the mouse, click another cell; it becomes the active cell. If the cell that you want to activate isn’t visible in the workbook window, you can use the scrollbars to scroll the window in any direction.
To scroll one cell, click either of the arrows on the scrollbar. To scroll by a complete screen, click either side of the scrollbar’s scroll box. You also can drag the scroll box for faster scrolling.
Press Ctrl while you use the mouse wheel to zoom the worksheet. If you prefer to use the mouse wheel to zoom the worksheet without pressing Ctrl, choose Office > Excel Options and select the Advanced section.
Place a check mark next to the Zoom On Roll With Intellimouse check box. Using the scrollbars or scrolling with your mouse doesn’t change the active cell. It simply scrolls the worksheet. To change the active cell, you must click a new cell after scrolling.

