Setup a Home Network
When you need to connect two or more computers together, you need to create a computer network. Why would you want to connect two computers together?
Maybe you want to transfer files or digital photos from one computer to another. Maybe you want to share an expensive piece of hardware (such as a printer) instead of buying one for each PC.
Maybe you want to connect all your computers to the same Internet connection. Whatever your reasons, it’s easy to set up and configure a simple home network. Read on to learn how!
How Networks Work
When it comes to physically connecting your network, you have two ways to go— wired or wireless. A wireless network is more convenient (no wires to run), but a wired network is faster. Which you choose depends on how you use the computers you network together.
If you use your network primarily to share an Internet connection or a printer or to transfer the occasional word processing file, wireless should work just fine. However, if you plan on transferring a lot of big files from one PC to another, or using your network for multiplayer gaming, you’ll want to stick to a faster wired network.
Wired Networks
A wired network is the kind that requires you to run a bunch of cables from each PC to a central hub or router. In a wired network, you install a network interface card (NIC) in each PC and connect the cards via Ethernet cable. (Note that many new PCs come with built-in Ethernet capability, so you don’t have to purchase an additional card.)
Although this type of network is fast and easy enough to set up, you still have to deal with all those cables—which can be a hassle if your computers are in different areas of your house. Most newer wired networks transfer data at 100Mbps; some older equipment works at a slower 10Mbps rate. The 100Mbps rate is ideal for transferring really big files, or for playing real-time PC games.
Wireless Networks
The alternative to a wired network is a wireless network. Wireless networks use radio frequency (RF) signals to connect one computer to another. The advantage of wireless, of course, is that you don’t have to run any cables.
This is a big plus if you have a large house with computers on either end or on different floors. The most popular wireless networks use the Wi-Fi standard. The original Wi-Fi standard, known as 802.11b, transferred data at 11Mbps—slower than Fast Ethernet, but fast enough for most practical purposes.
The current 802.11g standard transfers data at 54Mbps and is more than fast enough for most home networking needs. Even faster is the upcoming new 802.11n standard (available in some “pre-n” equipment now on the market), which promises a blazing 540Mbps data transmission with a substantially longer range than current equipment.
Current 802.11b and g equipment has a range of about 100 feet between transmitter and receiver; 802.11n promises a 160-foot range, with less interference from other wireless household devices.
In addition, you can combine wired and wireless technologies into a single network. Some PCs can connect directly to a wireless router via Ethernet, while others can connect via wireless WiFi signals. This type of mixed network is quite common.
Connecting and Configuring
Whether you’re going wired or wireless, the setup is surprisingly easy. You have to assemble the appropriate cards, cables, and hubs, and then install and connect them all. After everything is hooked up properly, you then have to configure all the PCs on your network.
The configuration can be made from within Windows or via the configuration utility provided with your network router or wireless adapter. You run this utility on each computer you connect to your network and then configure the network within Windows itself.
Setup a Wired or Wireless Network
Connecting multiple computers in a wired network is actually fairly simple. Just make sure that you do the proper planning beforehand and buy the appropriate hardware and cables; everything else is a matter of connecting and configuration.
How It Works
If you’re setting up a wired network, you’ll need to install a network interface card (NIC) in each computer you intend to connect. Each NIC then connects, via Ethernet cable, to the network router, which is a simple device that functions like the hub of a wheel and serves as the central point in your network.
Then, after you make the physical connections, each computer has to be configured to function as part of the network and to share designated files, folders, and peripherals.
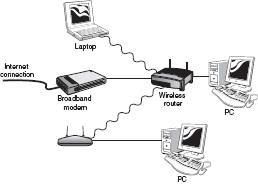
In a wireless network, the hub function is performed by a wireless router, sometimes called a base station. This device can make both wireless and wired connections; most base stations include four or more Ethernet connectors in addition to wireless capabilities.
You still need to connect your broadband modem and your main PC to the router via Ethernet cables, but all the other PCs on your network will connect wirelessly, via wireless adapters. These devices function as mini-transmitters/receivers to communicate with the base station.
Wireless adapters can be small external devices that connect to the PC via USB, expansion cards that install inside your system unit, or PC cards that insert into a portable PC’s card slot. When complete, your network should look something like the one in Figure 1.
What You Need
Here’s the specific hardware you’ll need to set up your network:
- Network interface cards (on a wired network, one for each PC; on a wireless network, just one for the main PC)
- Network router (one for the entire network; use a wireless router for a wireless network)
- Ethernet cables (on a wired network, one for each PC and another for your broadband modem; on a wireless network, one for the main PC and a second for the broadband modem)
- Wireless network adapters (one for each client PC; these may already be built into notebook PCs)
Making the Connections
Naturally, you should follow the instructions that come with your networking hardware to properly set up your network. In general, however, here are the steps to take:
- Power down your main computer and remove the system unit case.
- Install a network interface card into an open expansion slot.
- Close up the case, reboot the computer, and run the NIC installation software.
- Run an Ethernet cable from your broadband modem to your router.
- Run an Ethernet cable from the router to your main computer.
- Connect your network router to a power source.
- On your main computer, configure Windows to recognize your new network.
- If you’re connecting a wired network, connect each of the other computers to your network router via Ethernet cables.
- If you’re connecting a wireless network, move on to the second computer in your network and install a wireless networking adapter—either internally, via an expansion card, or externally, via USB. (Or, if your second PC is a laptop and doesn’t have built-in wireless networking, insert a wireless networking PC card.)
- Run the installation software to properly configure the wireless adapter.
- On the second computer, configure Windows to recognize your new network.
- Repeat steps 9–11 for each additional computer on your wireless network.
After you’ve connected all the computers on your network, you can proceed to configure any devices (such as printers) you want to share over the network. For example, if you want to share a single printer over the network, it connects to one of the network PCs (not directly to the router), and then is shared through that PC.
Configuring Windows for Your New Network
After your network hardware is all set up, you have to configure Windows to recognize and work with your new network. This is done differently depending on which version of Windows you have running on your computer.
Configuring Windows Vista
Configuring Windows Vista for your new network is a piece of cake. First, open the Control Panel and select Network and Internet. When the next window appears, select Connect to a Network (in the Network and Sharing Center section) and let Windows do its thing.
It should recognize the existing network and walk you through any necessary configuration. (This is one of the great things about Windows Vista; networking is much easier and more automatic than in previous versions.)
Configuring Windows XP
Configuring Windows XP for your new network is a little more complicated— although the task is made easier via the Network Setup Wizard. You start by opening the Control Panel and clicking Network and Internet Connections. When prompted, select Set Up or Change Your Home or Small Office Network.
This launches the Network Setup Wizard. Click the Next button to move through the introductory screens. When the Select a Connection Method screen appears, select This Computer Connects to the Internet Through a Residential Gateway or Through Another Computer on My Network and then click Next.
When the next screen appears, enter a description for this PC (make and model is good), along with a unique name (such as “Main Computer”); then click Next. When the next screen appears, enter a name for your network and then click Next.
Finally, on the next screen, check Turn On File and Printer Sharing. Continue clicking Next to finish the wizard, and Windows will be properly configured.
Setting Up Wireless Security
One of the issues with a wireless network is that all your data is just out there, broadcast over the air via radio waves, for anyone to grab. Fortunately, to keep outsiders from tapping into your wireless network, you can add wireless security to your network.
This is done by assigning a fairly complex encryption code to your network; in order to tap into the network, a computer must know the code. You can assign security codes to all the PCs in your network in one of several ways.
First, most wireless hubs, routers, and adapters come with configuration utilities that let you activate this type of wireless security. If your wireless equipment has this type of configuration utility, use it.
Otherwise, you can use Windows’ built-in wireless security. As you might suspect, this feature is different in Windows Vista than in Windows XP.
Wireless Security in Windows Vista
In Windows Vista, you enable wireless security via the Set Up a Wireless Router or Access Point Wizard. (Boy, is that a long name!) To get to this wizard, open the Control Panel, select Network and Internet, select Network and Sharing Center, and then choose Set Up a Connection or Network (in the Tasks panel).
In the next window, select Set Up a Wireless Router or Access Point. This launches the wizard. Click the Next button until Windows automatically detects your network hardware and settings.
From here you can give your network an SSID name (different from the name assigned in the Network Setup Wizard) and then either automatically assign or manually enter a network key.
The type and length of the key you choose depends on the type of encryption you choose; the strongest encryption comes from a 26-character WEP key. After the key is assigned, write it down.
You’ll need to run this wizard on all the other PCs on the network and manually enter this same key for each computer. (Alternatively, Windows lets you save the key to a USB drive, which you can then transfer to your other PCs.)
After all the work is done, only those PCs that have been assigned this specific key can connect to your wireless network—which means no more neighbors leeching off your wireless connection.
Wireless Security in Windows XP
In Windows XP, you configure wireless security via the Wireless Network Setup Wizard. To run the wizard, open the Control Panel and click the Wireless Network Setup Wizard icon. After you’ve launched the wizard, you proceed just as you do with the similar wizard in Windows Vista.
You’ll choose an SSID name and then set your network key. As with the Vista wizard, make sure that you write down the key; you’ll need it to activate the wireless security on the other PCs on your network.
Sharing Files and Folders Across the Network
After you have your network up and running, it’s time to take advantage of it—by copying or moving files from one computer to another. To share files between the PCs on your network, you have to enable file sharing on the PC that contains those files. As with most networking functions, this is done differently in Windows Vista than in Windows XP.
File Sharing in Windows Vista
In Windows Vista, file sharing is activated from the Network and Sharing Center.
You access the Network and Sharing Center from the Windows Control Panel. To turn on file sharing, simply click the down arrow next to the Public Folder Sharing option in the Sharing and Discovery section; then check the Turn On File Sharing option.
You’ll also want to click the down arrow next to the Public Folder Sharing option and select either the first or second option; the first option lets other users view but not change your files, whereas the second option lets other users fully edit the files in your Public folder.
With Windows Vista, the files you share are those located in the Public folder. If you want to share a file, just save it to the Public folder when you’re finished.
File Sharing in Windows XP
With Windows XP, you can share files stored in the Shared Documents folder or in any other folder you specify. By default, file sharing is turned on for the Shared Documents folder; you have to manually activate file sharing for any other folder you want to use. You do this by following these steps:
- Use My Computer to navigate to the folder that contains the file you want to share.
- Right-click the folder icon and select Sharing and Security from the pop-up menu; this displays the Properties dialog box.
- Select the Sharing tab
- Check the Share This Folder on the Network option.
- Click OK when done—then repeat this procedure for every folder you want to share on every computer connected to your network.
Sharing a Printer Across Network
To share a printer connected to one computer with all the other computers on your network, you have to activate printer sharing on the computer to which the printer is connected.
You then have to manually install that printer on all the computers on your network. As you’ve come to expect, this process is slightly different in Windows XP than in Windows Vista.
Printer Sharing in Windows Vista
Activating printer sharing in Windows Vista is quick and easy. It’s done from the Network and Sharing Center, which you access from the Windows Control Panel. After the Network and Sharing Center window is open, click the down arrow next to the Printer Sharing option. Check the Turn On Printer Sharing option, and you’re good to go.
Printer Sharing in Windows XP
In Windows XP, the process is slightly more involved. Follow these steps:
- Click the Start button to open the Start menu; then select Control Panel.
- From the Control Panel, double-click Printers and Other Hardware; then select View Installed Printers or Fax Printers.
- When the Printers and Faxes window opens, select the printer that you want to share; then click Share This Printer in the Printer Tasks panel.
- When the printer Properties dialog box appears, select the Sharing tab and check the Share This Printer option. Edit the name of the printer if you want and then click OK.
Installing a Shared Printer
After you’ve enabled printer sharing on your main PC, you have to install that shared printer on all the other computers on your network. You do this on a Windows Vista PC by opening the Control Panel, selecting Printer (in the Hardware and Sound section), and then clicking the Add a Printer button.
(On Windows XP, open the Printers and Faxes window and select Add a Printer.) When prompted, opt to add a network printer; then follow the onscreen instructions from there to identify and select the network printer to install.
Sharing an Internet Connection
The other thing you’re likely to share over your network is your Internet connection, especially if you have a broadband (cable or DSL) connection. For many users, this is the primary—and sometimes the sole—reason to set up a home network.
Sharing an Internet connection is relatively automatic, as soon as you connect your broadband Internet modem to your network router. Most broadband modems connect to the router via an Ethernet cable. Just plug the modem into the router, and the Internet connection is available to all computers connected to the network. It’s that simple.


